By: Team W16-4 Since: Mar 2020 Licence: MIT
- 1. Introduction (Xinwei)
- 2. Quick Start
- 3. Features (Xinwei)
- 3.1. General (Xinwei)
- 3.2. Calendar (Xinwei)
- 3.3. Notes (Xinwei)
- 3.4. Address Book
- 3.5. Profile / Module Book (Part 1: Manage your modules)
- 3.6. Profile / Module Book (Part 2: Manage your tasks separately for each module)
- 3.7. Module planning
- 3.8. Diary
- 3.8.1. Adding an diary entry:
diaryAdd - 3.8.2. Viewing diary logs:
diaryLog - 3.8.3. Deleting an diary entry:
diaryDelete - 3.8.4. Viewing diary entries with a specified entry ID:
diaryShow - 3.8.5. Viewing list of diary entries with a specified date:
diaryShow - 3.8.6. Tagging a diary entry with weather:
diaryWeather - 3.8.7. Tagging a diary entry with mood:
diaryMood - 3.8.8. Filtering diary entries according to mood or weather:
diaryFilter(coming in v2.0)
- 3.8.1. Adding an diary entry:
- 4. Command Summary
- 5. Glossary
- 6. FAQ
1. Introduction (Xinwei)
1.1. An Introduction to NUSProductivity User guide
-
NUSProductivity is an application designed for all NUS students to better manage their school work. The app is set out to enhance your productivity in school through 5 main features, module planning, CAP (cumulative average point) tracking, note taking, deadline and task listing, and finally, diary logging. This app is designed only for NUS students for now with the possibility to customise it for students from other universities in the future. More importantly, NUSProductivity is optimized for those who prefer to work with a Command Line Interface (CLI) while still having the benefits of a Graphical User Interface (GUI). Read on to get you started on using the application!
-
The purpose of this document is for you to familiarise yourself with the functions and capabilities of what NUSProductivity can do.
-
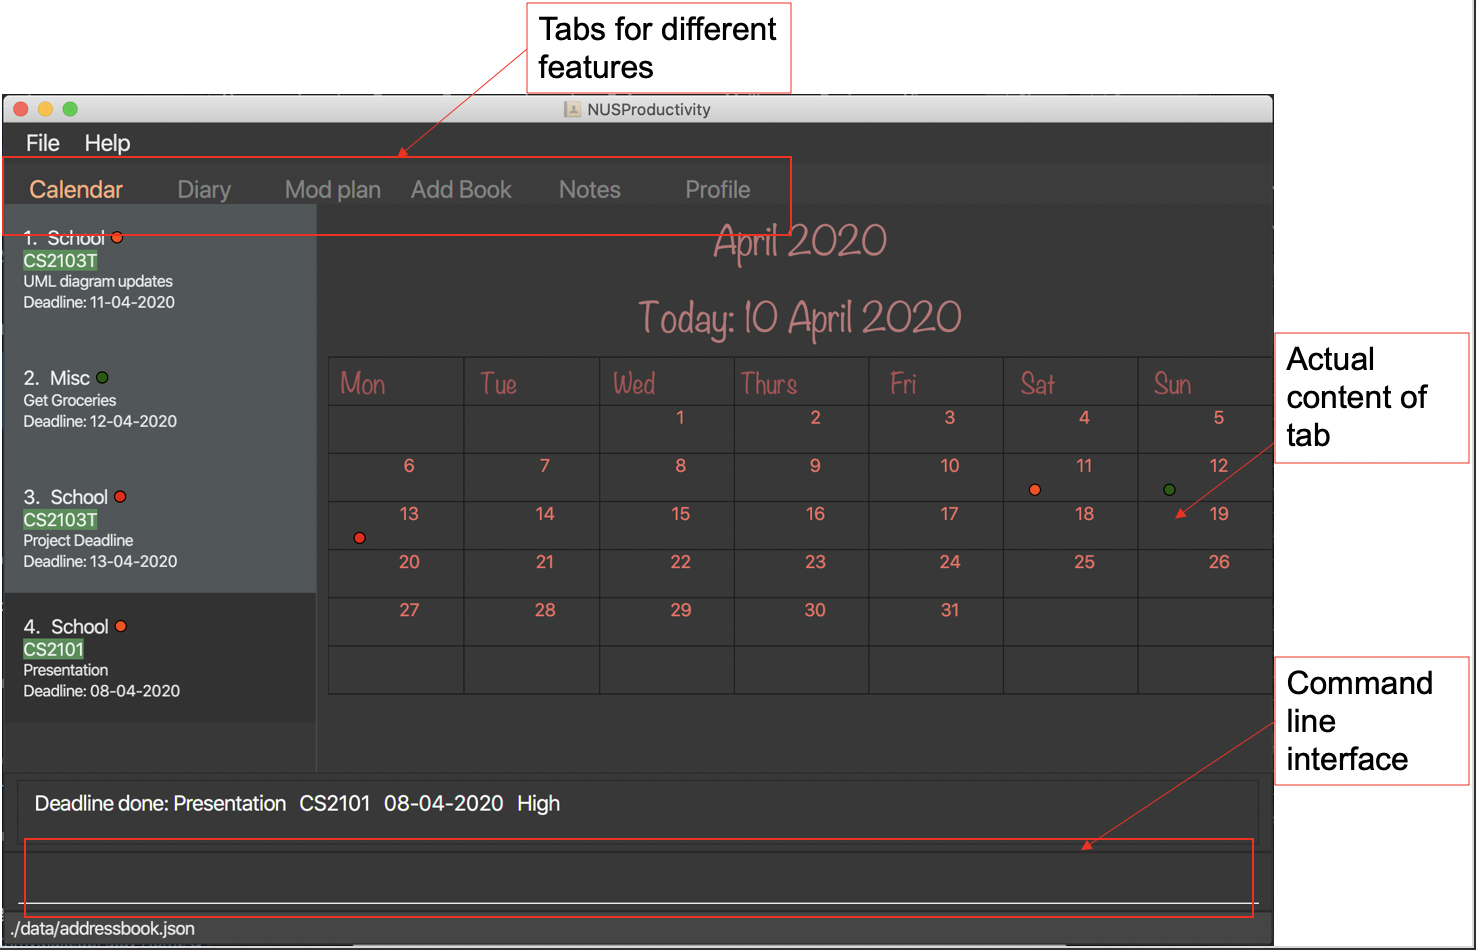
The image below shows the different parts of the user interface of NUSProductivity
1.2. Commonly Used Symbols
| This symbol indicates something you should take note of. |
| This symbol indicates a tip that you could use. |
| This symbol indicates something need be used or followed with caution. |
| This symbol indicates something you really need to pay attention to. |
2. Quick Start
This section allows you to start up NUSProductivity with ease. Detailed steps are listed below.
-
Ensure you have Java
11or above installed on your computer, if not you can refer to the guide below -
Download the latest version of
NUSProductivity.jarhere. -
Copy the file to the folder you want to use as the home folder for NUSProductivity.
-
Double-click the file to start the app. The GUI should appear in a few seconds (screenshot of GUI shown below).
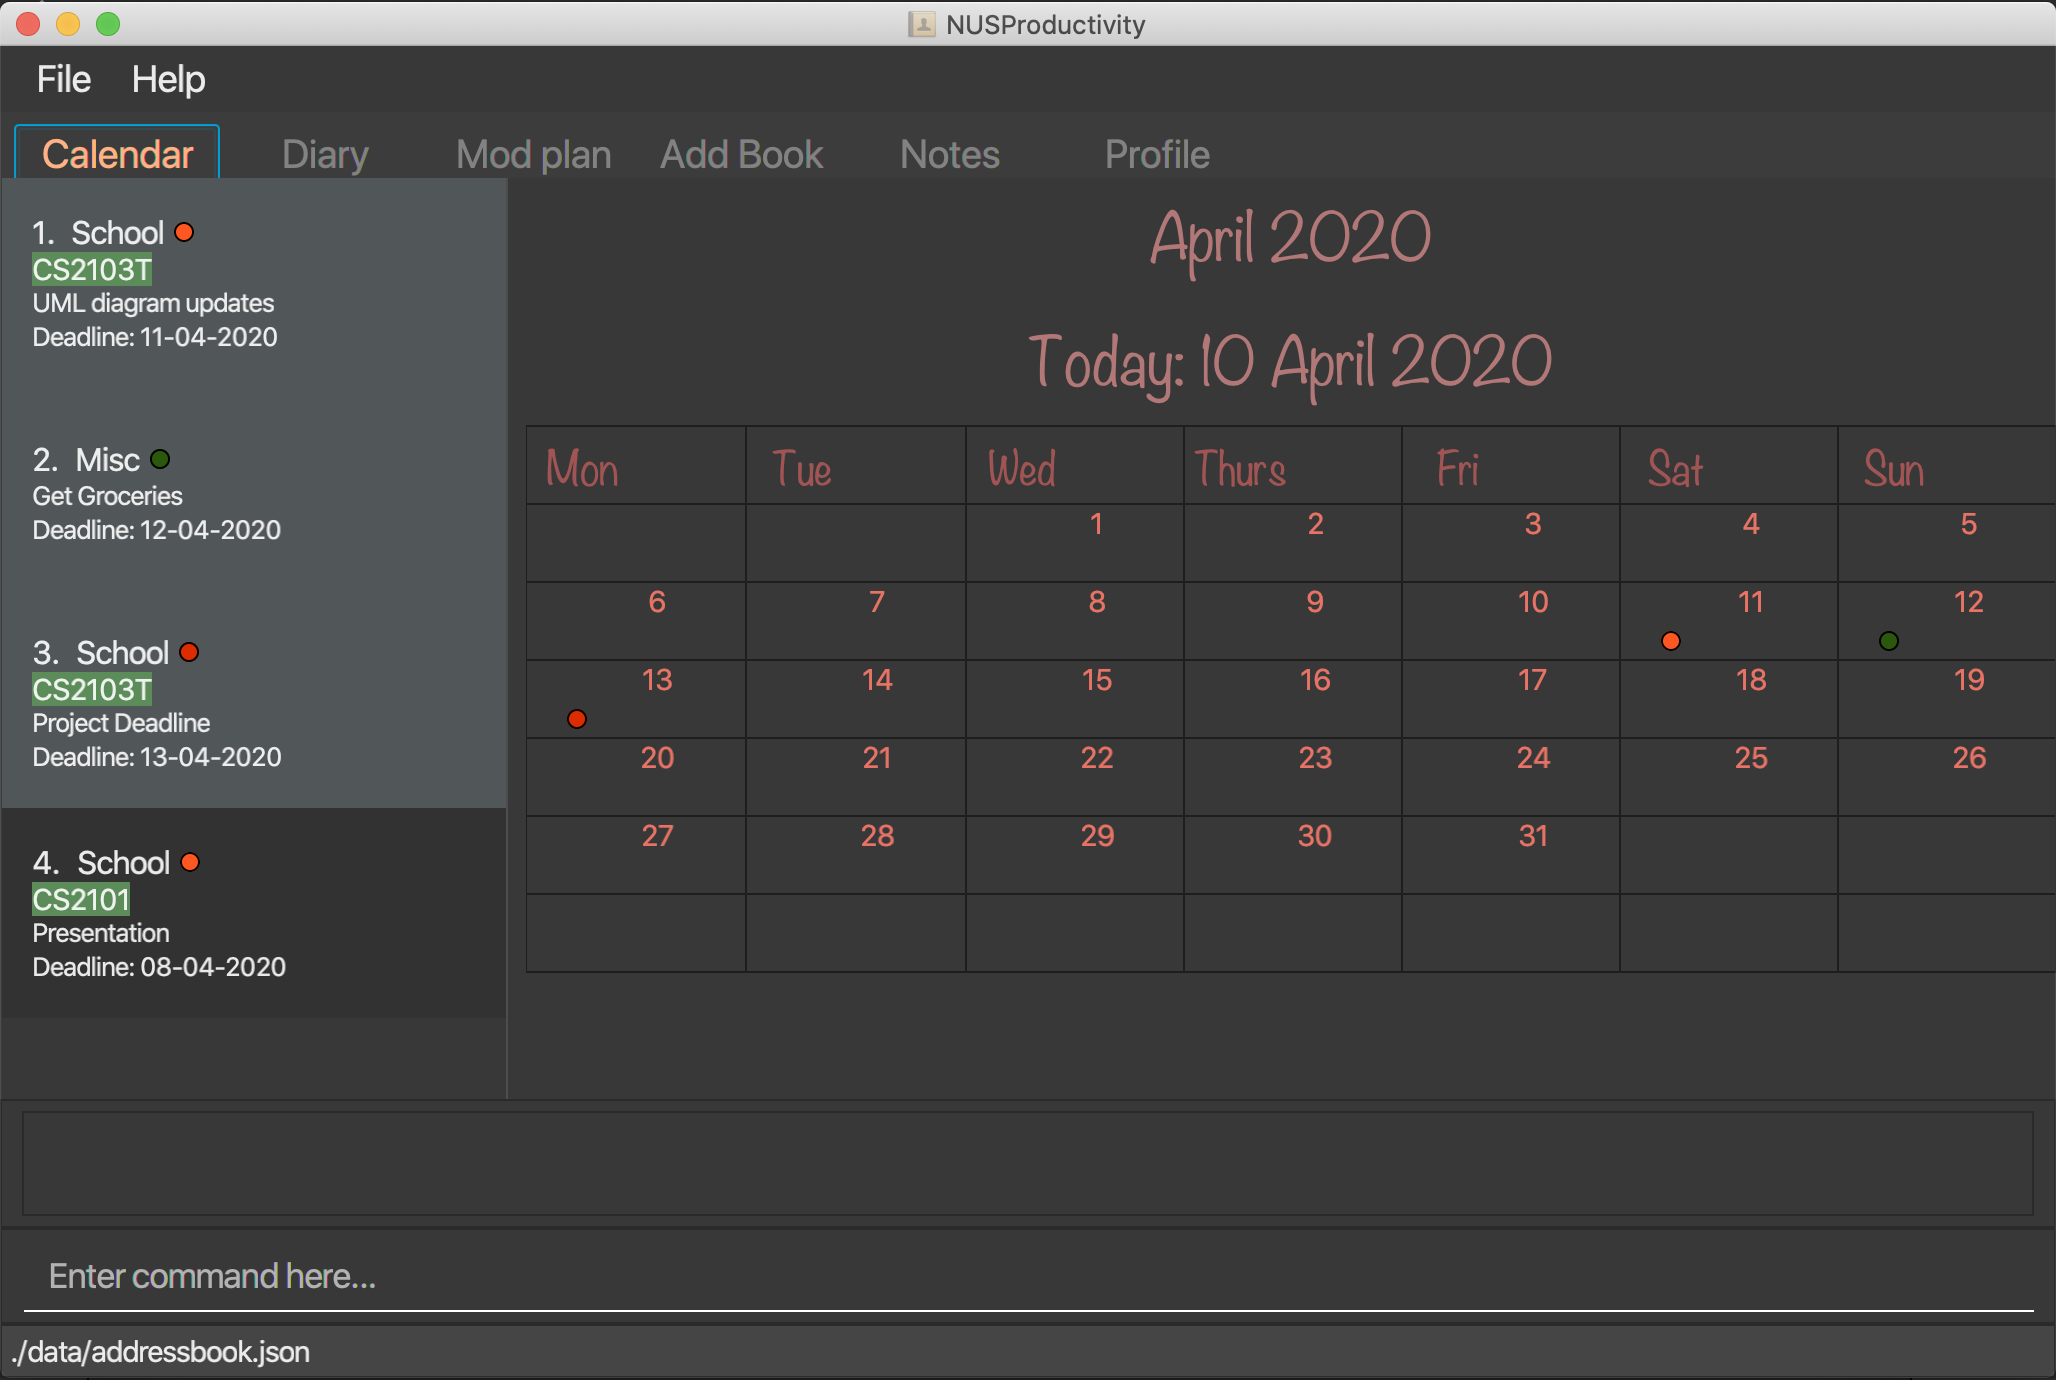 Figure 2. NUSProductivity Start up
 -
Type the command in the command box and press Enter to execute it.
e.g. typinghelpand pressing Enter will open the help window. -
Some example commands you can try:
-
searchCS2103T: searches for the moduleCS2103T -
calendar: Allows you to switch to the calendar tab -
deadlineAdd desc/Finish homework by/30-04-2020 cat/School: schedules a deadline on the calendar for you to finish your homework -
cap: calculates your CAP -
exit: exits the app
-
-
Refer to Section 3, “Features (Xinwei)” for details of each command.
3. Features (Xinwei)
This section shows the detailed list of usable commands.
Command Format
-
Words in
UPPER_CASEare the parameters to be supplied by the user e.g. inadd n/NAME,NAMEis a parameter which can be used asadd n/John Doe. -
Items in square brackets are optional e.g
n/NAME [t/TAG]can be used asn/John Doe t/friendor asn/John Doe. -
Items with
… after them can be used multiple times including zero times e.g.[t/TAG]…can be used ast/friend,t/friend t/familyetc. -
Parameters can be in any order e.g. if the command specifies
n/NAME p/PHONE_NUMBER,p/PHONE_NUMBER n/NAMEis also acceptable.
3.1. General (Xinwei)
3.1.1. Viewing help : help
-
Format:
help
3.1.2. Exiting the program : exit
-
Exits the program.
-
Format:
exit
3.1.3. Switching Tabs : calendar, diary, modplan, addressbook, notes, profile
-
This command allows you to switch to the tab using the command line instead of clicking on the respective tab.
-
Format:
calendar,diary,modplan,addressbook,notes,profile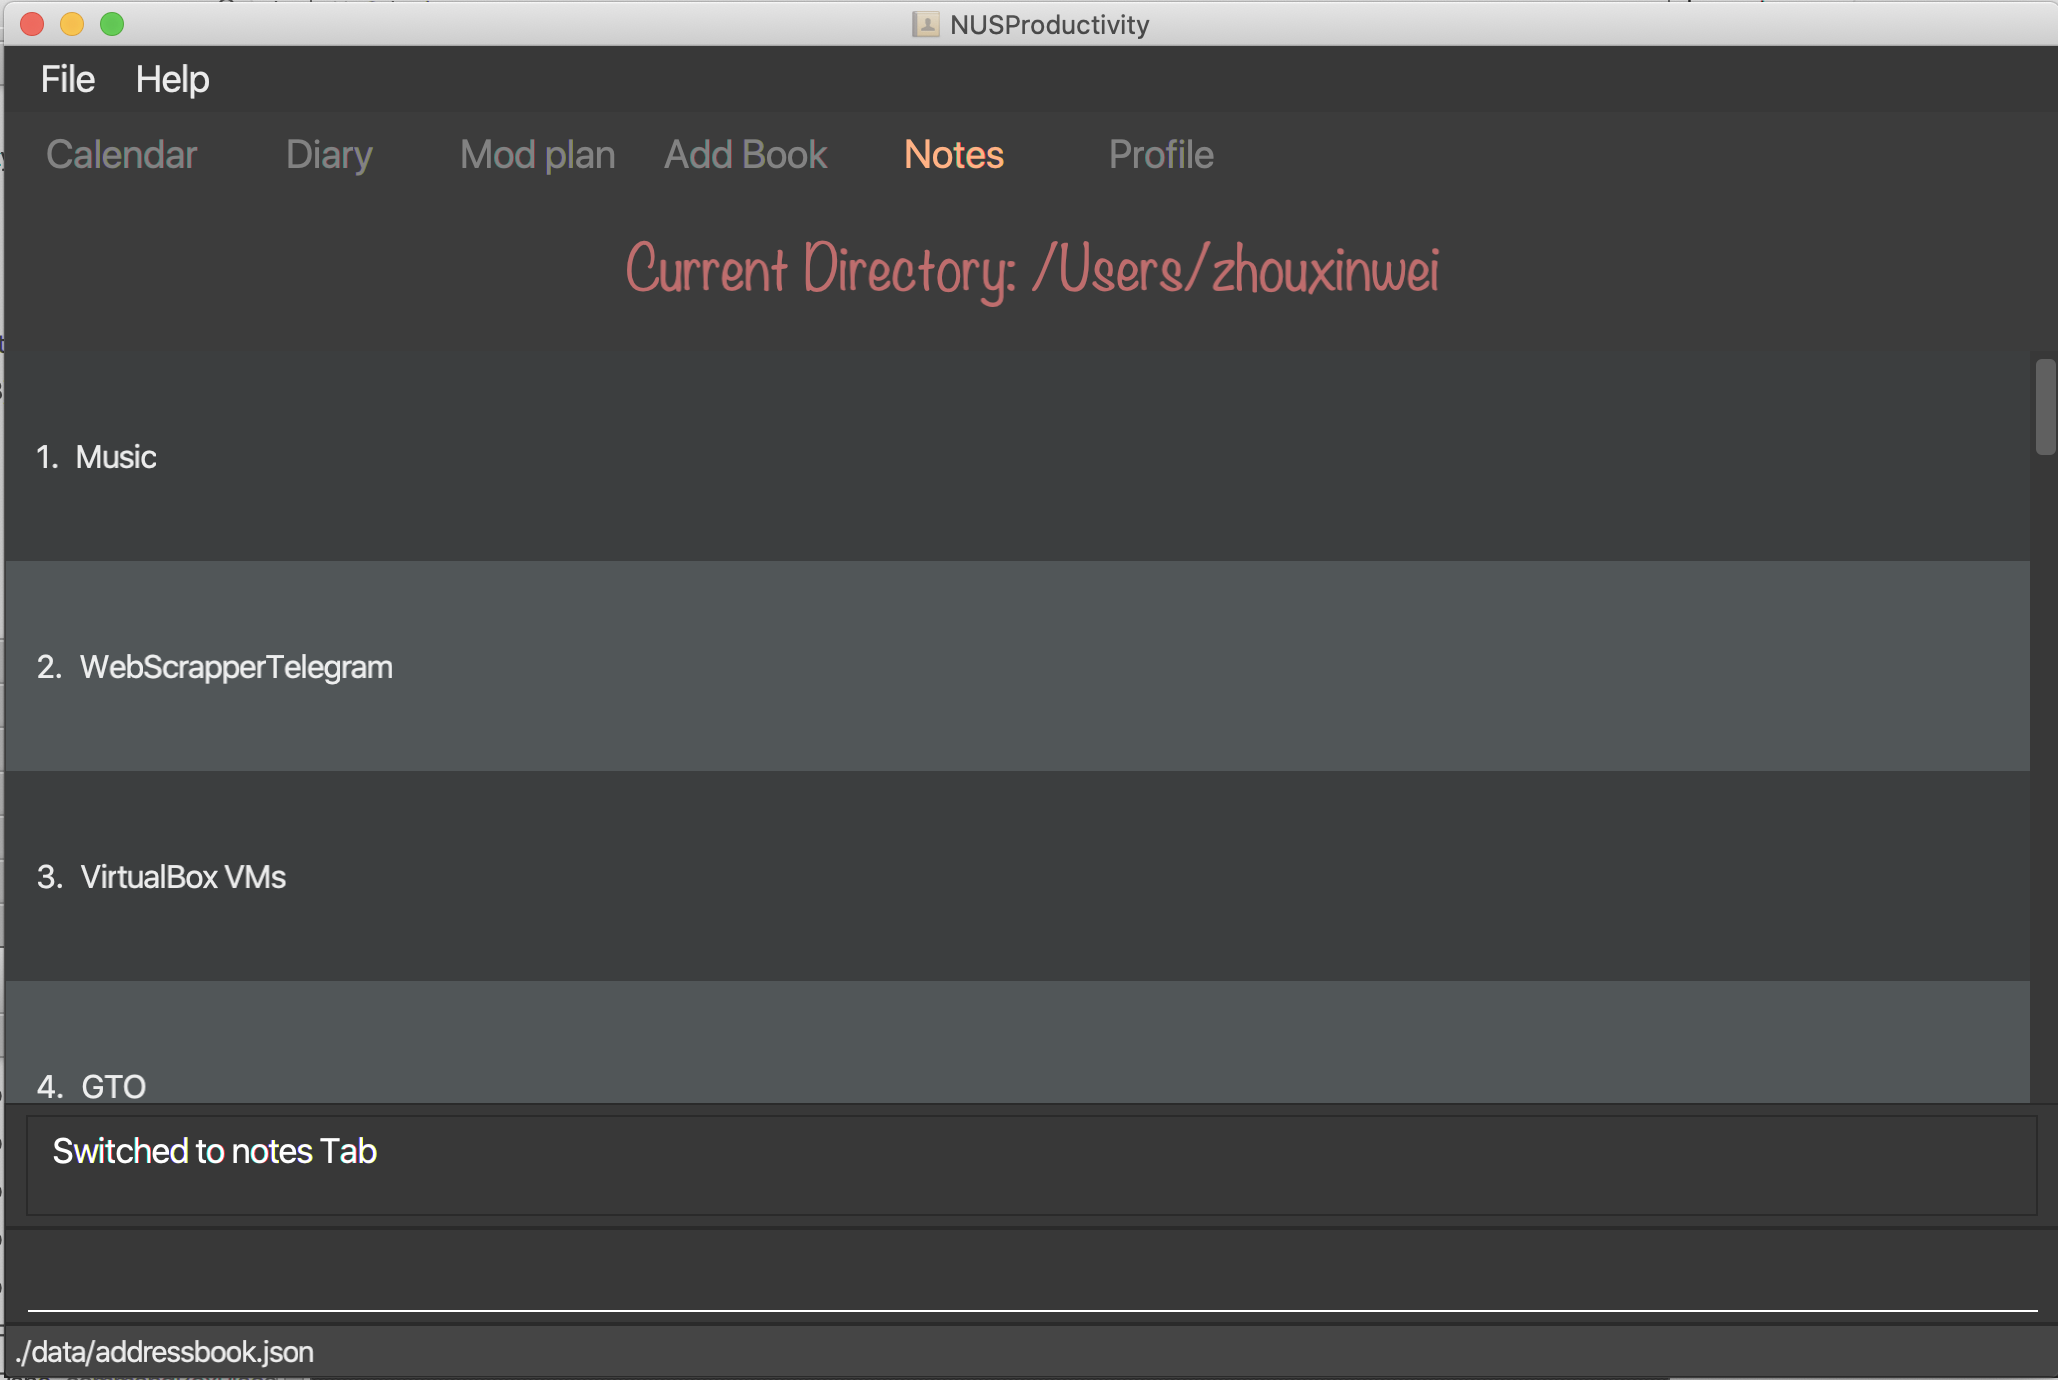 Figure 3. Switching tabs
3.2. Calendar (Xinwei)
The calendar feature in the app that allows you to schedule and set deadline for important tasks such as project or assignment deadlines.
The application allows you to add 2 type of tasks, deadline and moduleTask.
moduleTask allows you to tag a module, that you have already inputted in your Profile tab, to the task itself. It allows you to set the priority level of the task.
deadline allows you to input a deadline event into the calendar without any specified modules attached to it.
3.2.1. Priority Levels
We give you the flexibility to choose and indicate what priority each moduleTask should have. This priority is represented from 1 to 5, with 1 being the lowest priority and 5 being the highest.

3.2.2. Deadline
Adding Deadline: deadlineAdd
-
Schedules a task tagged with a deadline to the calendar. A dot will be shown to indicate there is a deadline to be met on that day
-
Format:
deadlineAdd desc/DESCRIPTION by/DD-MM-YYYY cat/CATEGORY
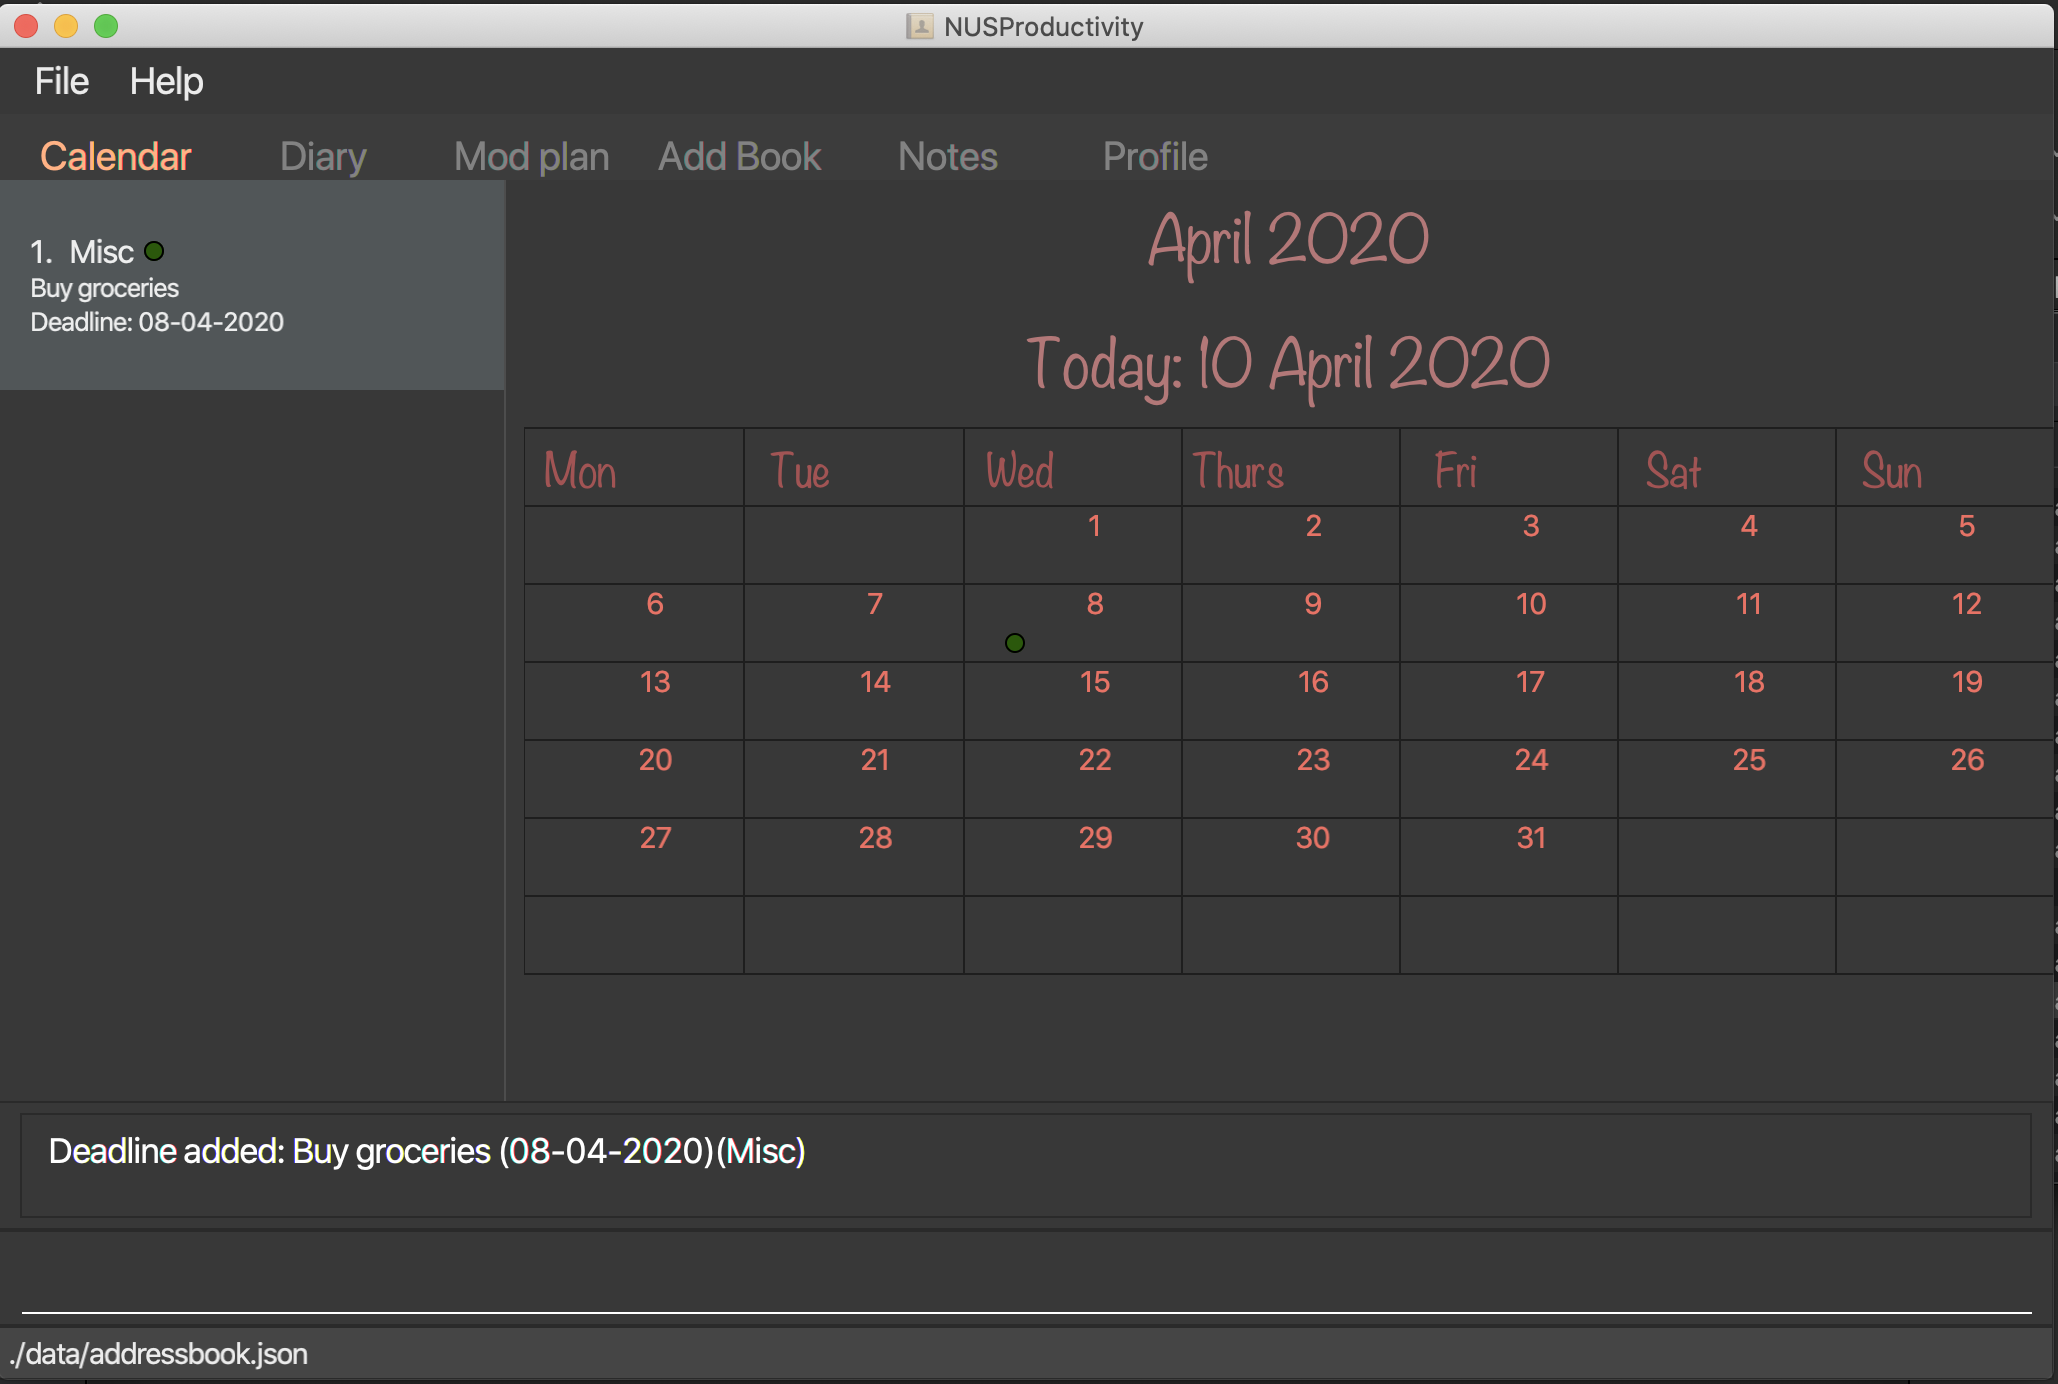
After invoking the command, the deadline will be added to the calendar as shown in figure 5. The task will be tagged as light grey to signify it is uncompleted yet.
Deadline tasks are defaulty tagged with the lowest priority.
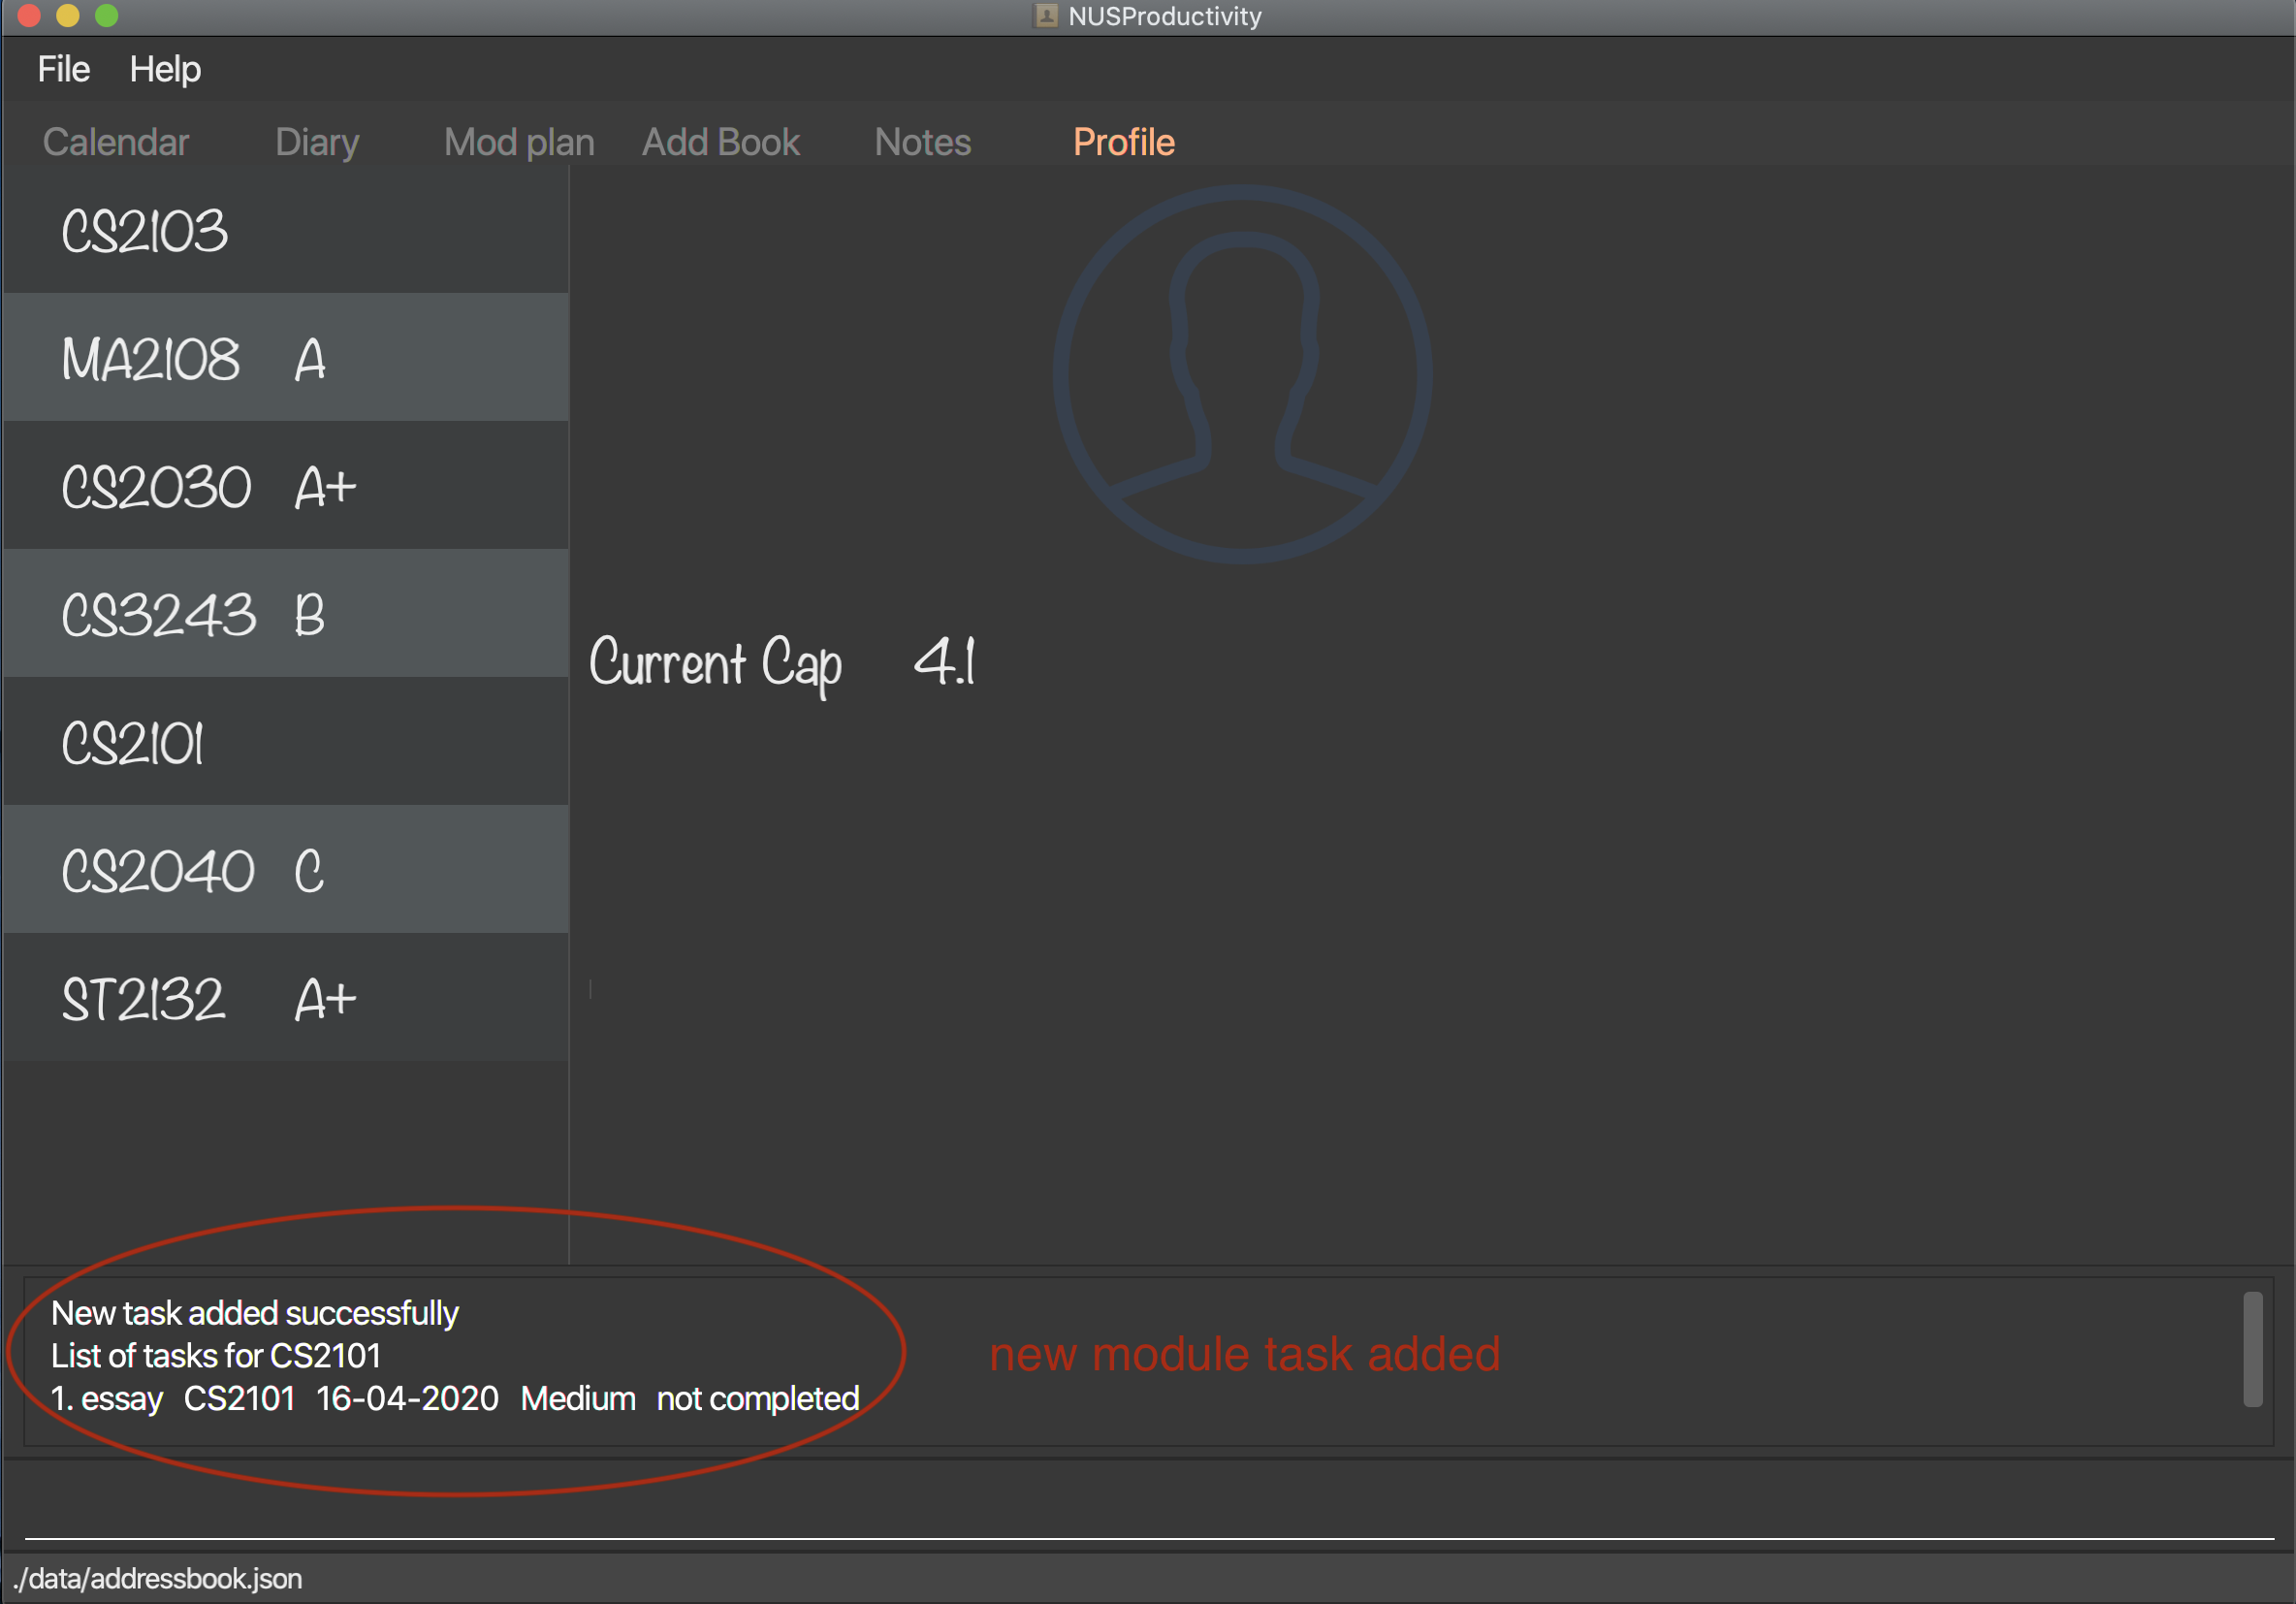
3.2.4. Adding a module task : moduleTask
-
Format:
moduleTask desc/DESCRIPTION m/MODULE_CODE date/DEADLINE_OR_SCHEDULED_TIMING pri/PRIORITY
| The date inputted should be in the format: DD-MM-YYYY. |
-
Example:
-
moduleTask desc/essay m/CS2101 date/02-04-2020 pri/3
Add a module task as specified in module book and also shows on calendar.
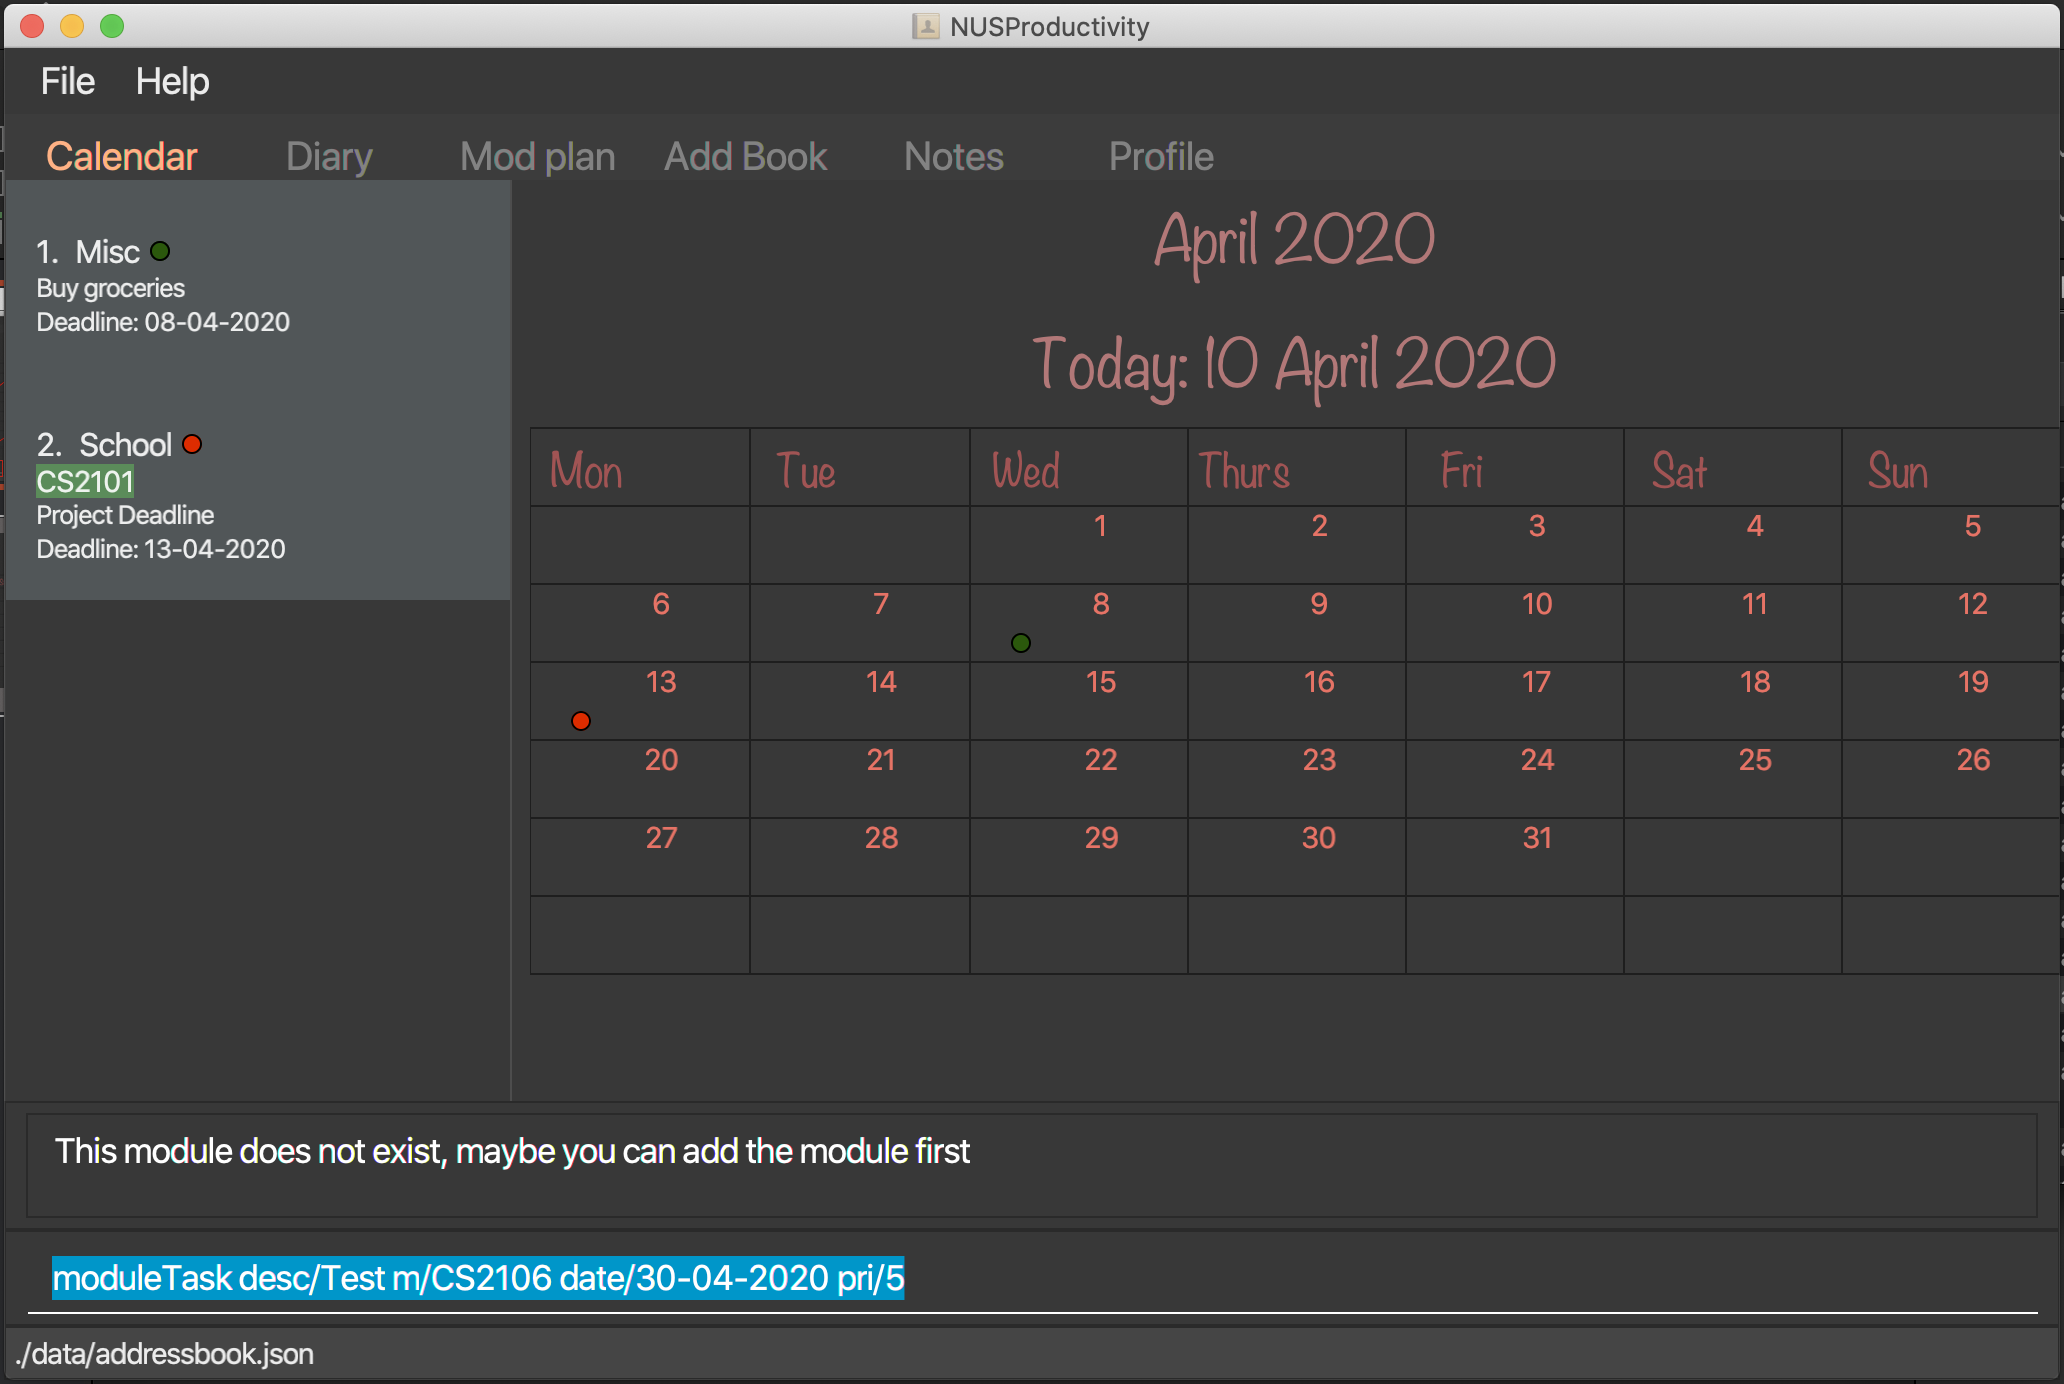
-

This requires you to add a module under moduleAdd before you can use it
|
3.2.5. Shared Functions
The commands stated in this section can be used for both moduleTask and deadline tasks.
Marking a task as Done: done
-
Marks a task as completed, completed task will be shown with a black background while uncompleted task will be shown as a grey background.
-
Format:
done index/INDEX
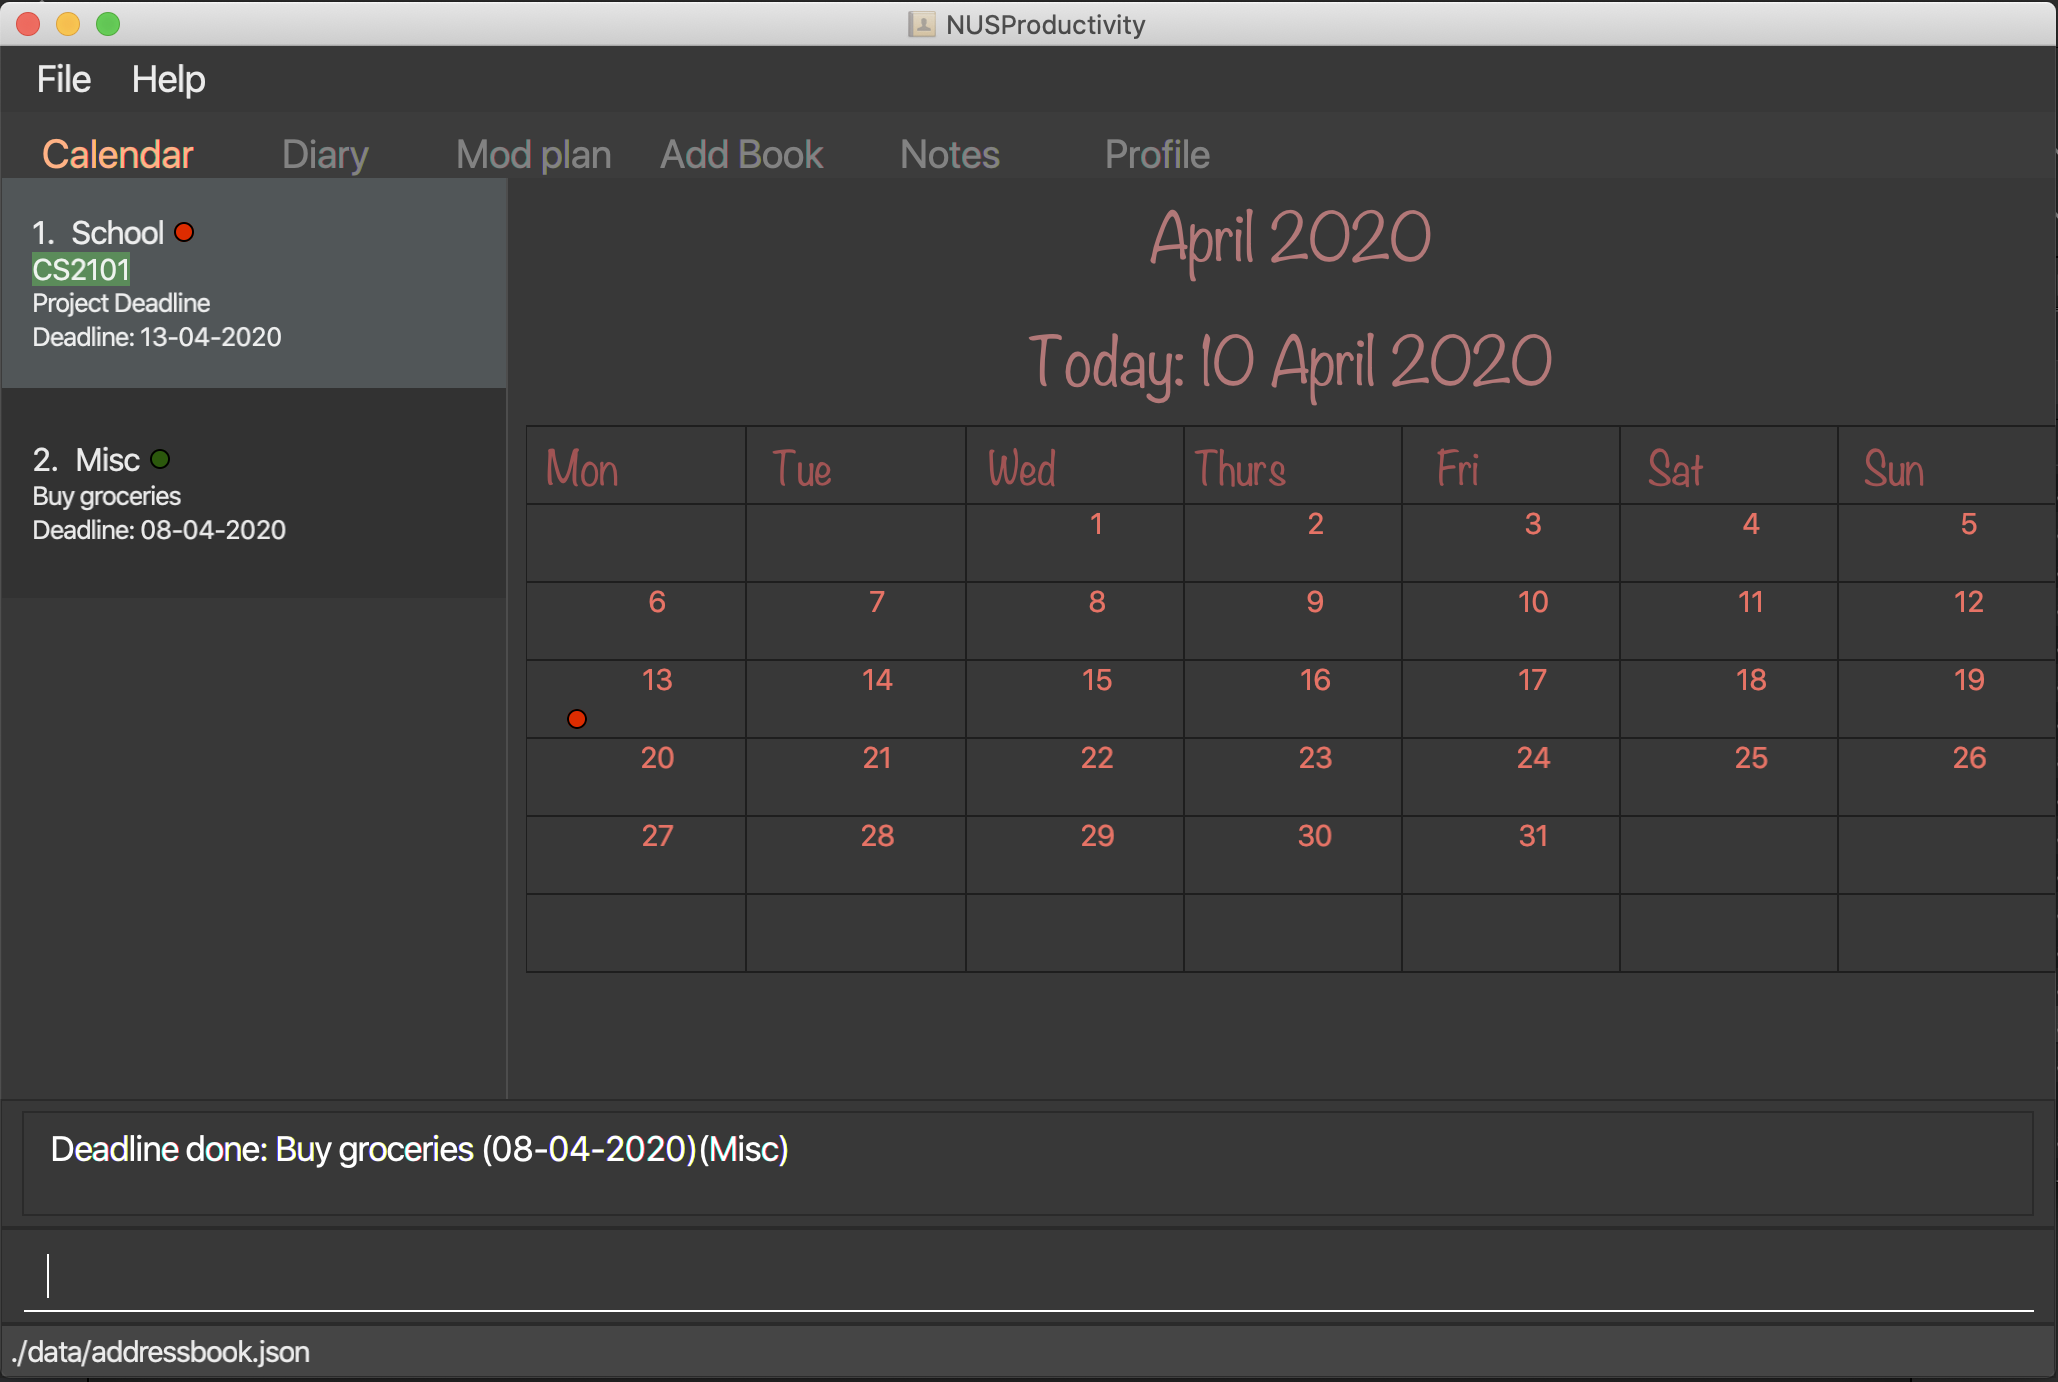
After a task is completed, it will be pushed to the bottom, the dot on the calendar removed and the background of the task is changed to black to signify the task is compelted.
Removing Deadline: taskDelete
-
Deletes a task from the deadline list, marking the task as done
-
Format:
taskDelete index/INDEX
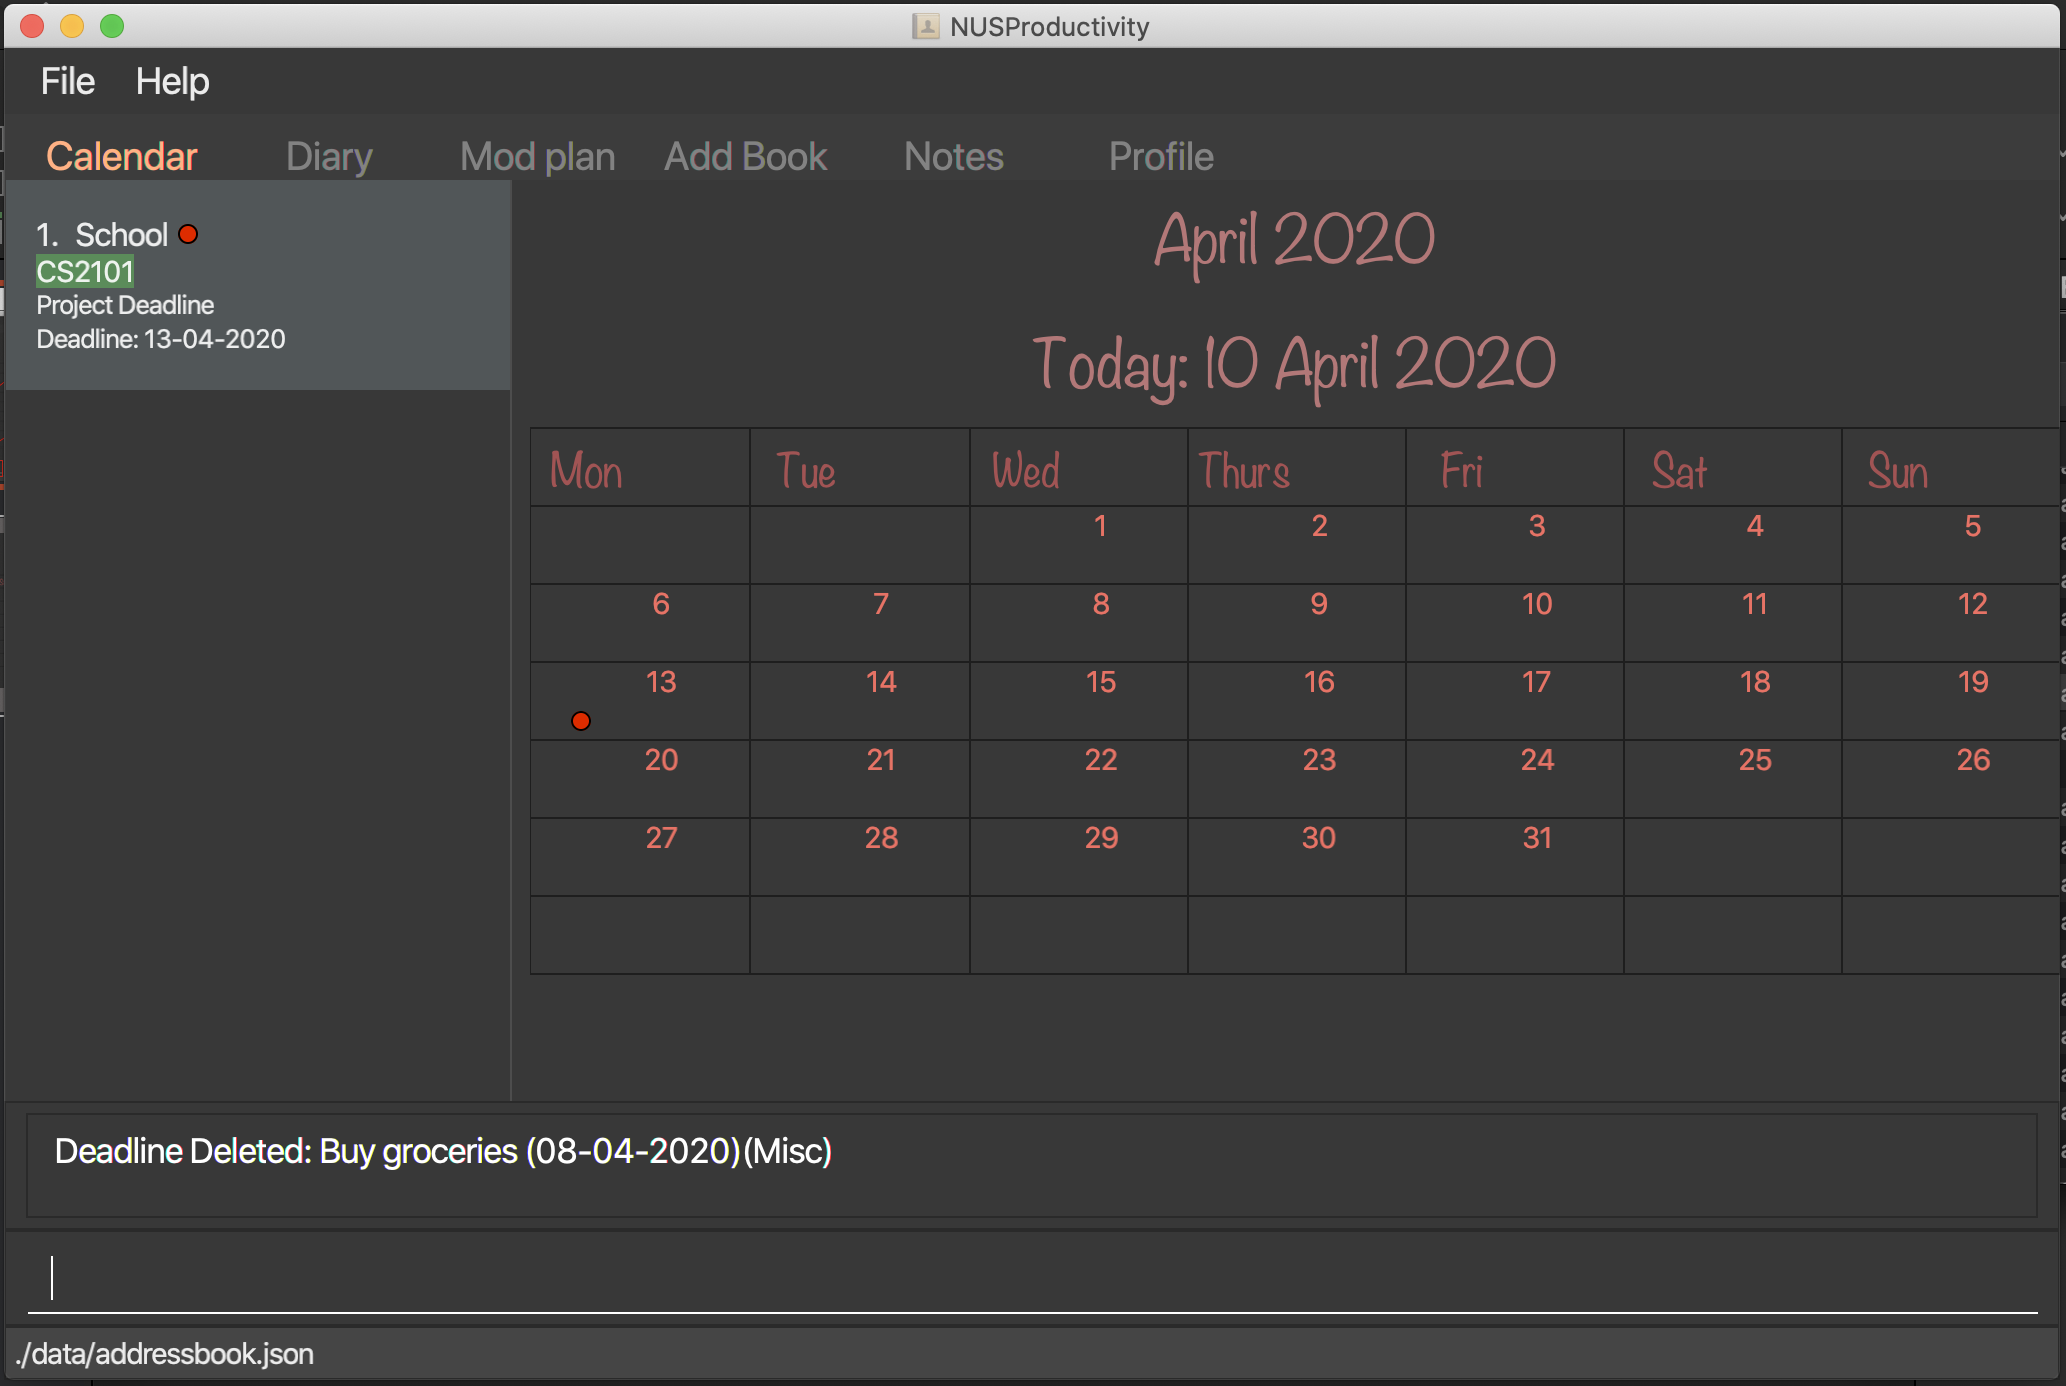
| Tip: delete a task only after the date have passed to make sure everything is completed up to your current date |
Sorting the Calendar: sortTask
-
Allows you to sort the tasks list on the left by either date or priority. This gives you the flexibility to plan ahead, whether you want to complete a more urgent task or to complete a task with the deadline that is earlier
-
Format:
sortTask by/SORT
| SORT can only be either date or priority |
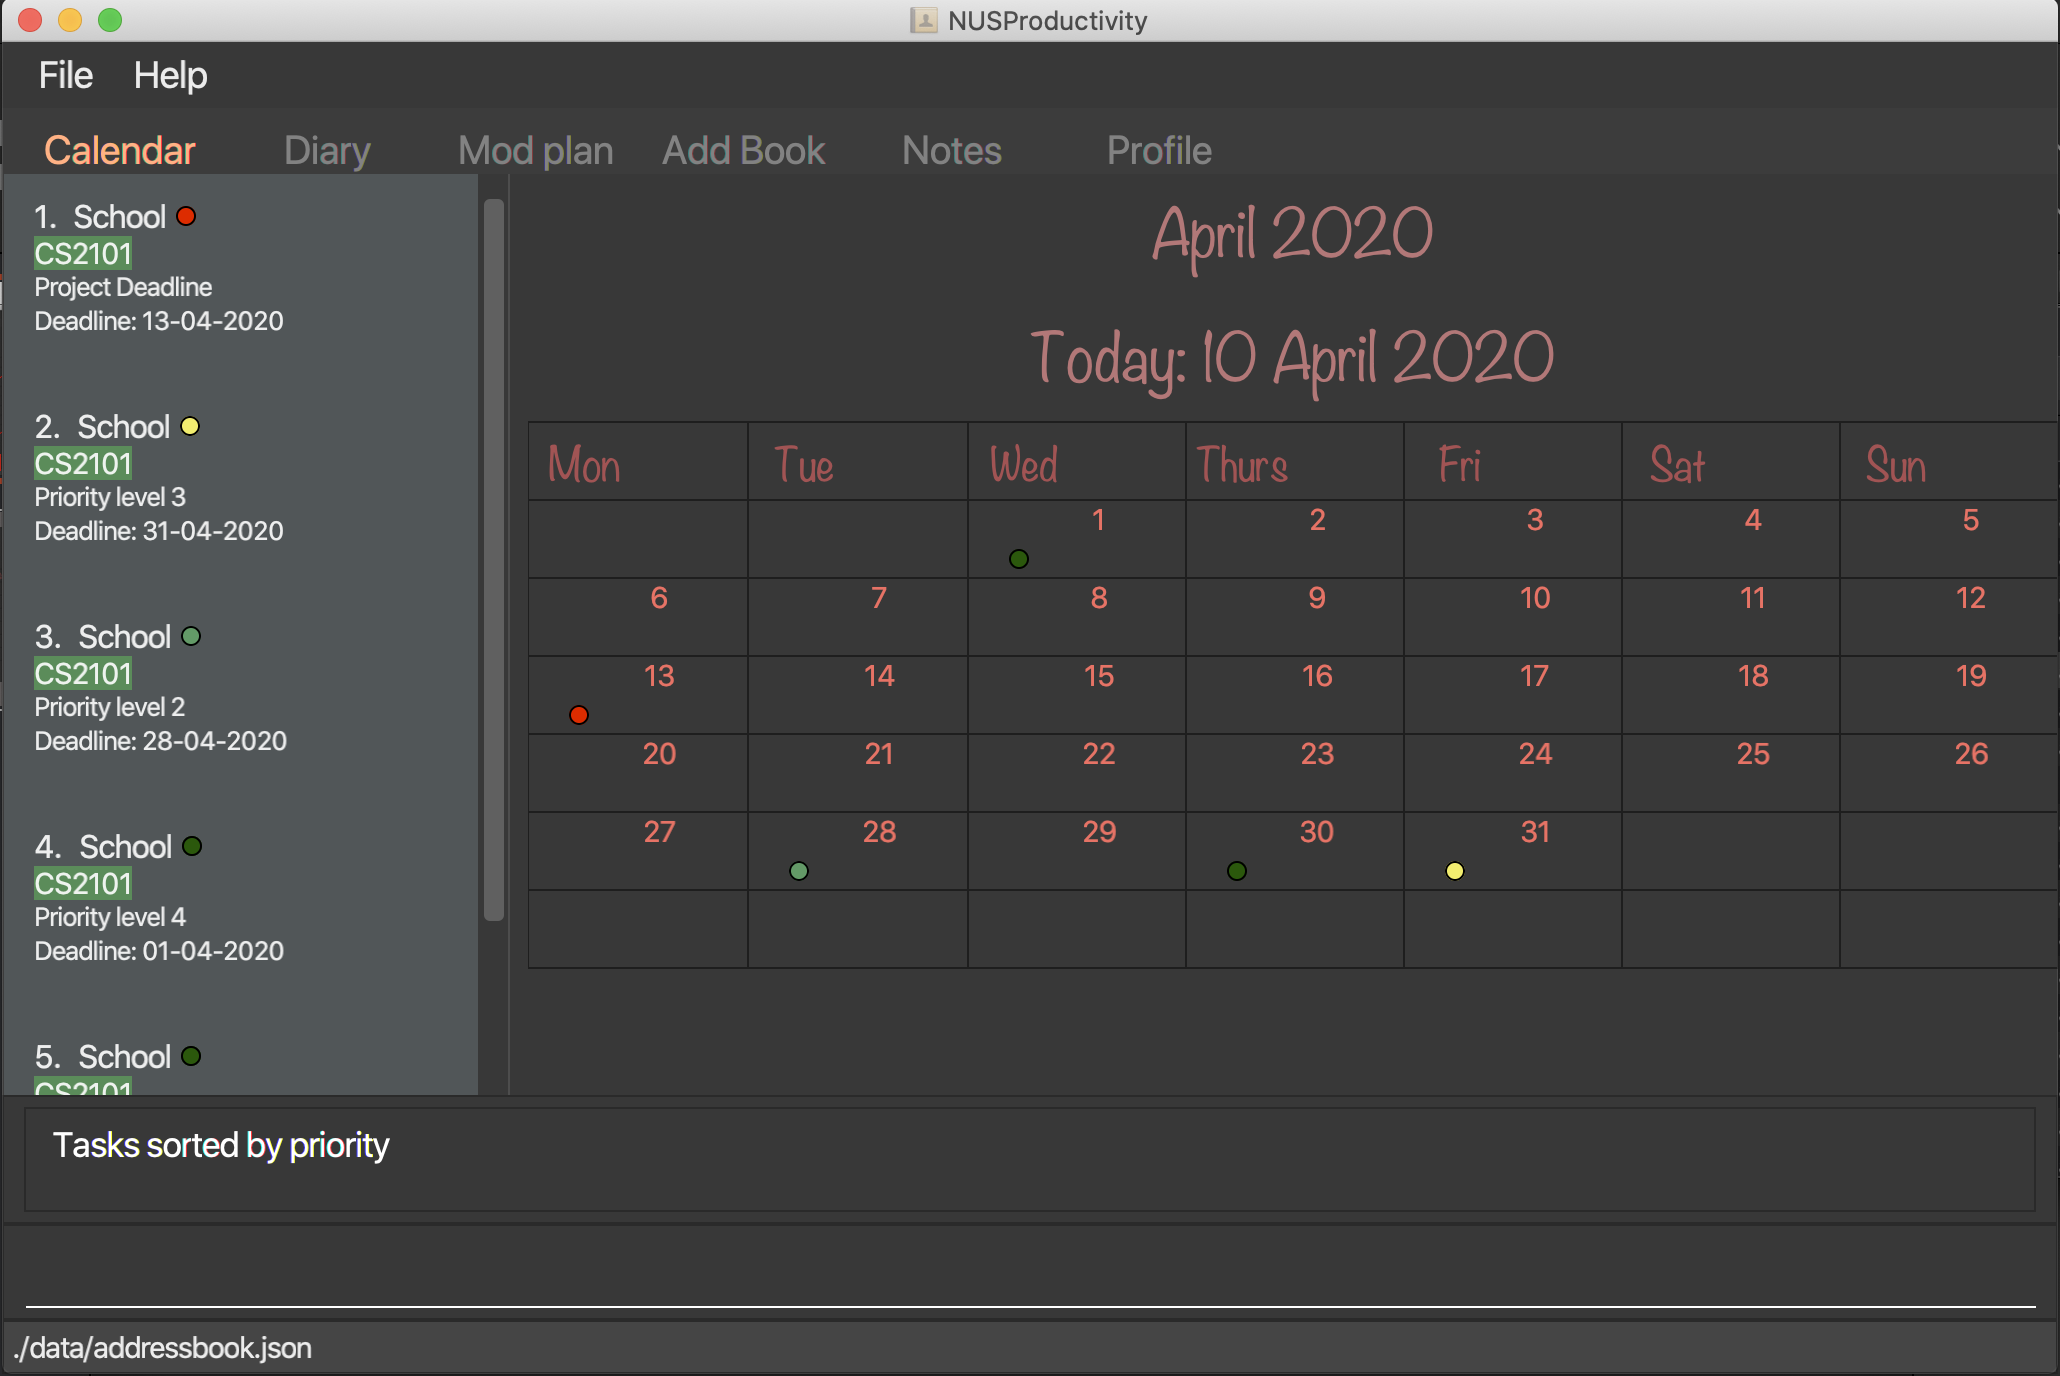
Finding specific tasks in the Calendar: findTask
-
Allows you to see task at a glance based on what you specified.
-
Format:
findTask m/MODULECODEorfindTask cat/CATEGORYorfindTask date/DD-MM-YYYY
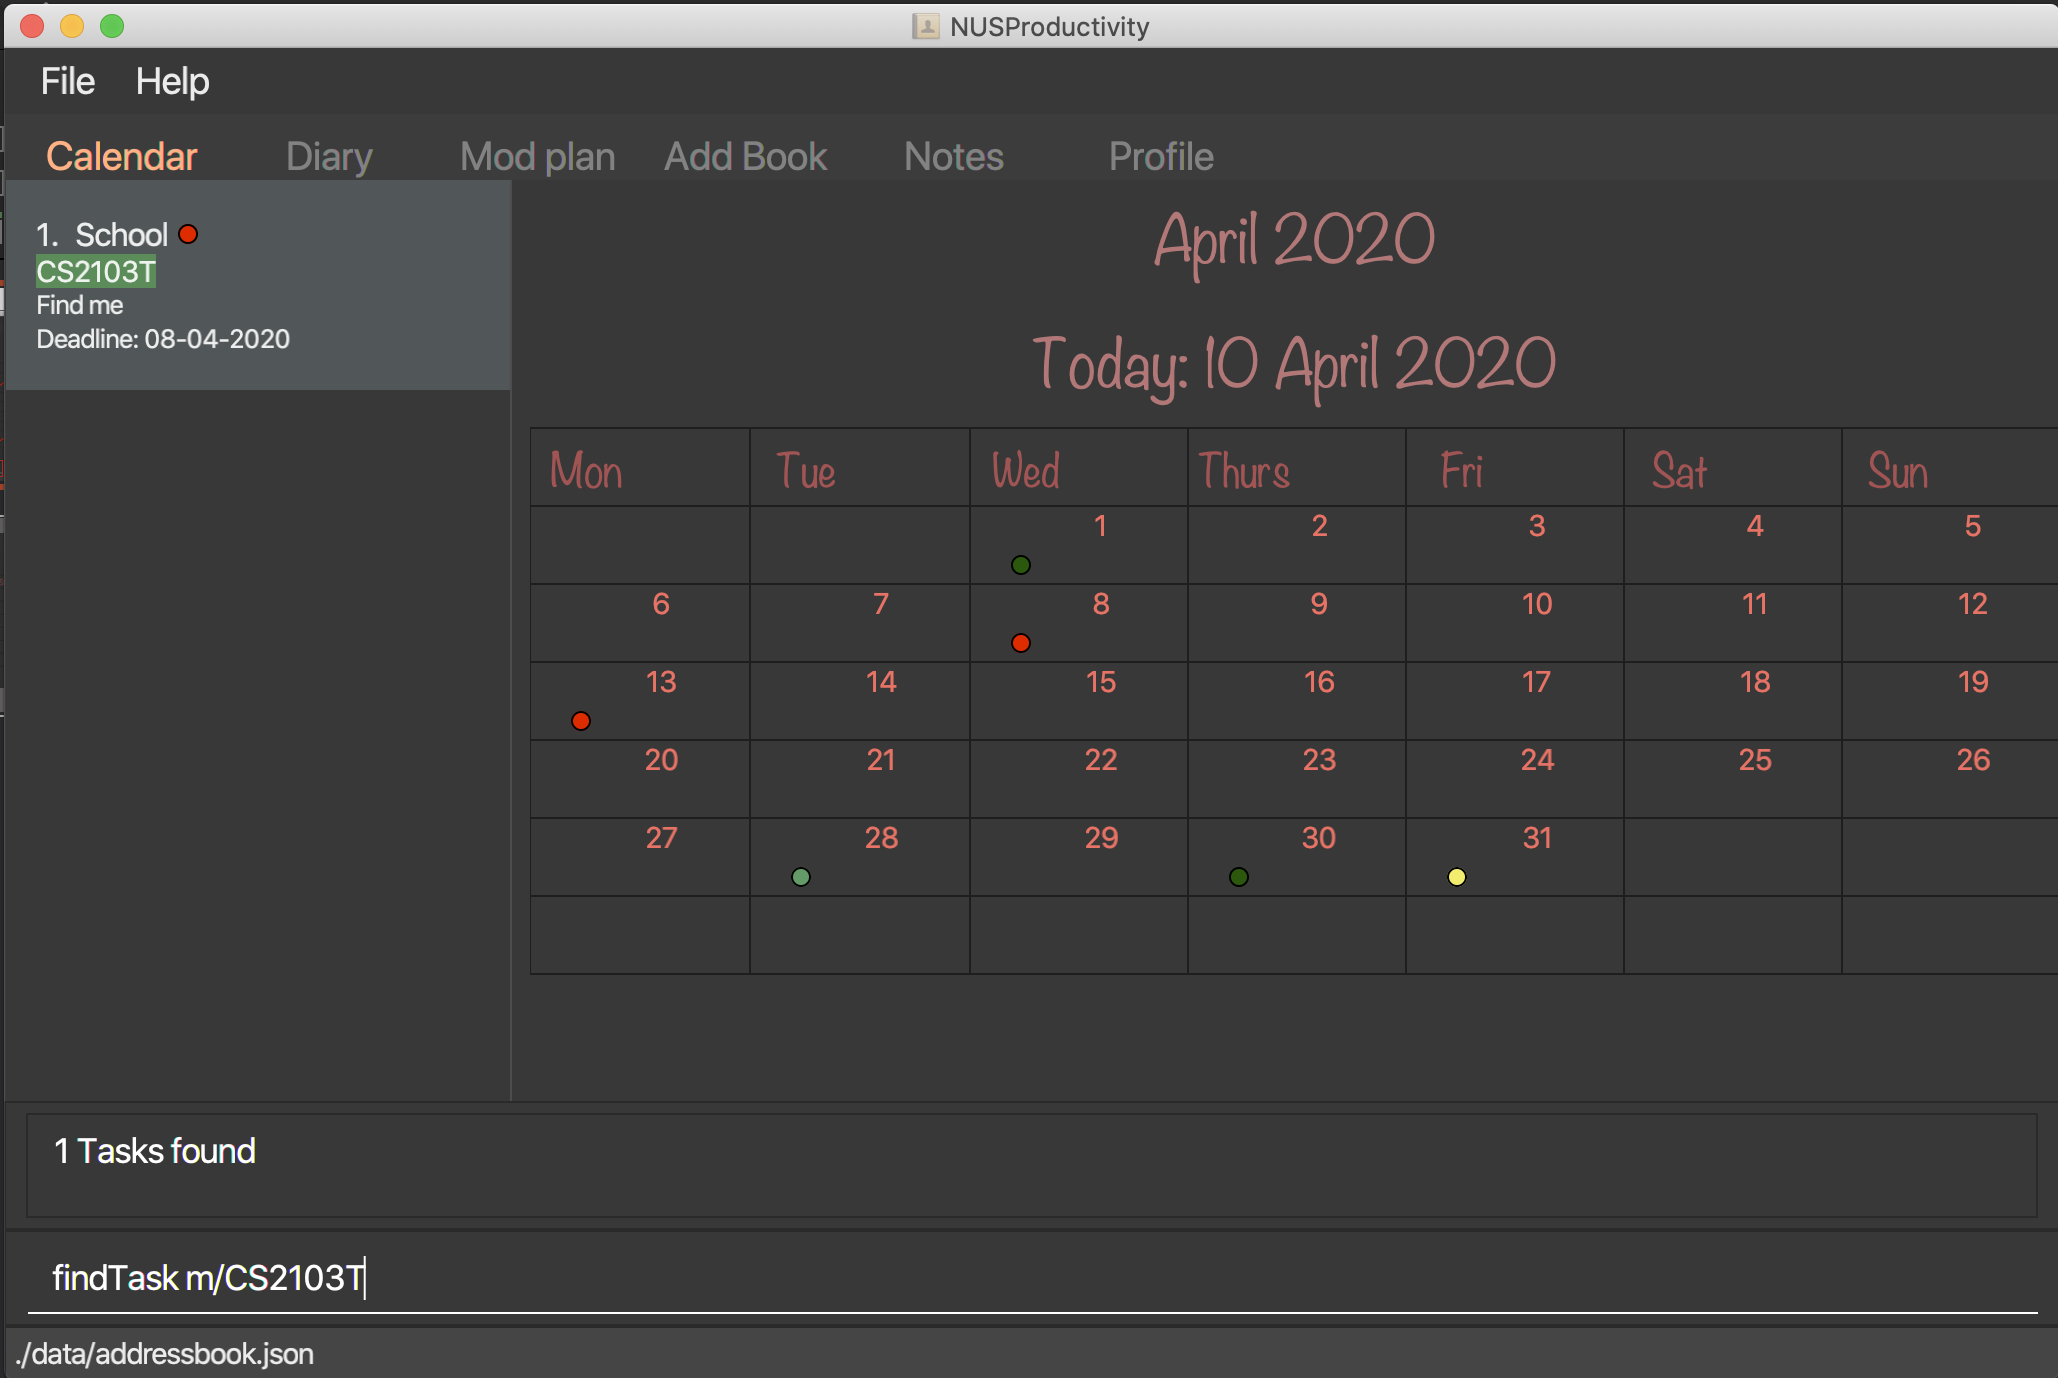
| The dots on the calendar will not disappear and will show that there is still task to be completed on that date despite filtering |
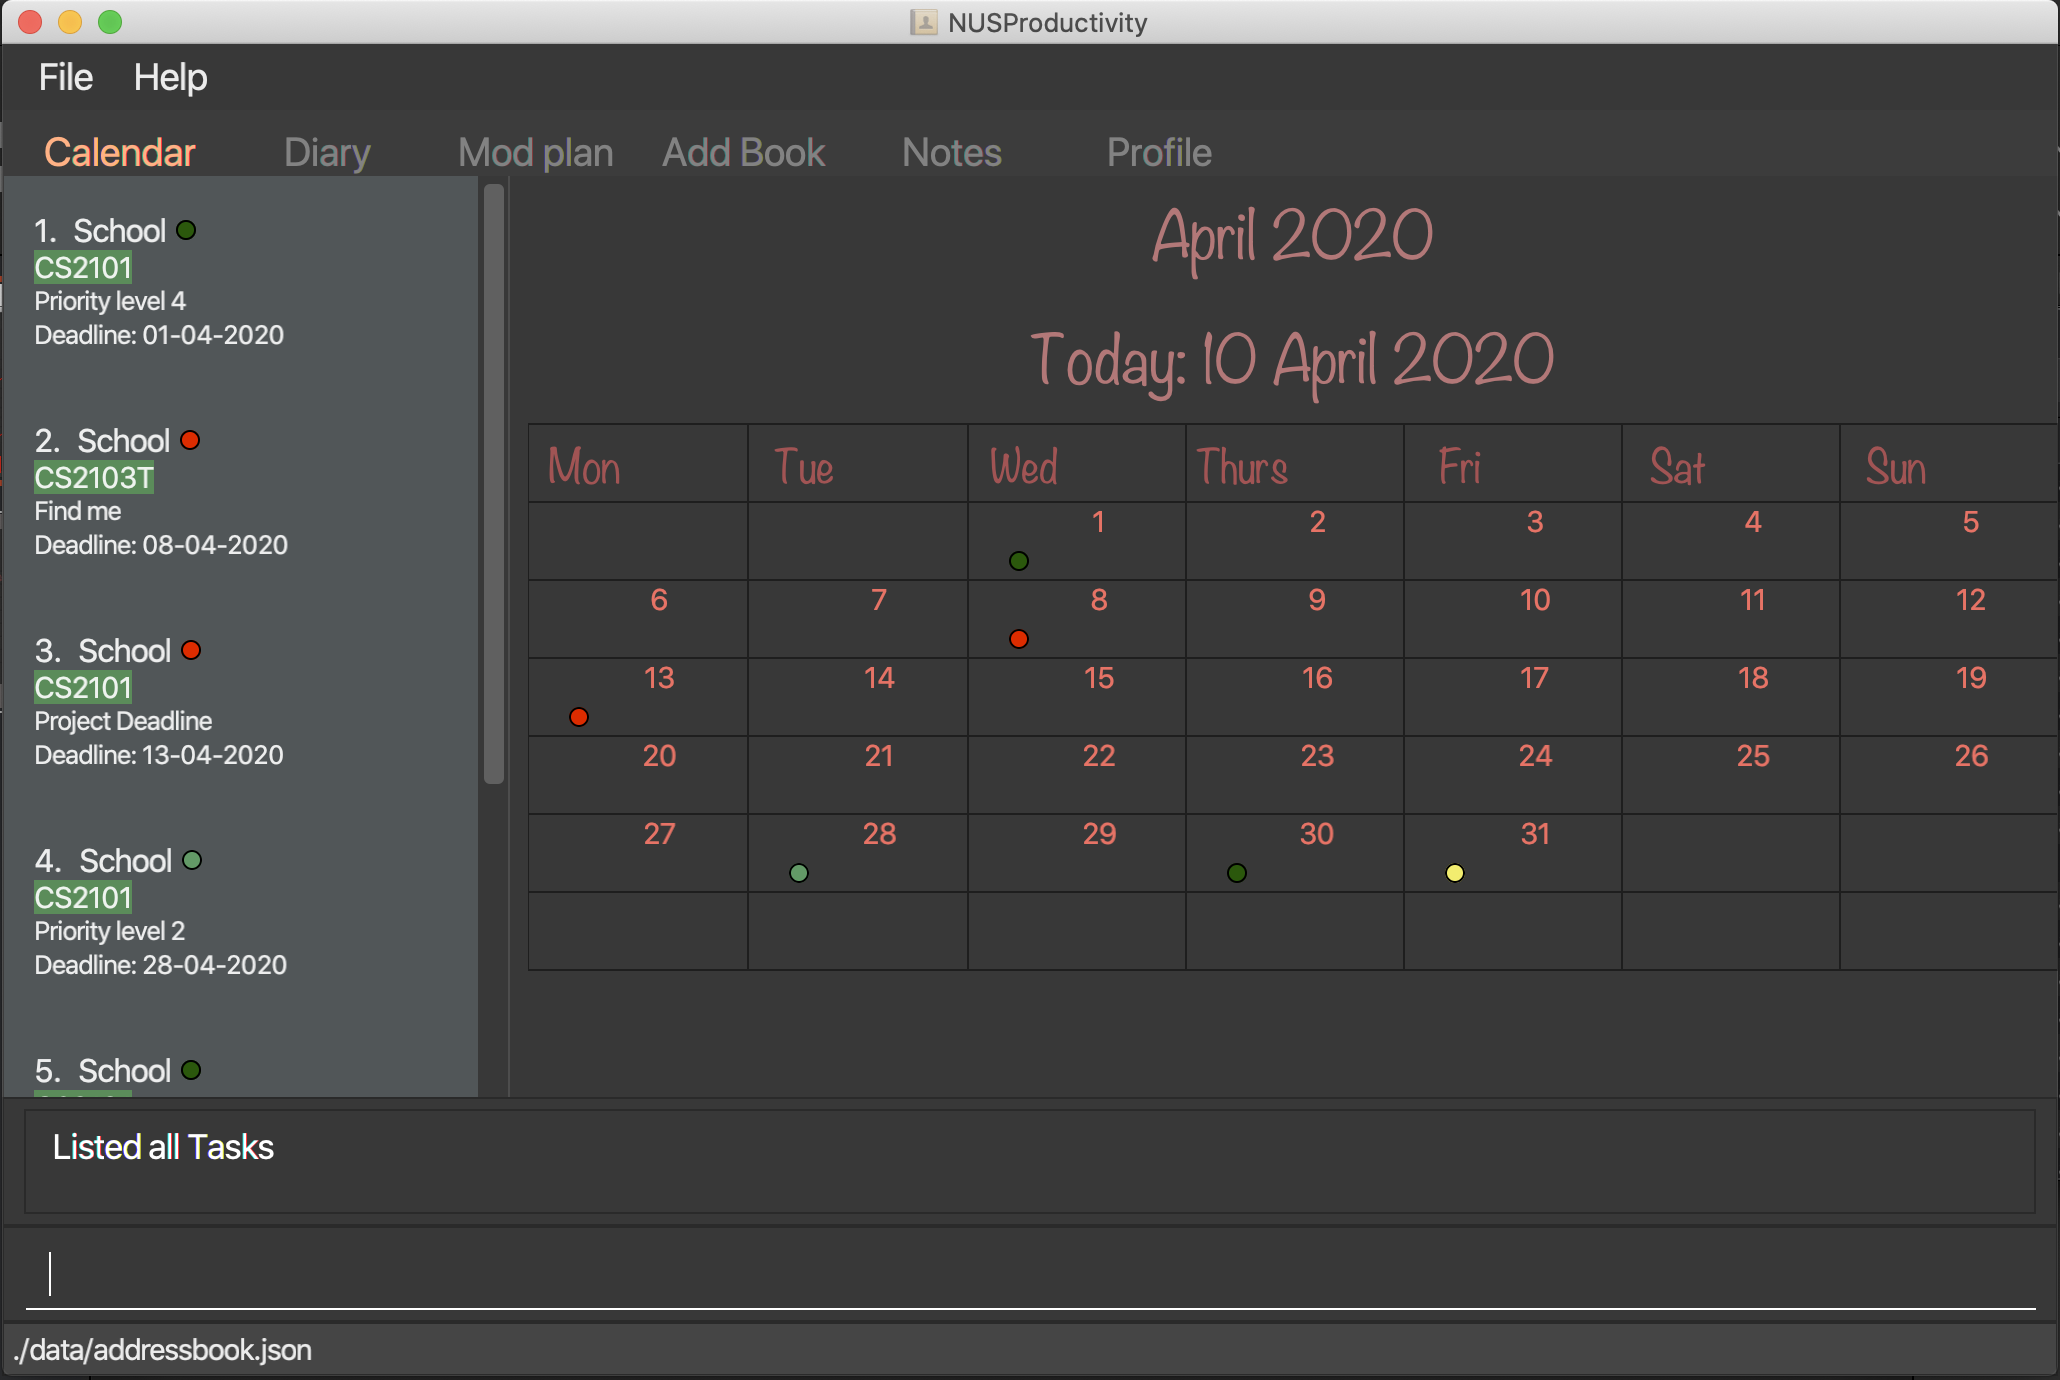
Listing back all tasks in the Calendar: listTask
-
Allows you to list back all task after you have filtered the list with findTask
-
Format:
listTask
3.2.6. Event (coming in v2.0)
Adding Event: eventAdd
-
Schedules event to the calendar
-
Format:
eventAdddesc/DESCRIPTION on/DD-MM-YYYY
Deleting Event: eventDelete
-
Deletes event from list with the given index
-
Format:
eventDeleteindex/INDEX
Marking Event as done: done
| This is meant to be an extension of the done command above, hence its implementation will follow said format. |
-
Format: done index/INDEX
Sorting Events: sortEventList
-
Sorts events by date (default)
-
Format:
sortEventList
List Events: listEvent
-
Lists scheduled events
-
Format:
listEvent
3.3. Notes (Xinwei)
-
Allows you to create notes from the application, making it easier for you to find your files since often time students have a lot of research papers or references opened when writing a report.
-
Allows for users to create documents for notes, organise their notes in folders. Default location is set to
/User/<ACCOUNT NAME>for macC:\Users\<ACCOUNT NAME>for windows
3.3.1. Pathing
-
The notes feature allows you to specify the pathing used to access the file/folder you specify
-
The diagram below shows a comparision between absolute vs relative pathing
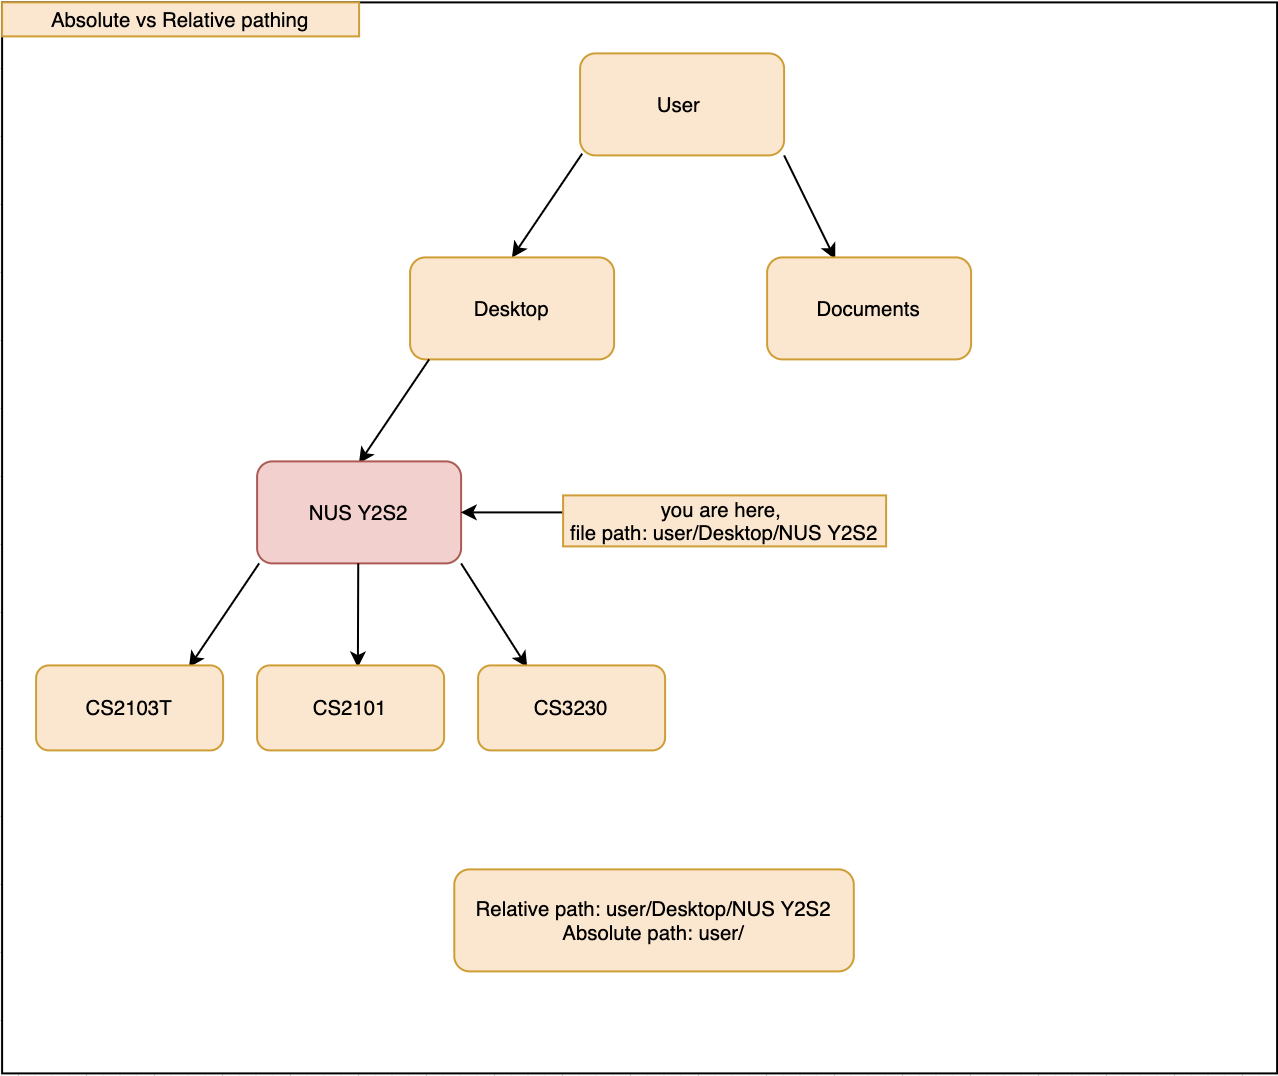
| if you want to access the Documents folder as shown in figure 13, you can use the absolute pathing and specify loc/Desktop instead of typing loc/../../../Documents |
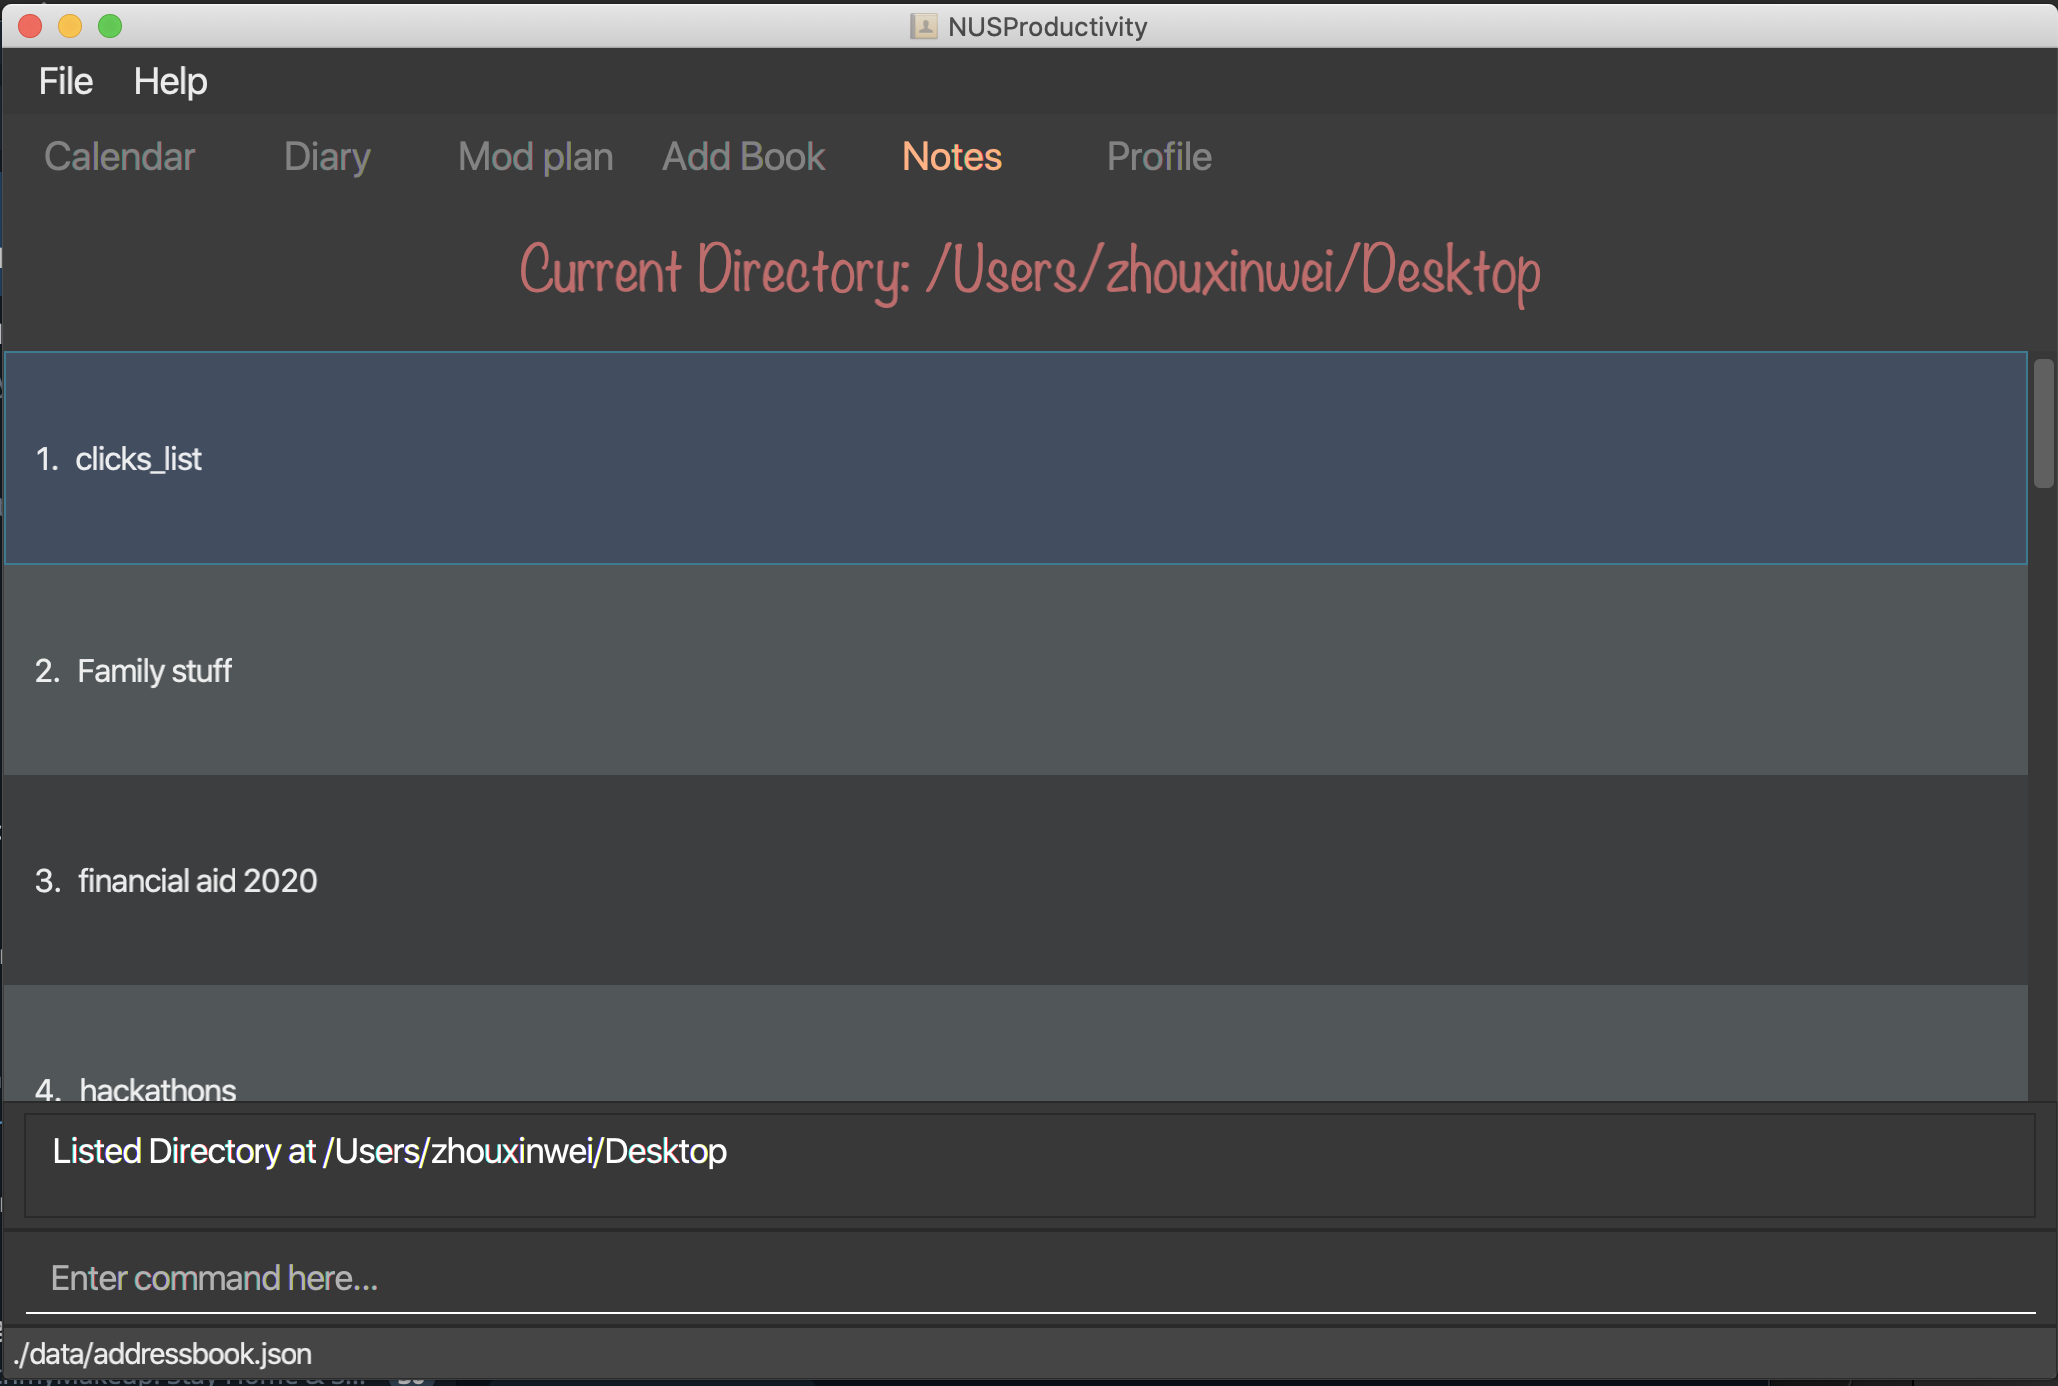
3.3.2. Listing Directory: notesList
-
List the directory that you supplied. The display will show all folders that is in that directory.
-
Format:
notesList loc/PATH pt/PATH TYPE
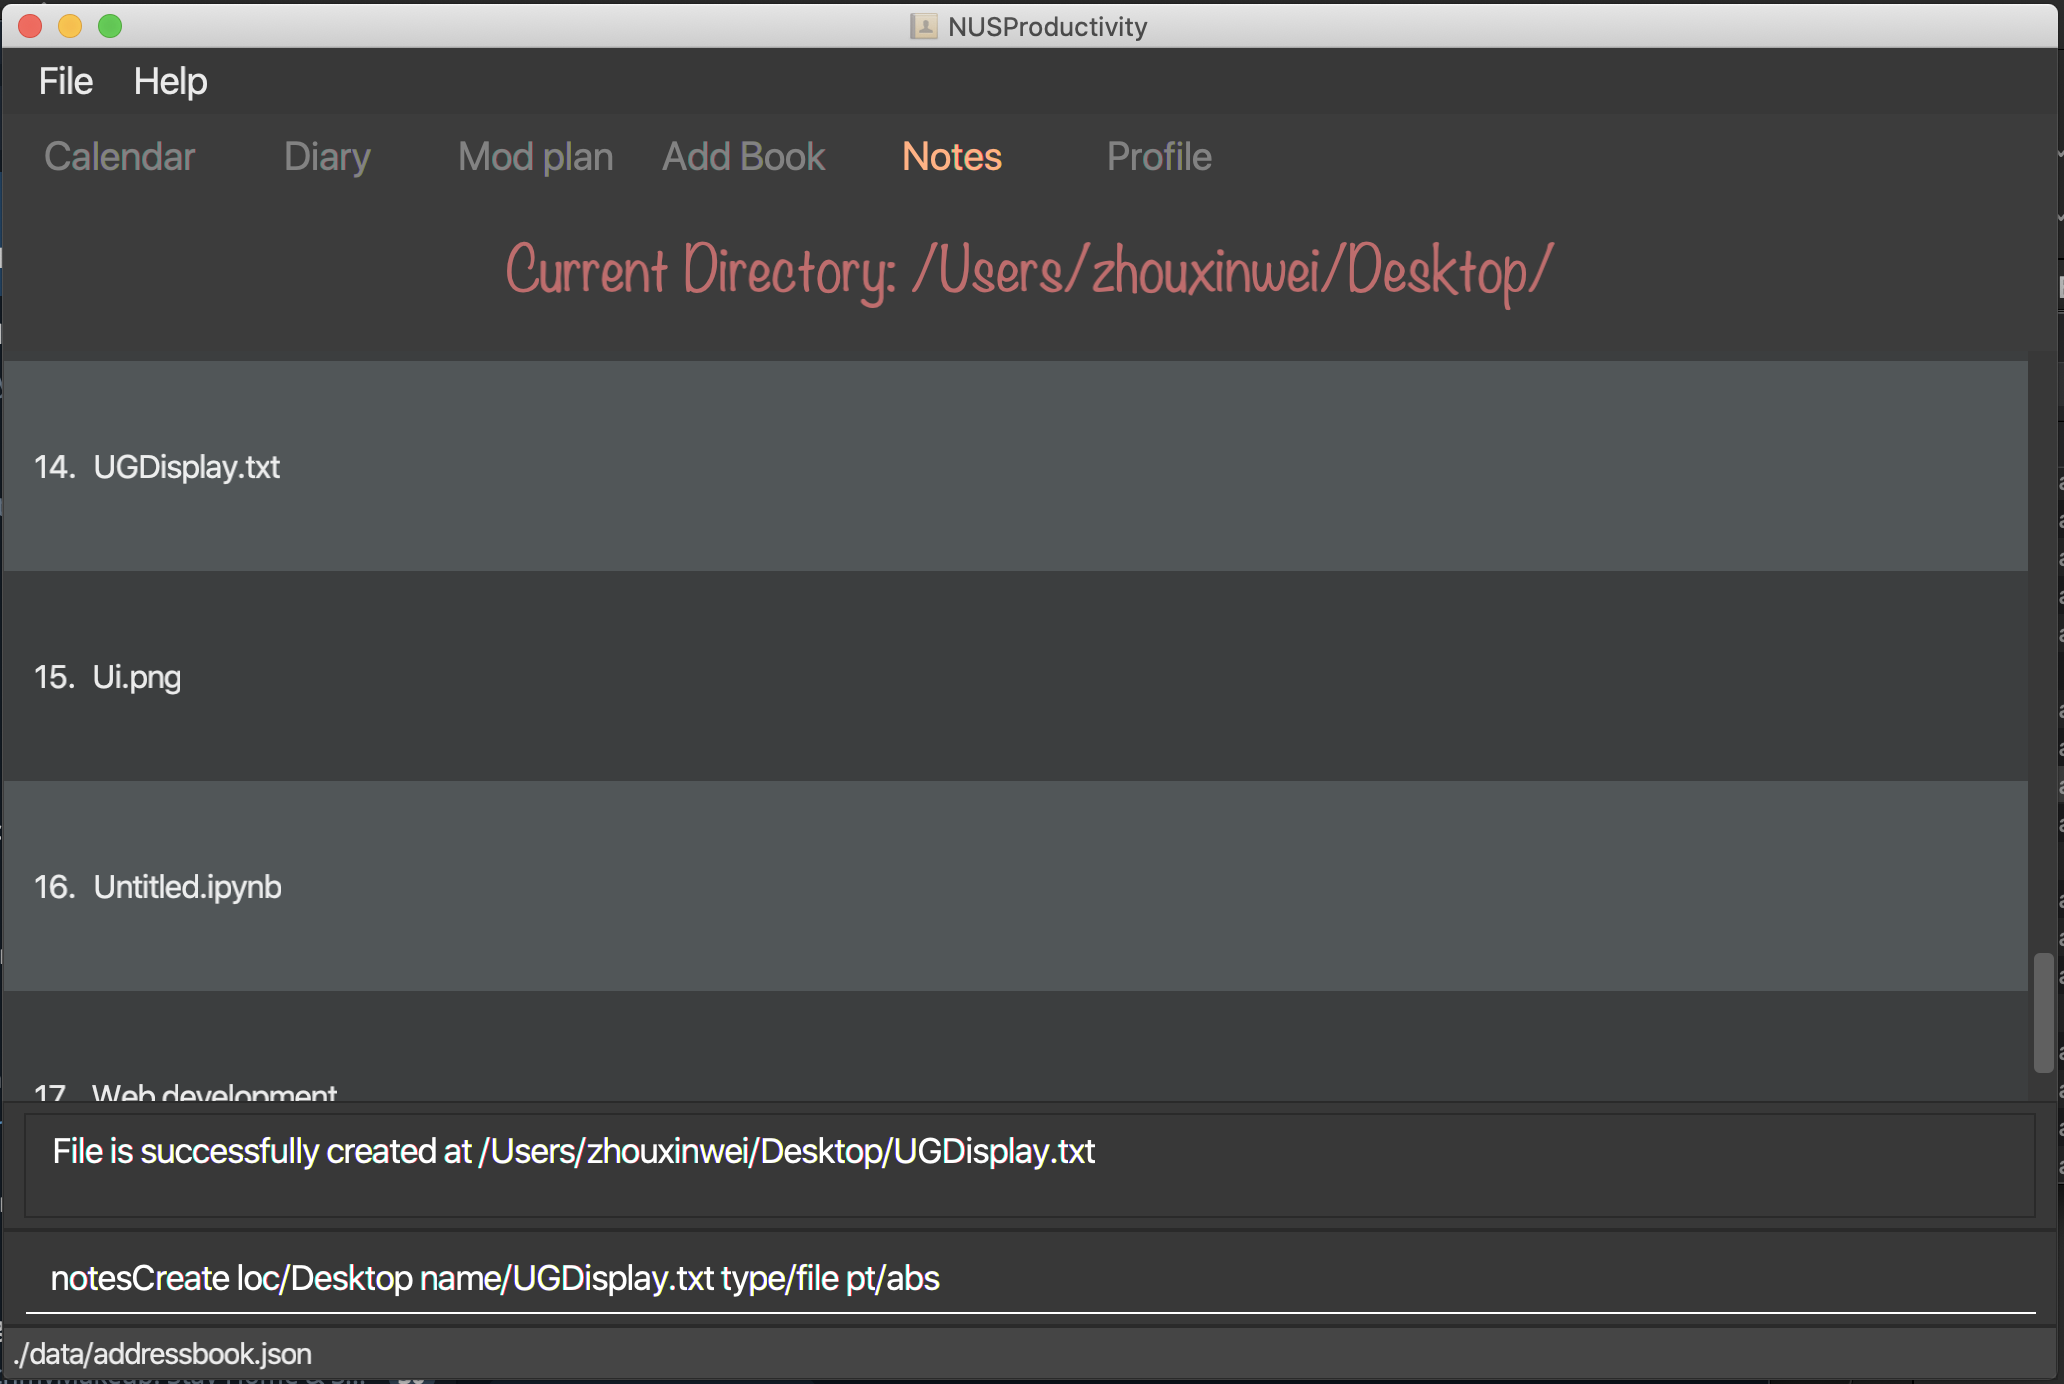
3.3.3. Creating a note: notesCreate
-
Creates a file/directory based on what you specified.
-
Format:
notesCreate loc/PATH name/FILE_NAME type/TYPE pt/PATH_TYPE
| The type can only be file or folder |
3.3.4. Opening a note: notesOpen
-
Opens a file/directory based on what you specified.
-
Format:
notesOpen loc/PATH name/FILE_NAME pt/PATH_TYPE

3.3.5. Deleting a note: notesDelete
-
Delete a file based on what you specified.
-
Format:
notesDelete loc/PATH name/FILE_NAME pt/PATH_TYPE
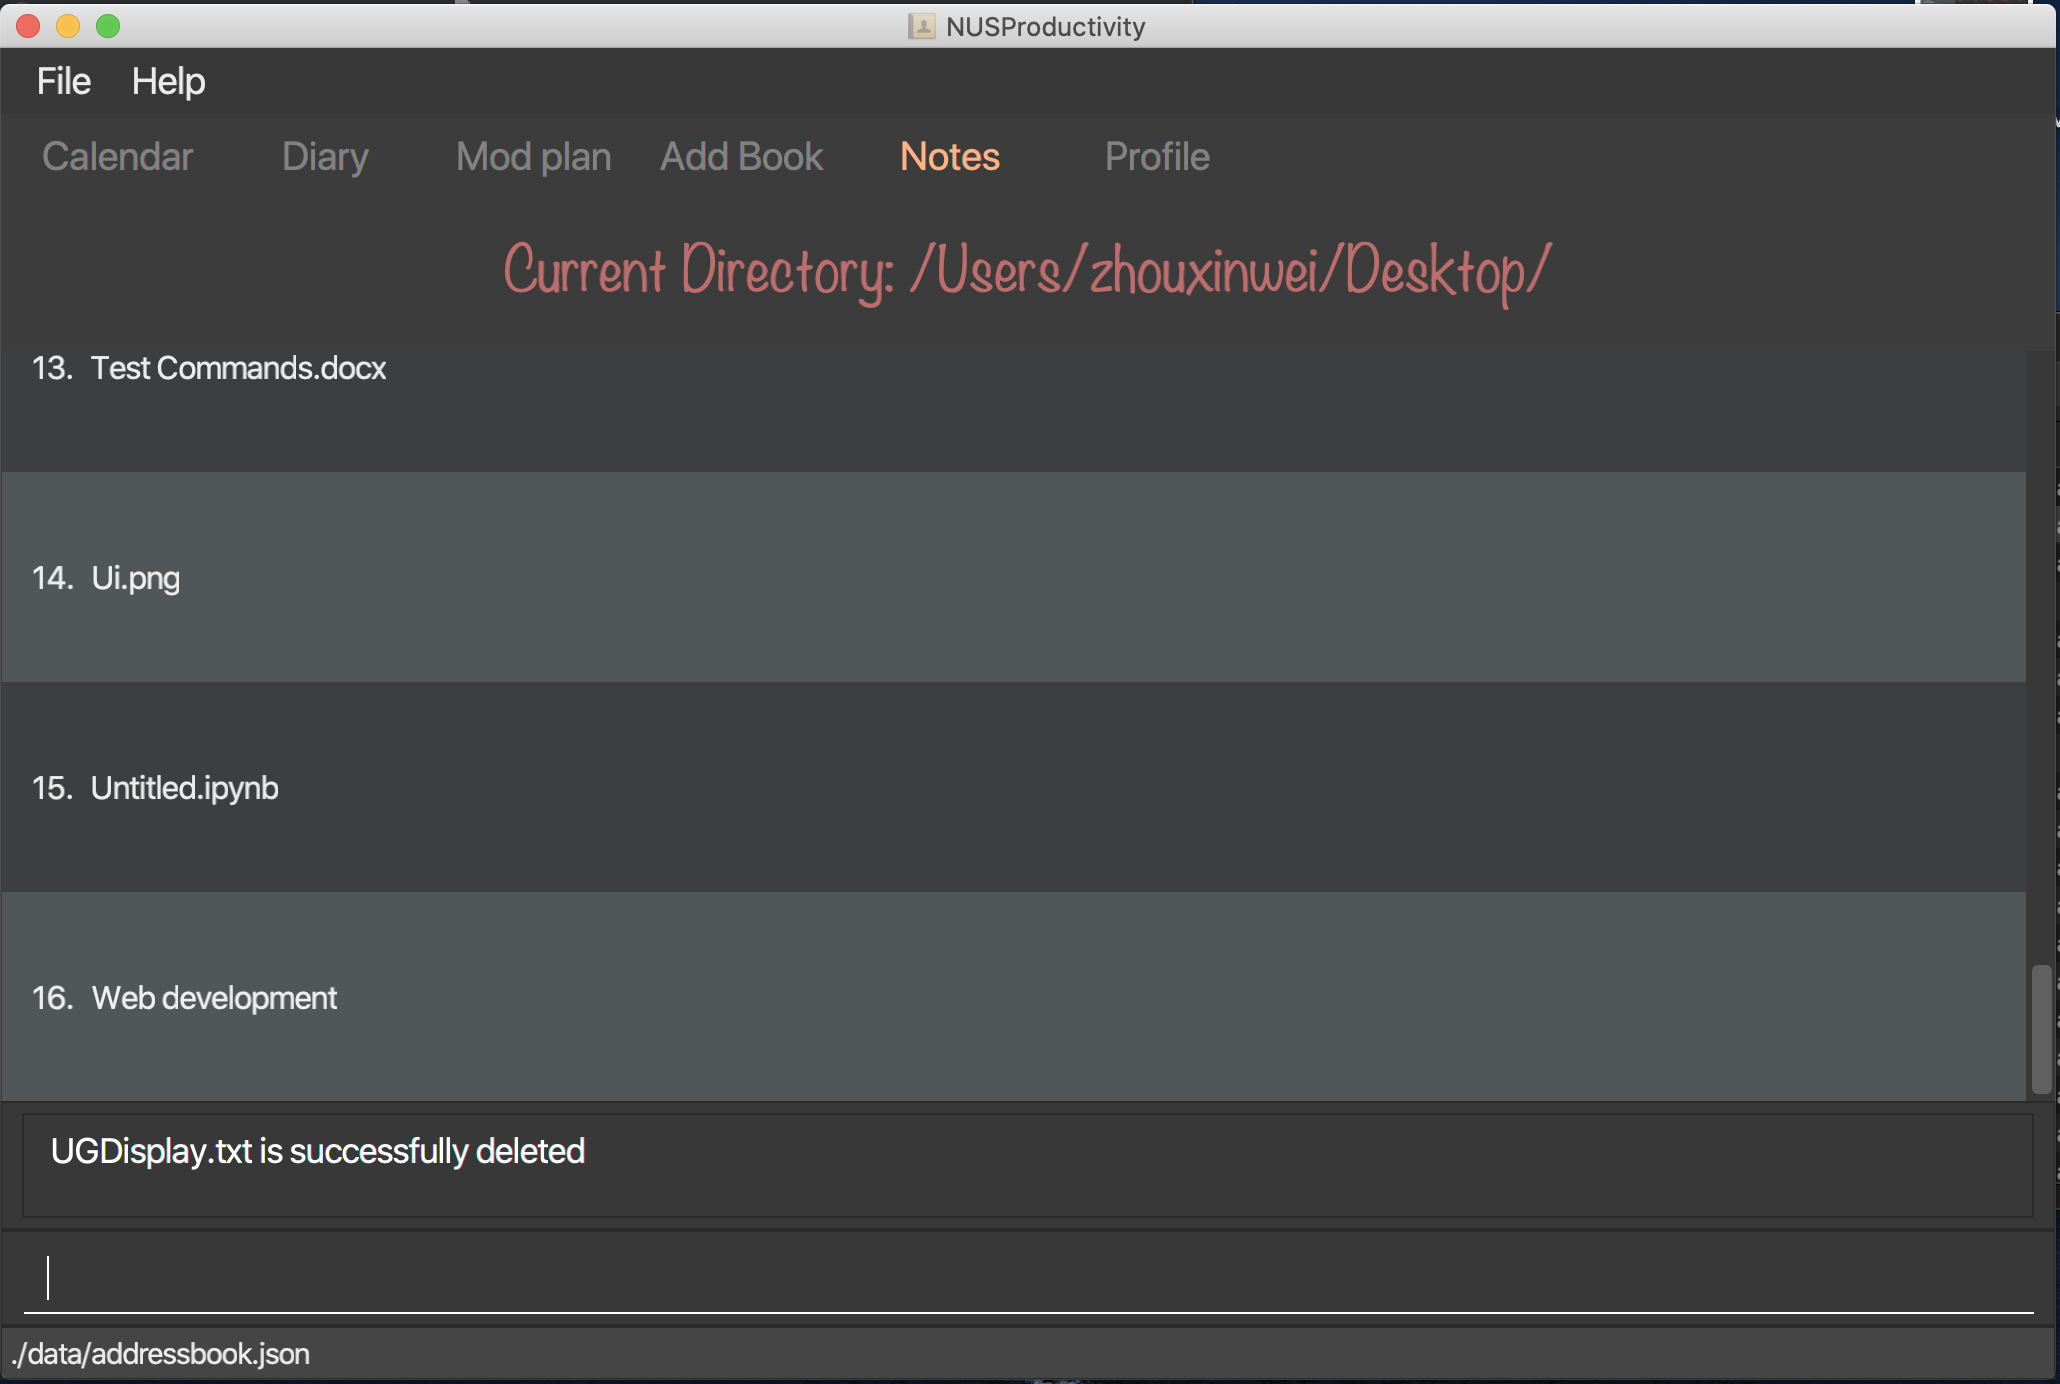
| This can only be use to delete a file and not a folder |
3.4. Address Book
The address book allows you to add other individuals, such as professors and fellow classmates to your addressbook. Information such as phone number and email of the person will be saved into the address book for easier communication for projects or to schedule consultation relating to the module.
3.4.1. Adding a person: add
-
Adds a person to the address book.
-
Format:
add n/NAME p/PHONE_NUMBER e/EMAIL [t/TAG]…
| A person can have any number of tags (including 0) |
-
Examples:
-
add n/John Doe p/98765432 e/johnd@example.com -
add n/Betsy Crowe t/friend e/betsycrowe@example.com p/1234567 t/criminal
-
3.4.2. Listing all persons : list
-
Shows a list of all persons in the address book.
-
Format:
list
3.4.3. Editing a person : edit
-
Edits an existing person in the address book.
-
Format:
contactEdit INDEX [n/NAME] [p/PHONE] [e/EMAIL] [t/TAG]…
-
Examples:
-
edit 1 p/91234567 e/johndoe@example.com
Edits the phone number and email address of the 1st person to be91234567andjohndoe@example.comrespectively. -
edit 2 n/Betsy Crower t/
Edits the name of the2nd personto beBetsy Crowerand clears all existing tags.
-
3.4.4. Locating persons by name: find
-
Finds persons whose names contain any of the given keywords.
-
Format:
find KEYWORD [MORE_KEYWORDS]
-
Examples:
-
find John
ReturnsjohnandJohn Doe -
find Betsy Tim John
Returns any person having namesBetsy,Tim, orJohn
-
3.4.5. Deleting a person : delete
-
Deletes the specified person from the address book.
-
Format:
delete INDEX
-
Examples:
-
list
delete 2
Deletes the 2nd person in the address book. -
find Betsy
delete 1
Deletes the 1st person in the results of the find command.
-
3.4.6. Clearing all entries : clear
-
Clears all entries from the address book.
-
Format:
clear
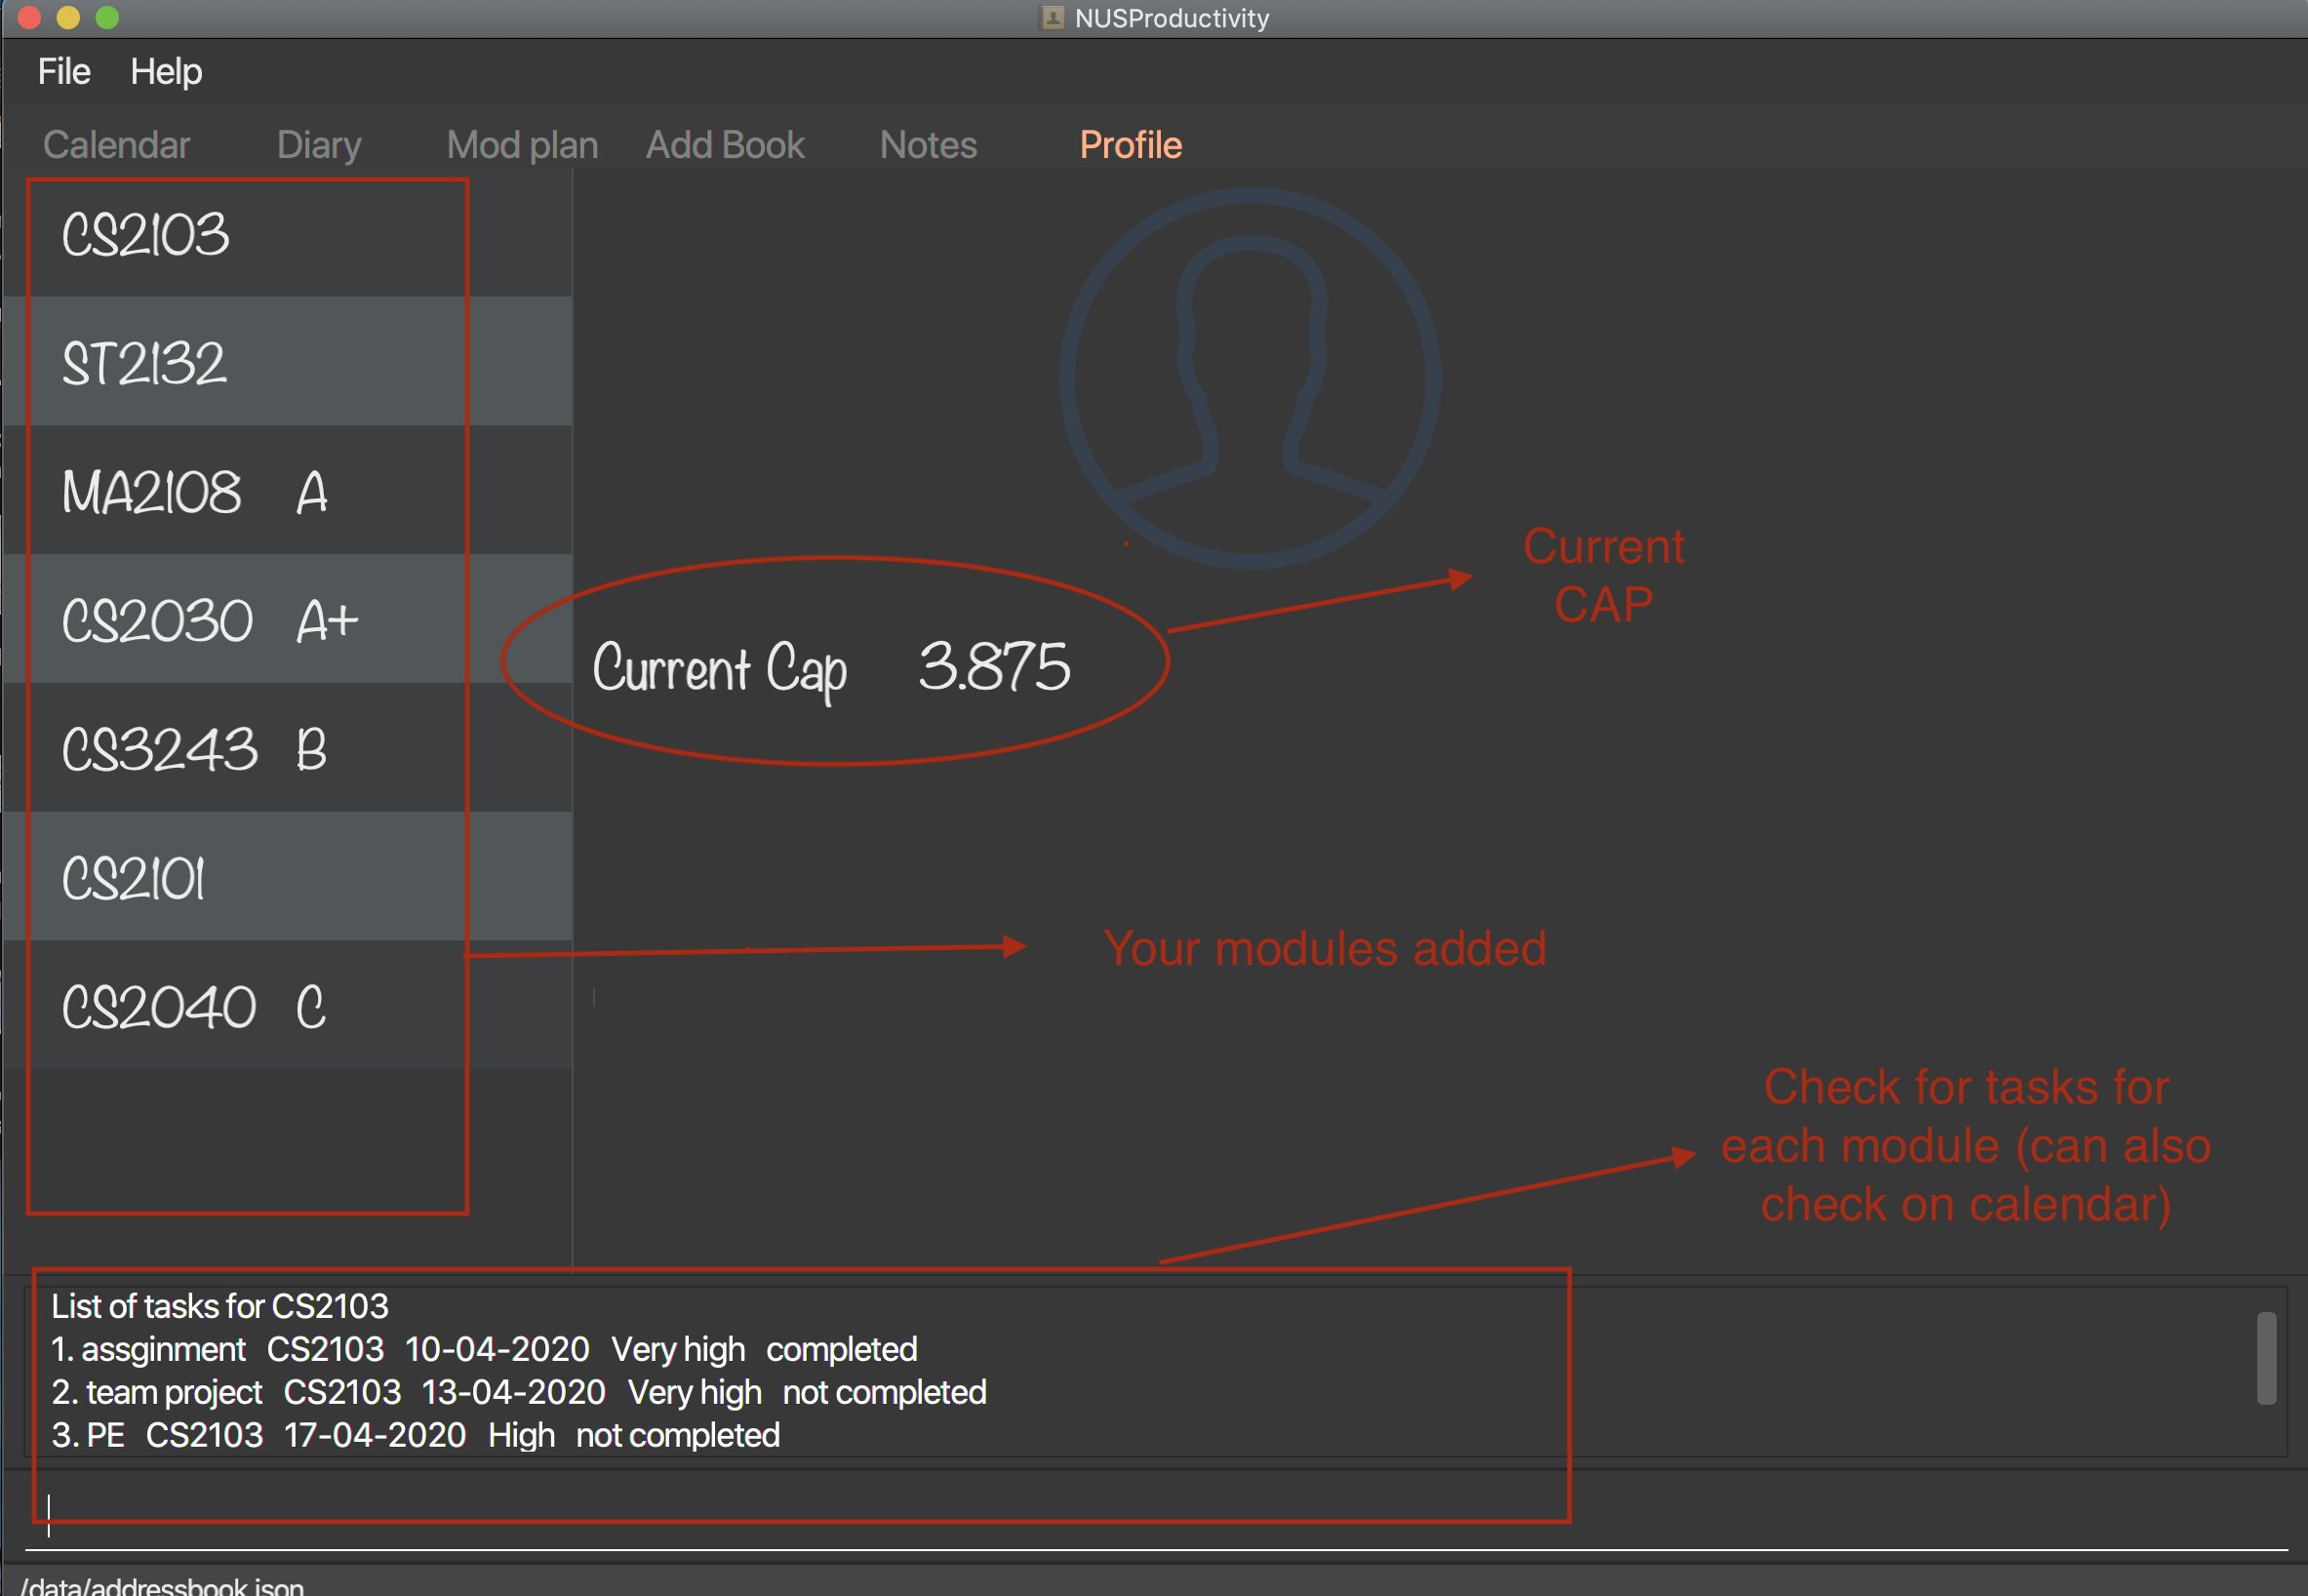
3.5. Profile / Module Book (Part 1: Manage your modules)
-
This feature allows individuals to see their own profile, their current cap and the all modules that the individual have taken and all the grades gotten.
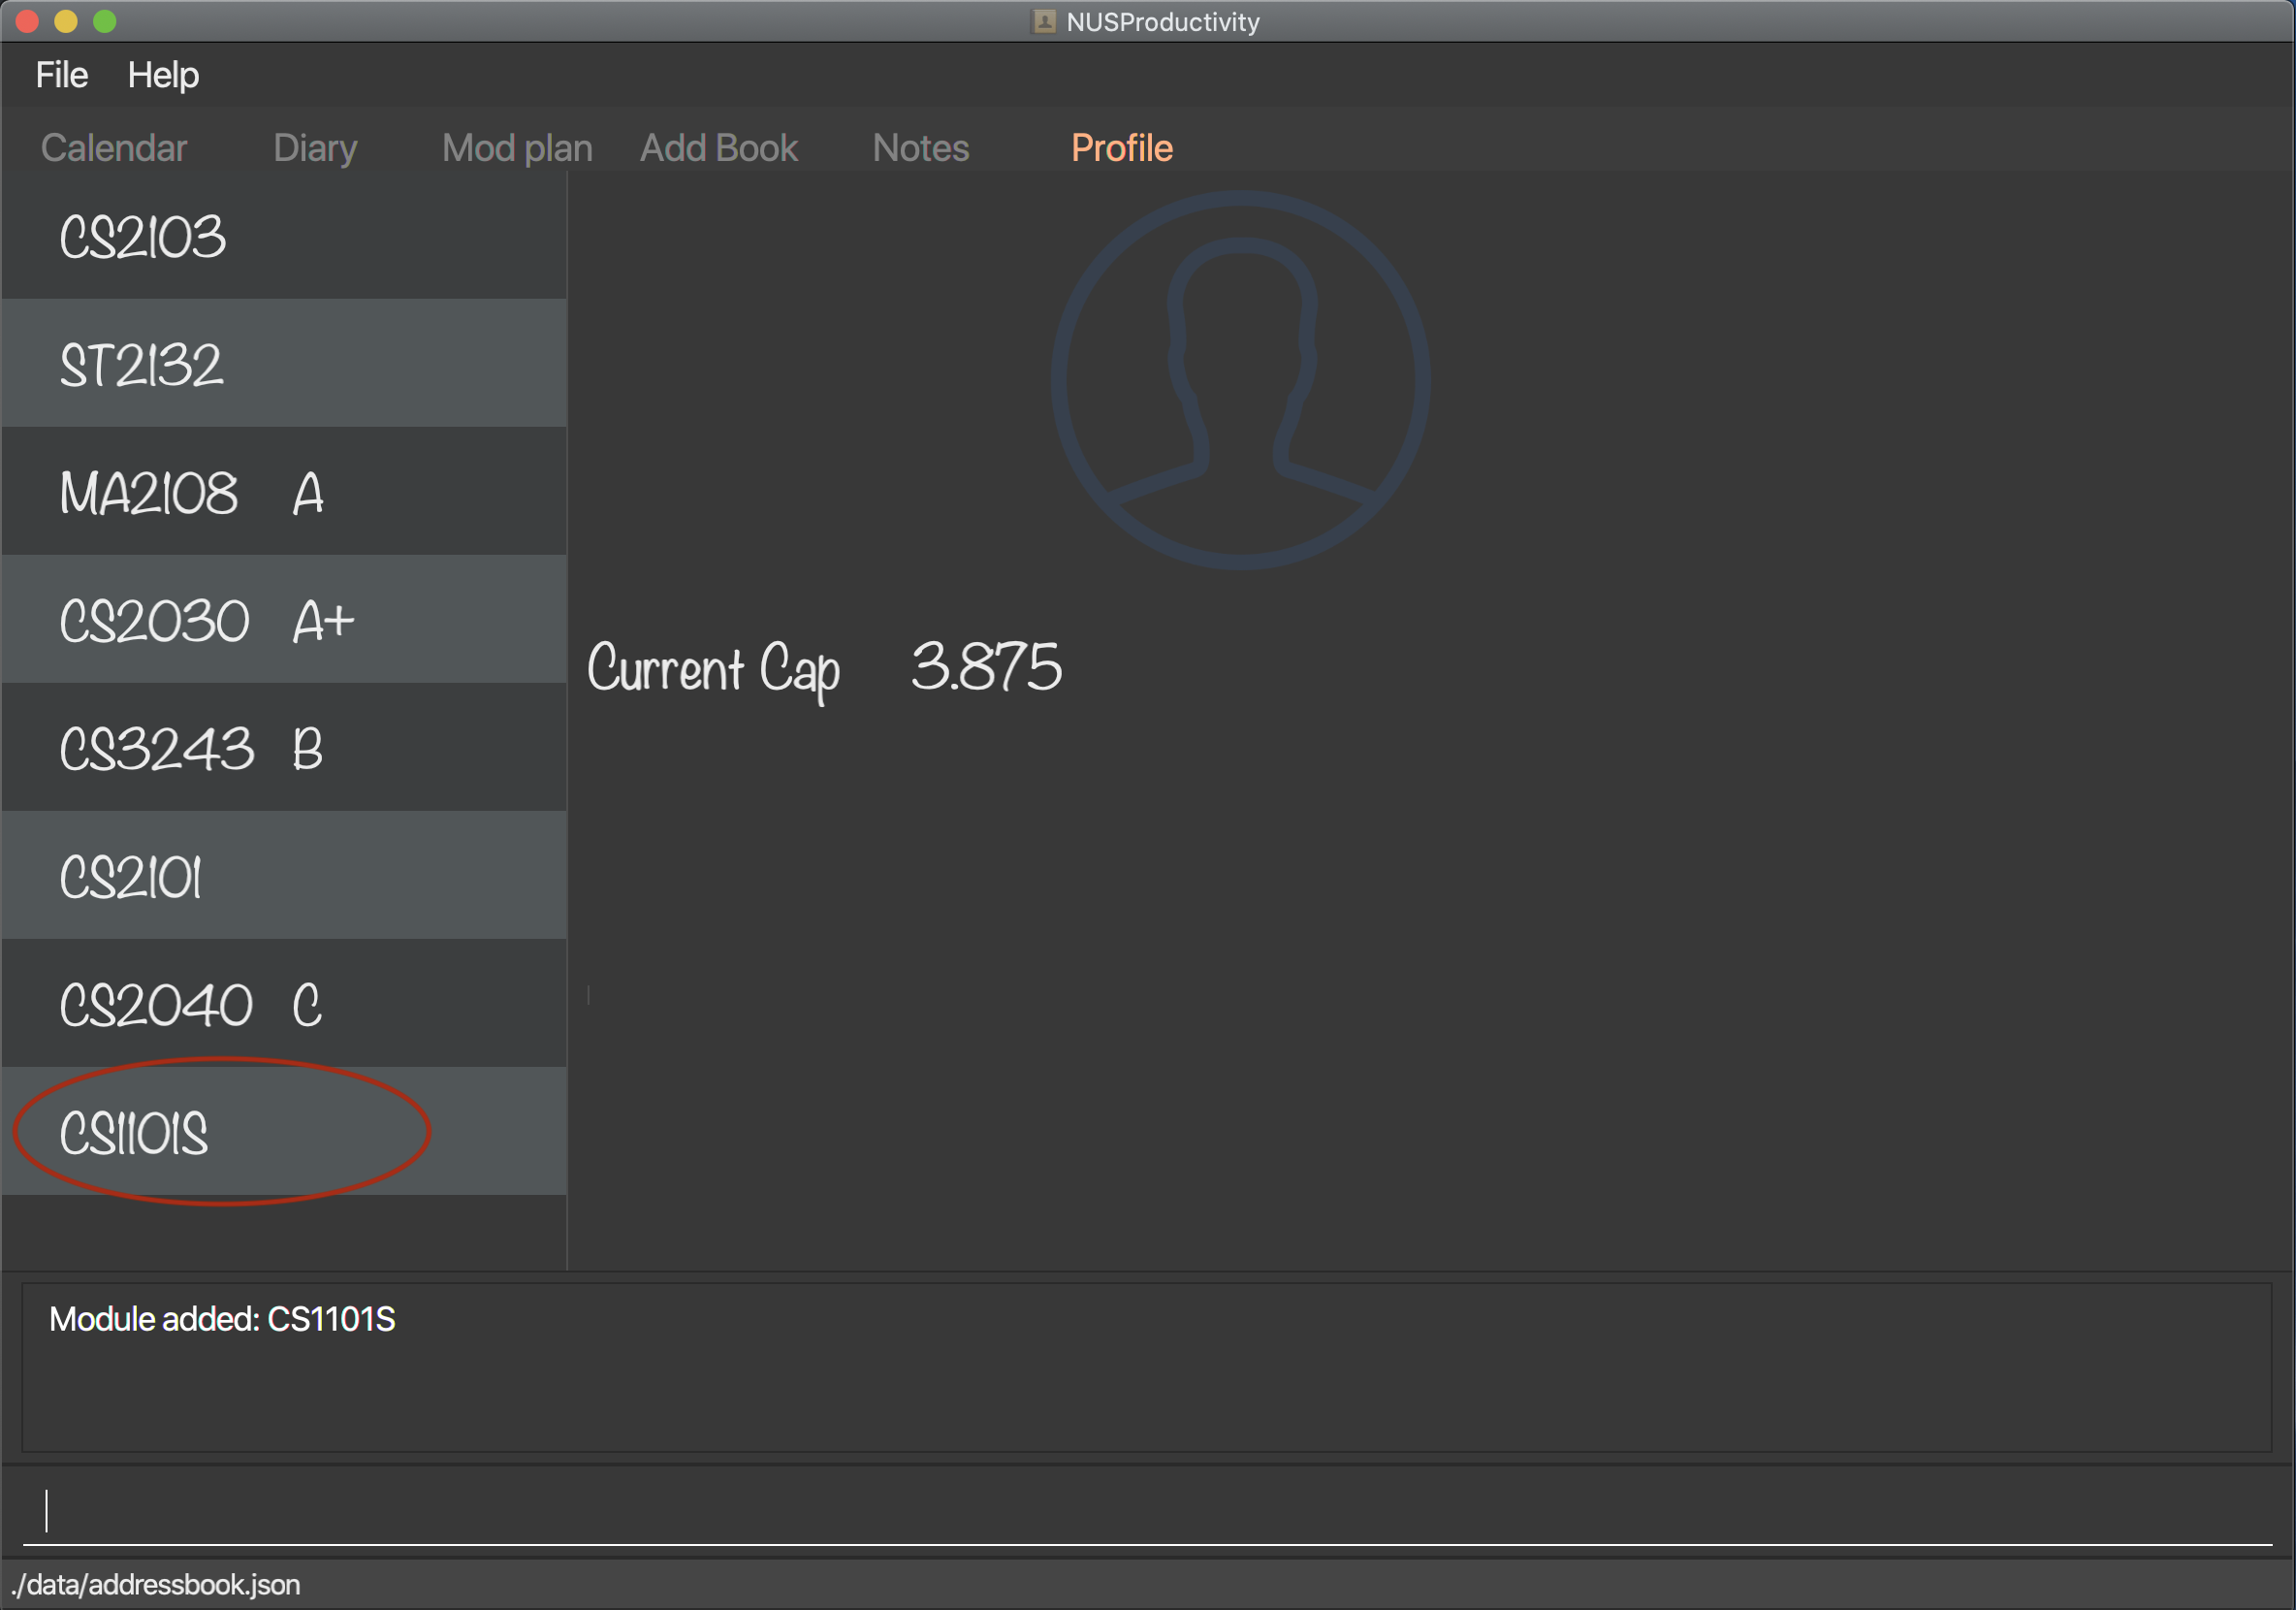
3.5.1. Adding a module : moduleAdd
-
Adds a module you have taken before or is taking now and store your grade for each module if you want.
-
Format:
moduleAdd m/MODULE_CODE [g/GRADE]
| The grade field is optional. You can state your grade when you add in modules and also can update or add in your grade later. |
| The program checks whether a module code provided is valid or not by using the search function in module planning feature, which fetch information about modules online. If the search function fails to fetch any information, the module code will be treated as invalid. |
-
Example:
-
moduleAdd m/CS2103 -
moduleAdd m/cs1101s g/A
-
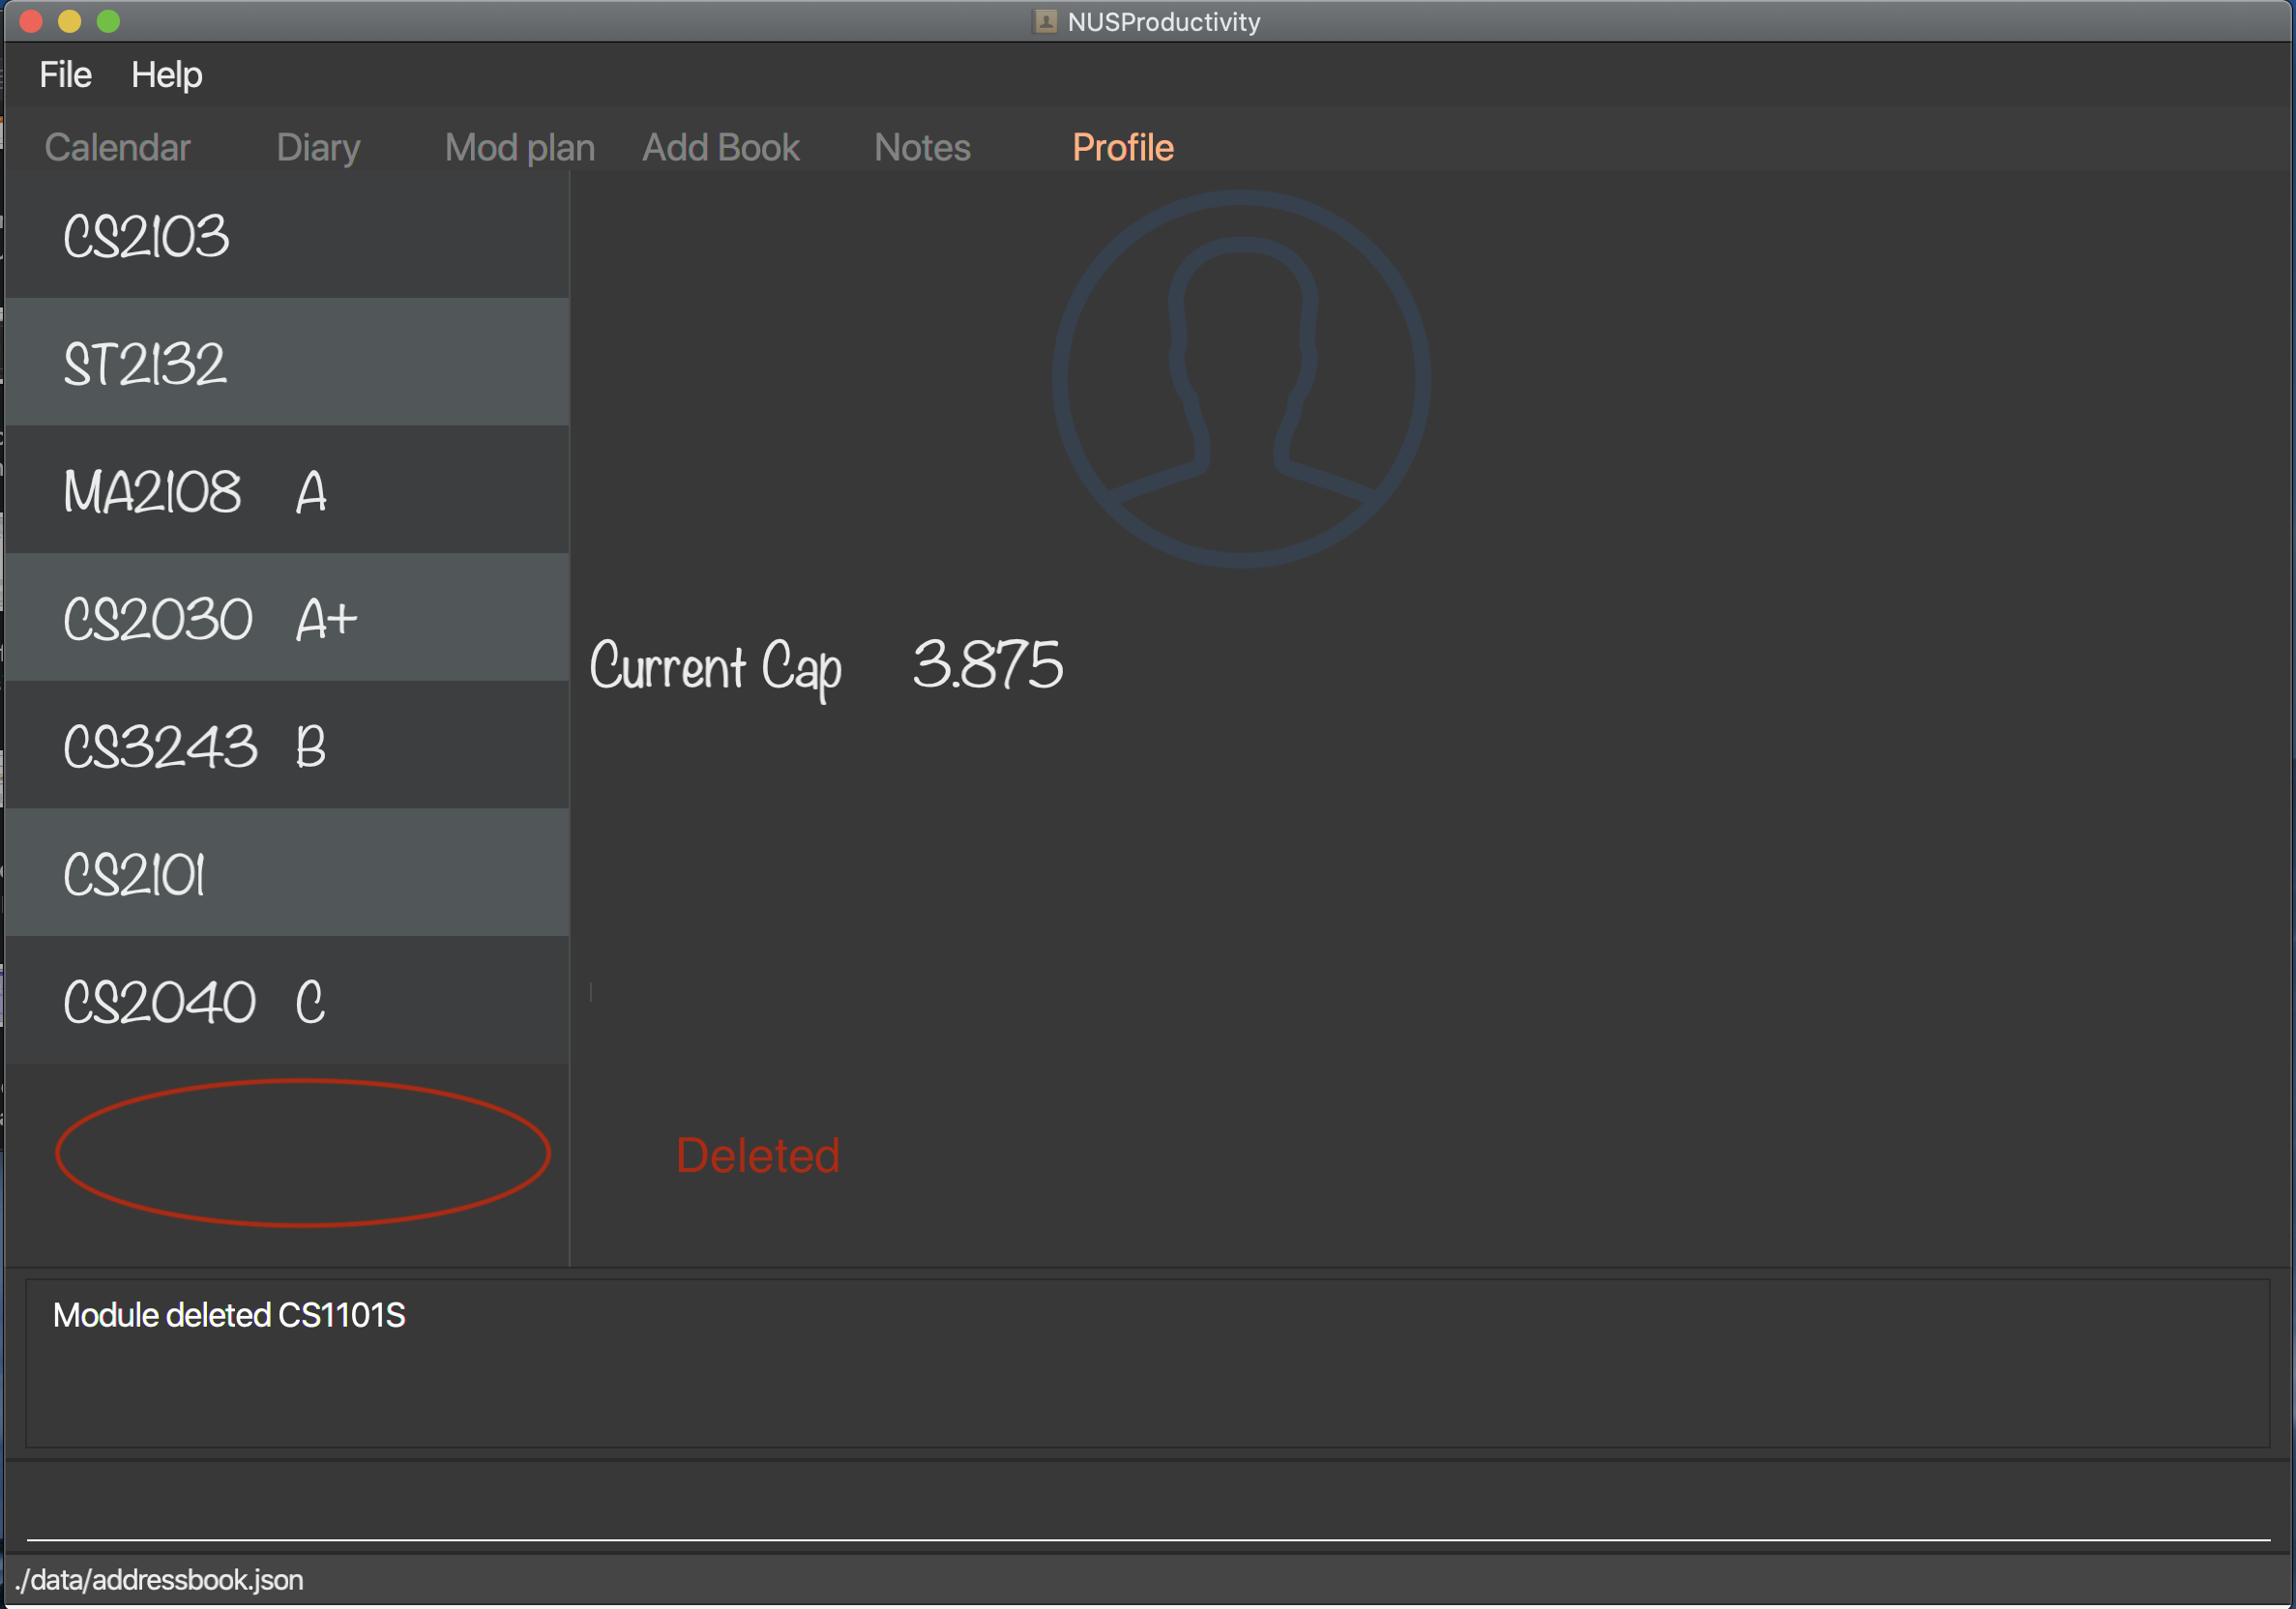
3.5.2. Deleting a module : moduleDel
-
Deletes a module you have added to the program before from the profile tab.
-
Format:
moduleDel MODULE_CODE
-
Example:
-
moduleDel CS2103
Delete CS2103 from module book if you have added it before.
-
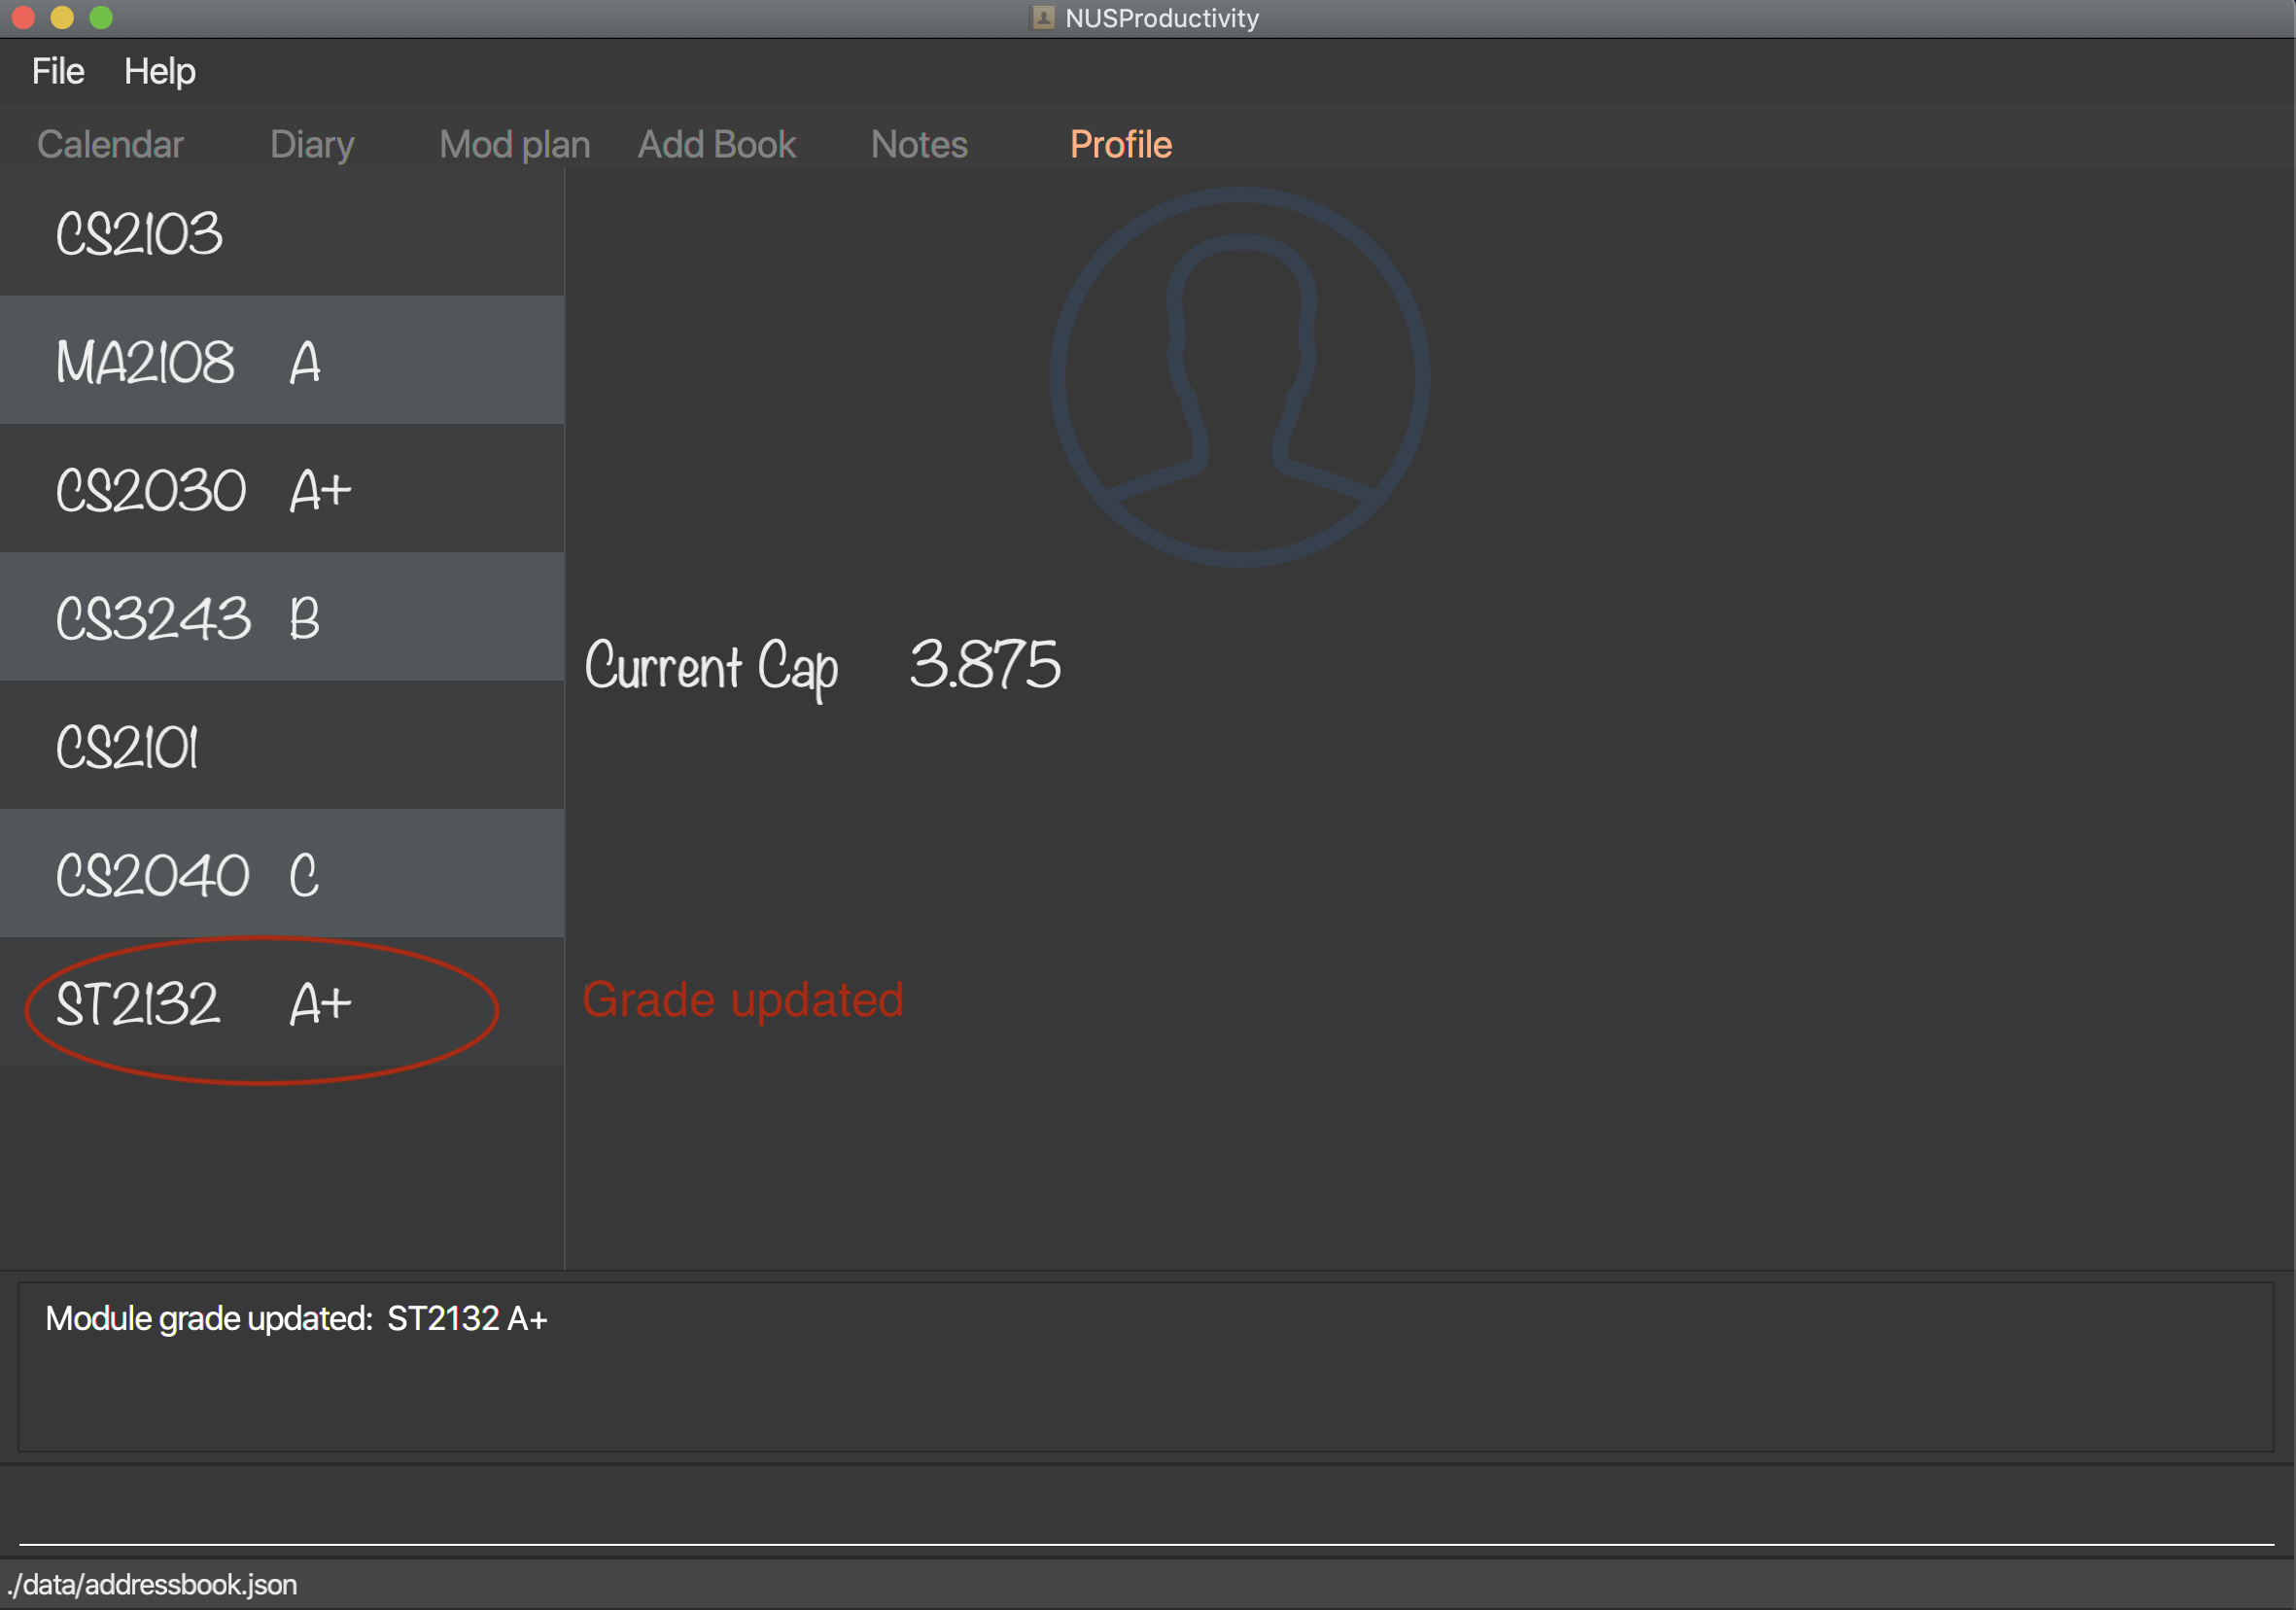
3.5.3. Editing the grade of a module : grade
-
Updates or adds the grade of certain modules you have added to the program.
-
Format:
grade m/MODULE_CODE g/GRADE
| List of all valid grade: A+, A, A-, B+, B, B-, C+, C, D+, D, F, S and U. |
-
Example:
-
grade m/CS1101S g/S -
grade m/CS2103 g/A
-
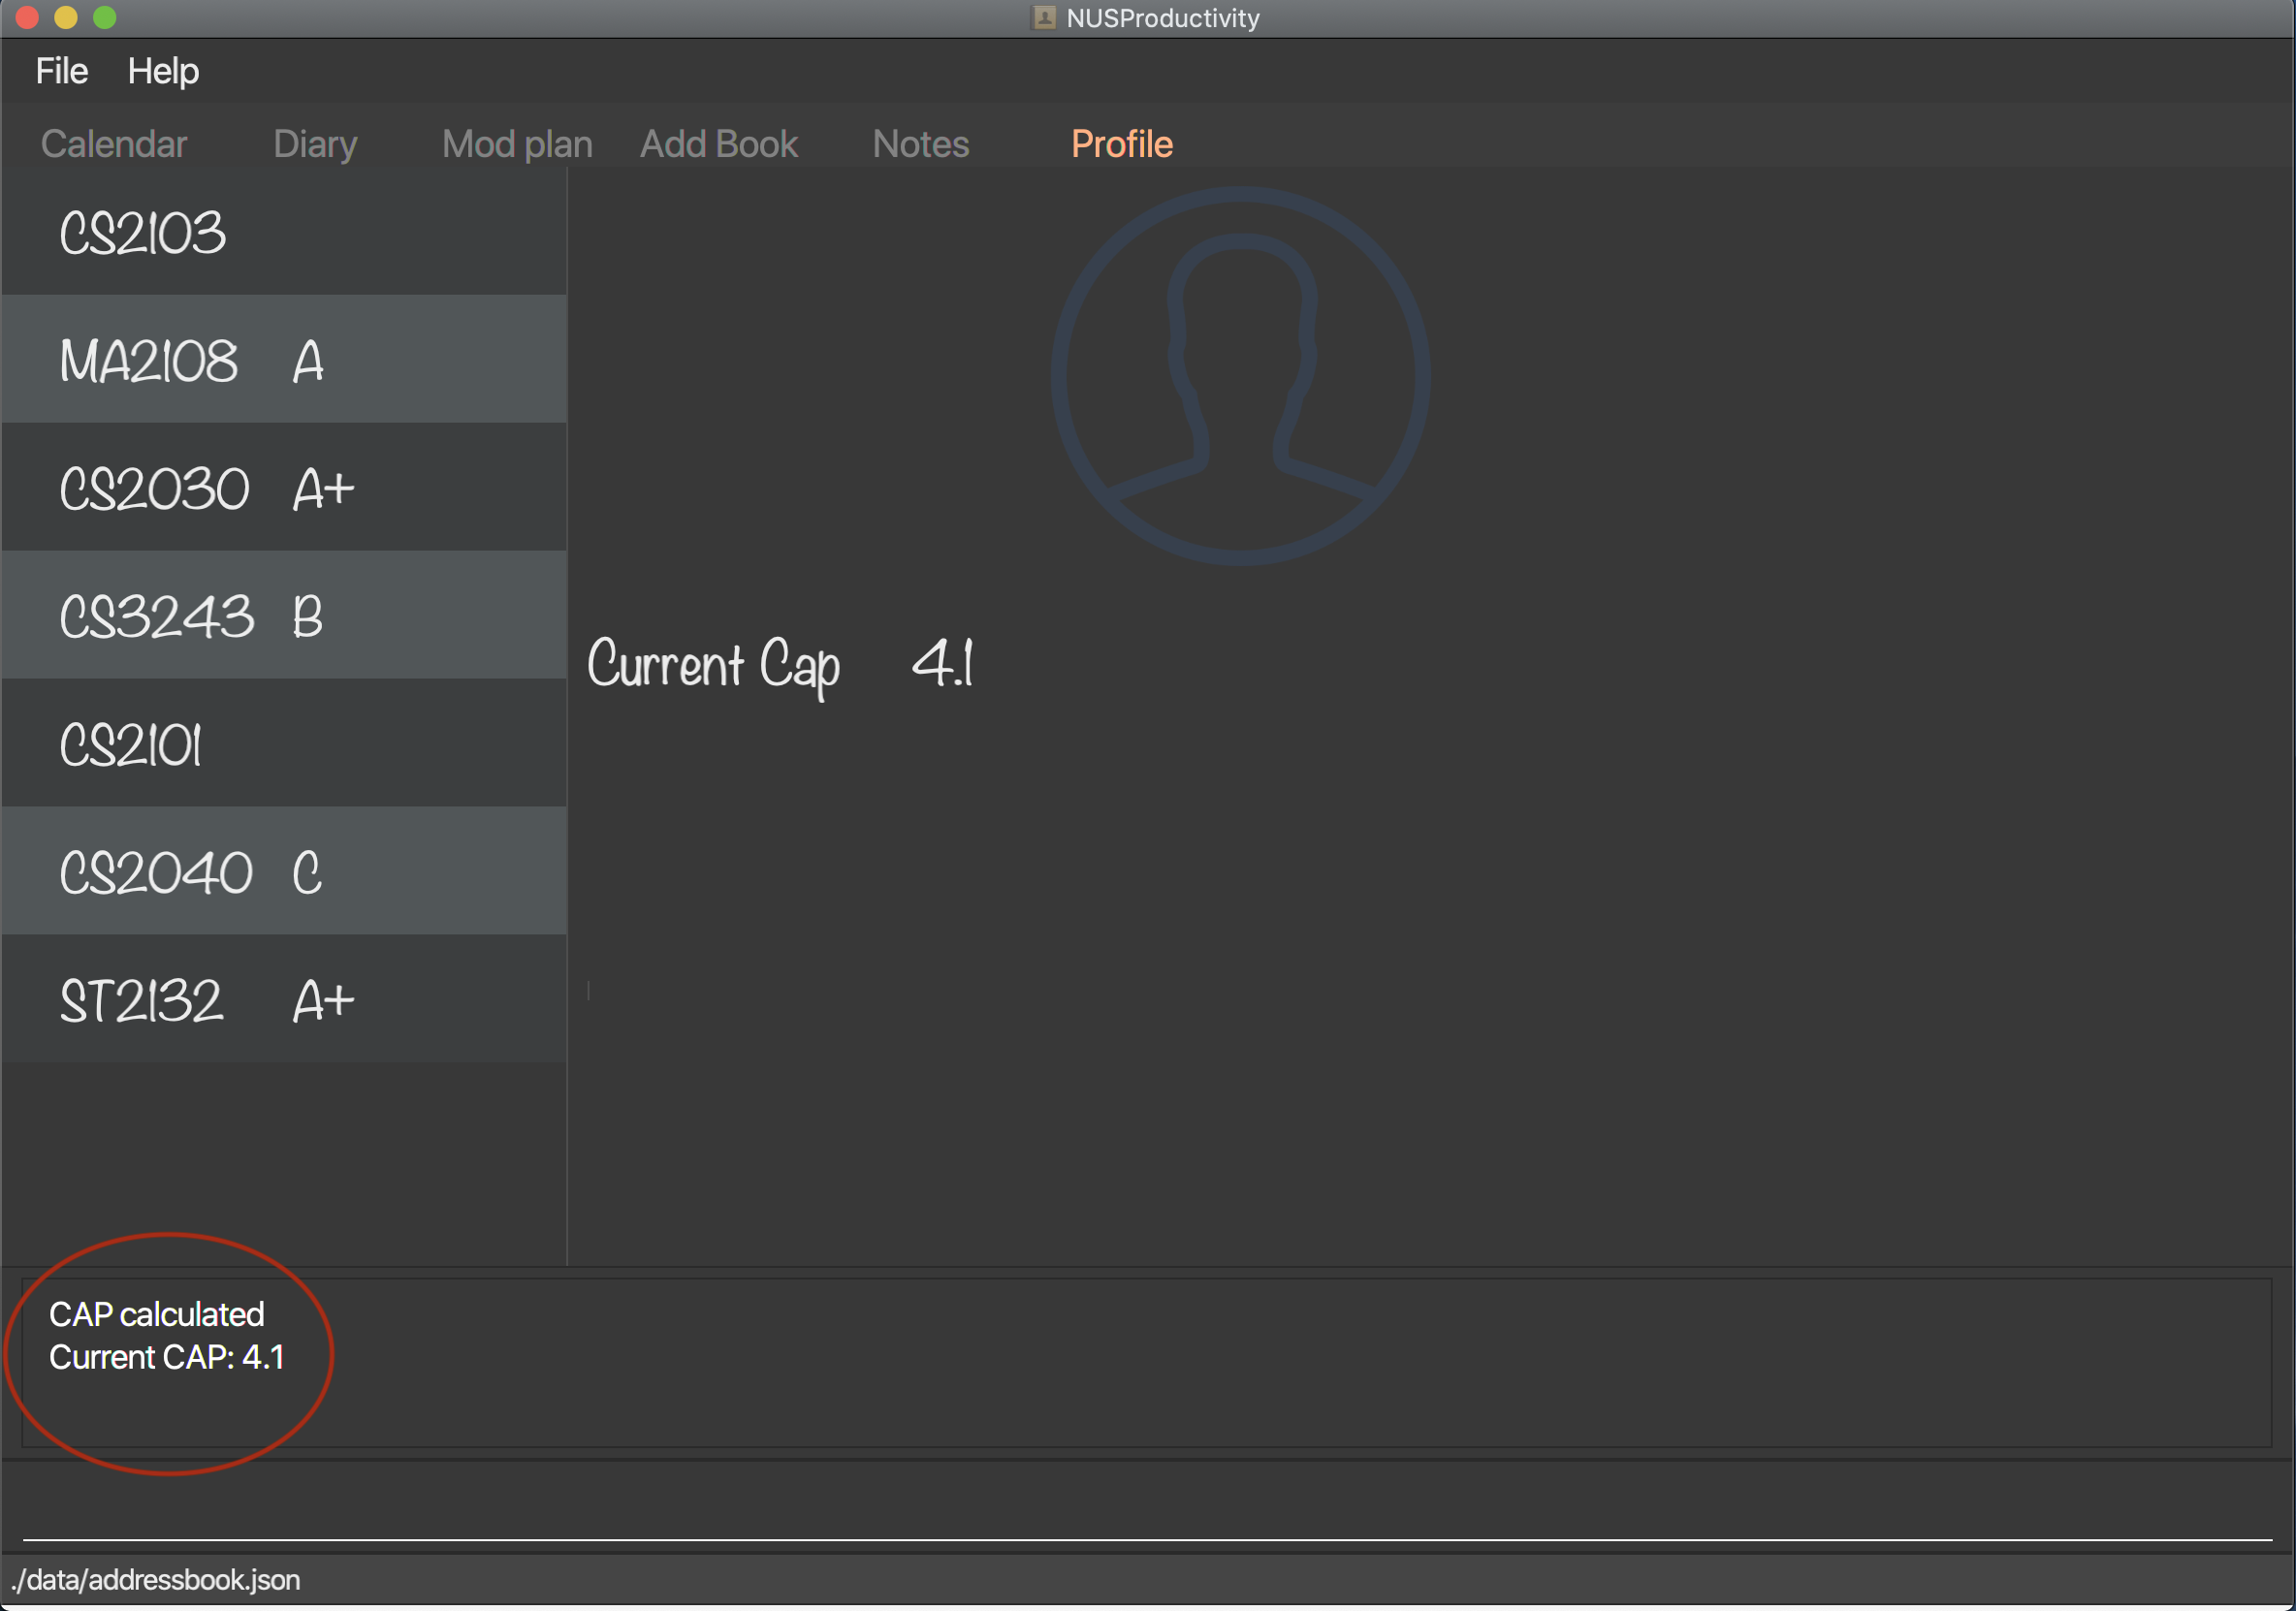
3.5.4. View current CAP : cap
-
Shows your current cap based on the grades of modules you have stated.
-
Format:
cap
| You don’t need to indicate the modular credits for each module when you add it in because the program will fetch that infomation online. |
3.6. Profile / Module Book (Part 2: Manage your tasks separately for each module)
Most of the functionality here has been integrate into the Calendar feature but these commands left here still can be used. You can give it a try if you want.
| These tasks related to certain module are called 'module task' from now on. |
| All commands that make changes to the module tasks will be synchronous for both module book and the task list in calendar feature. |
| For this part, the UI hasn’t been implemented yet but you are able to see the updated list of module tasks in command line. |
| Most functionality covered in this part can also be achieved by some commands in Calendar feature above. Just provides users with an alternative way. (The orders of tasks shown are different. Thus, the index inputted may be different to achieve the same modification.) |
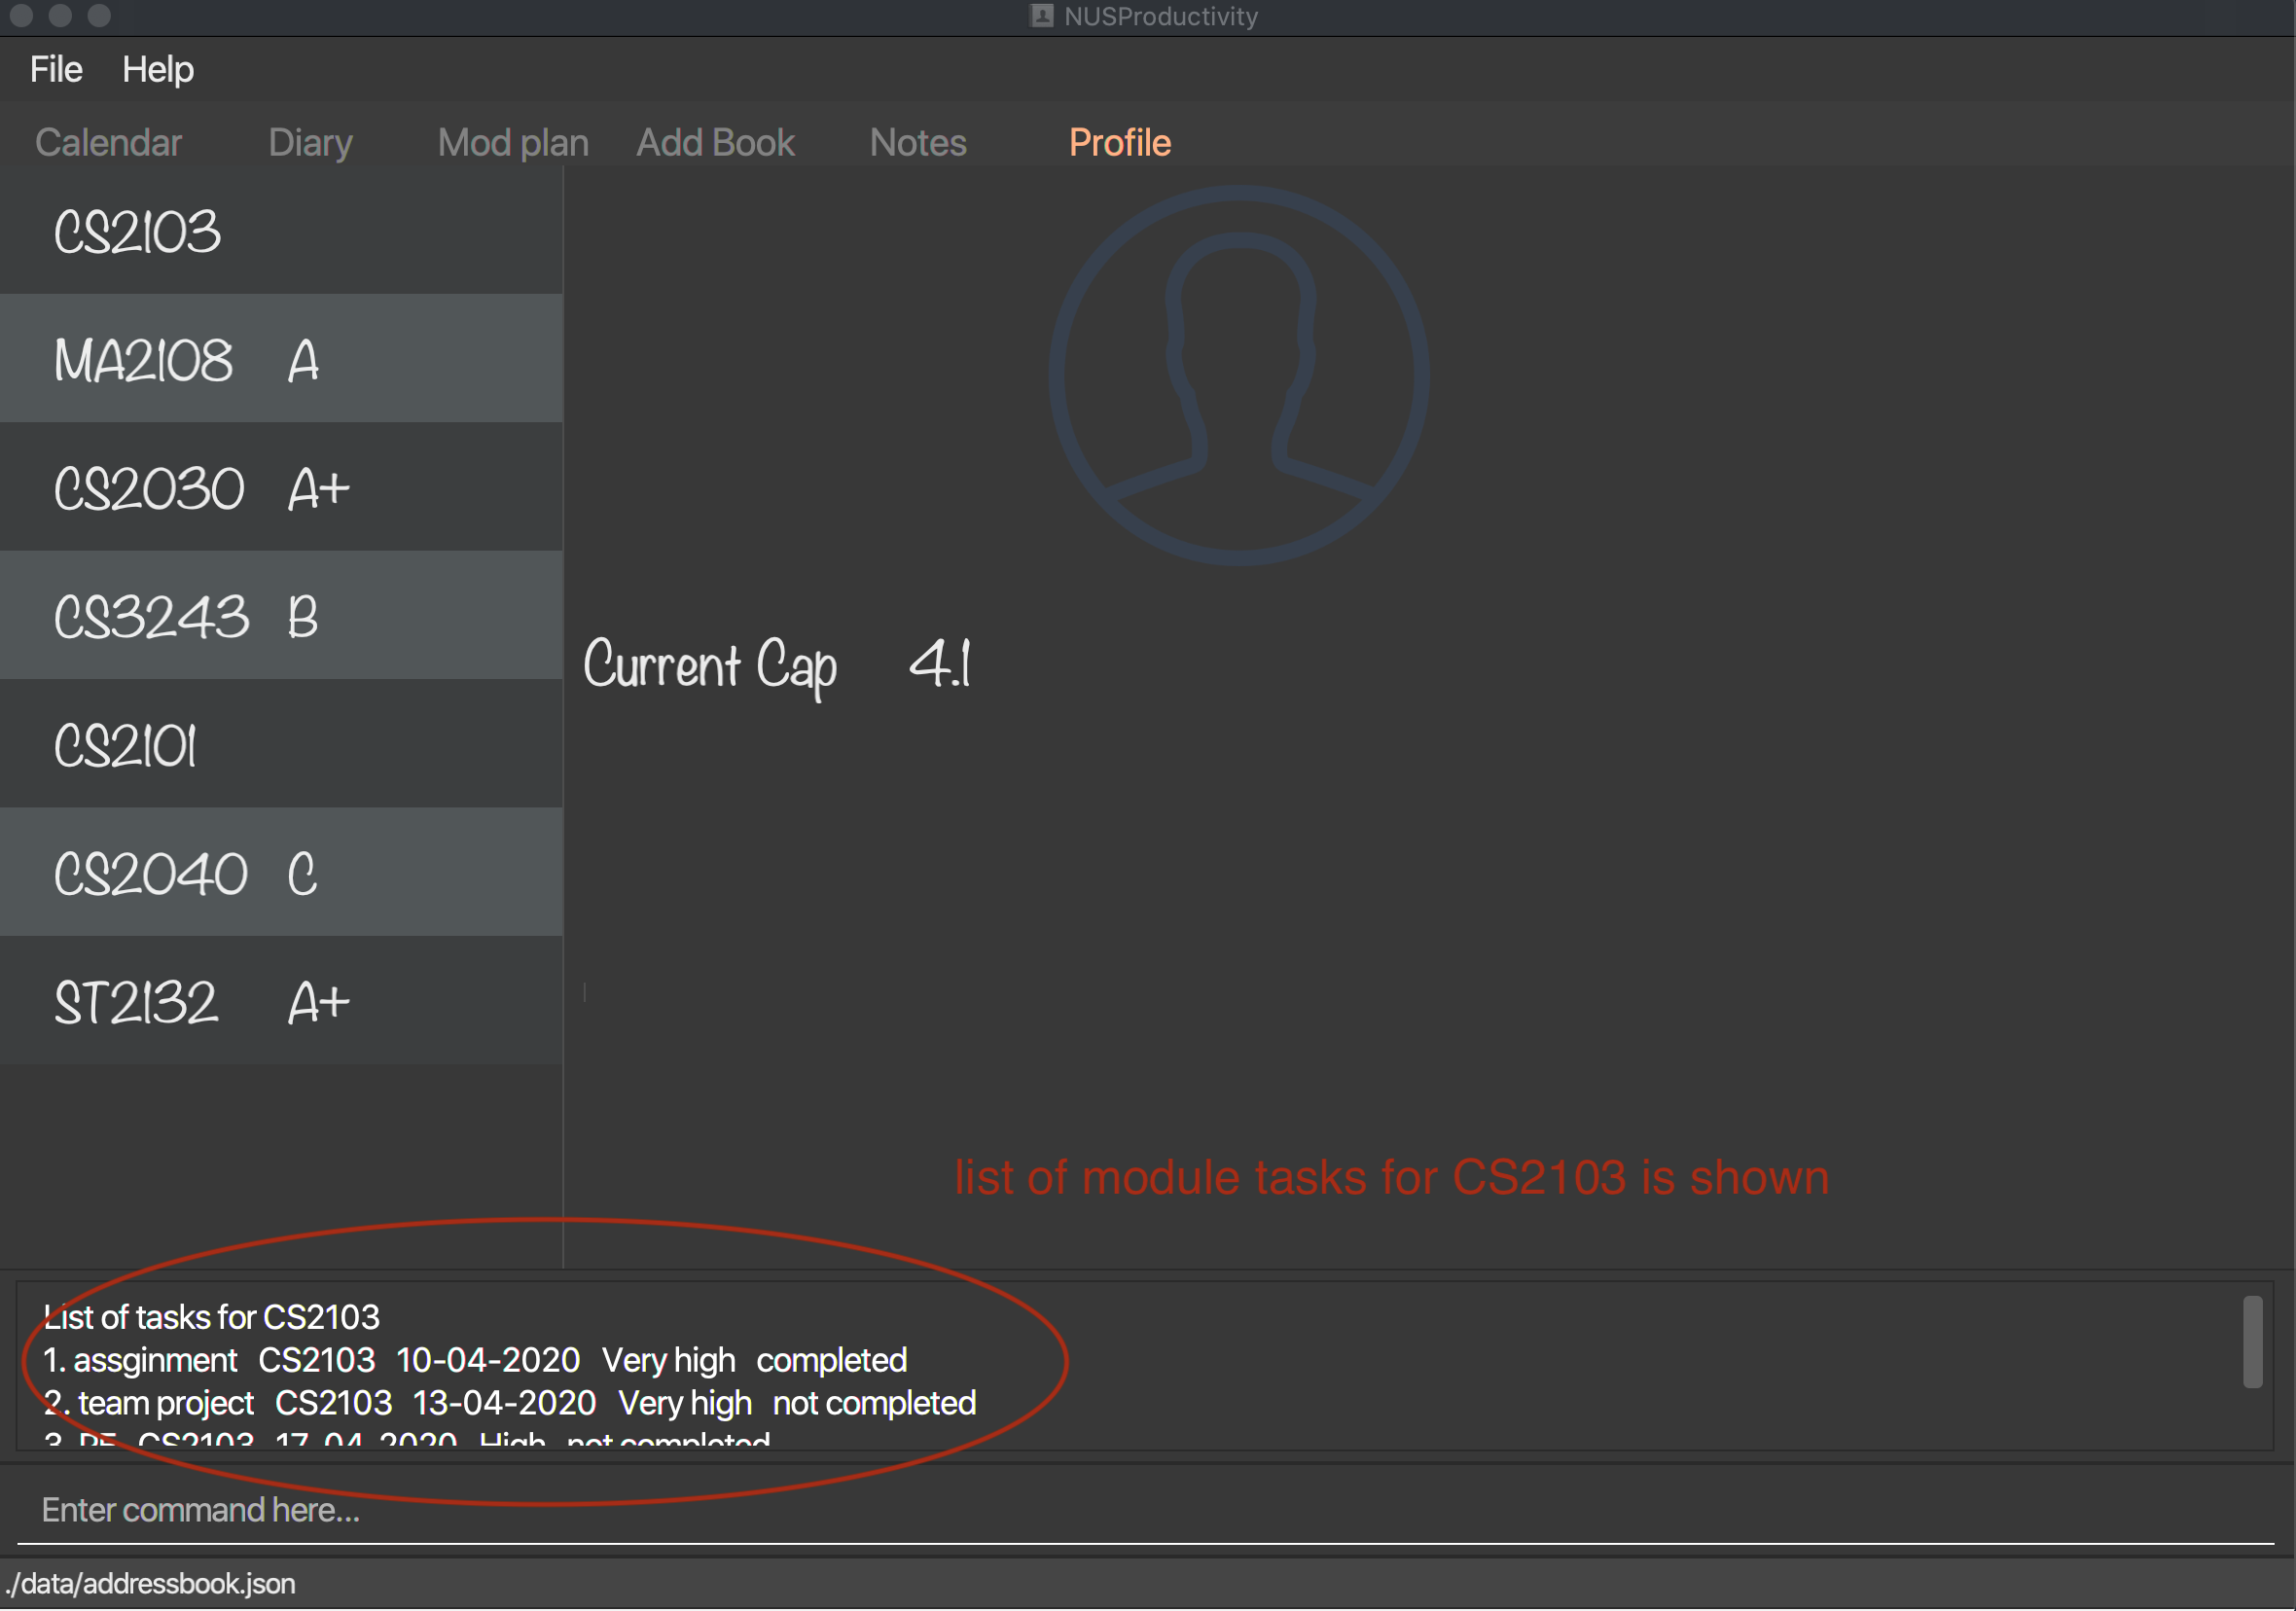
3.6.1. Listing all module tasks of certain module
You can also view module tasks in calendar using findModule m/MODULE_CODE
|
-
Lists all module tasks related to the specific module.
-
Format:
listModuleTasks MODULE_CODE
-
Example:
-
listModuleTasks CS2103
Lists all module tasks of CS2103.
-
3.6.2. Deleting a module task : taskDelete
-
Deletes the specified module tasks for certain module from the module book and calendar.
-
Format:
taskDelete m/MODULE_CODE index/INDEX
This command is similar to the taskDelete command in Calendar feature but you need to specify the module code.
|
| Only refer to the index of tasks shown in command line when performing this command. (not the one in calendar) |
-
Example:
-
taskDelete m/CS2103 index/1
Deletes the first module task for CS2103 in module book and Calendar.
(First task in module book and may not be the first in Calendar even after performingfindTask m/cs2103)
-

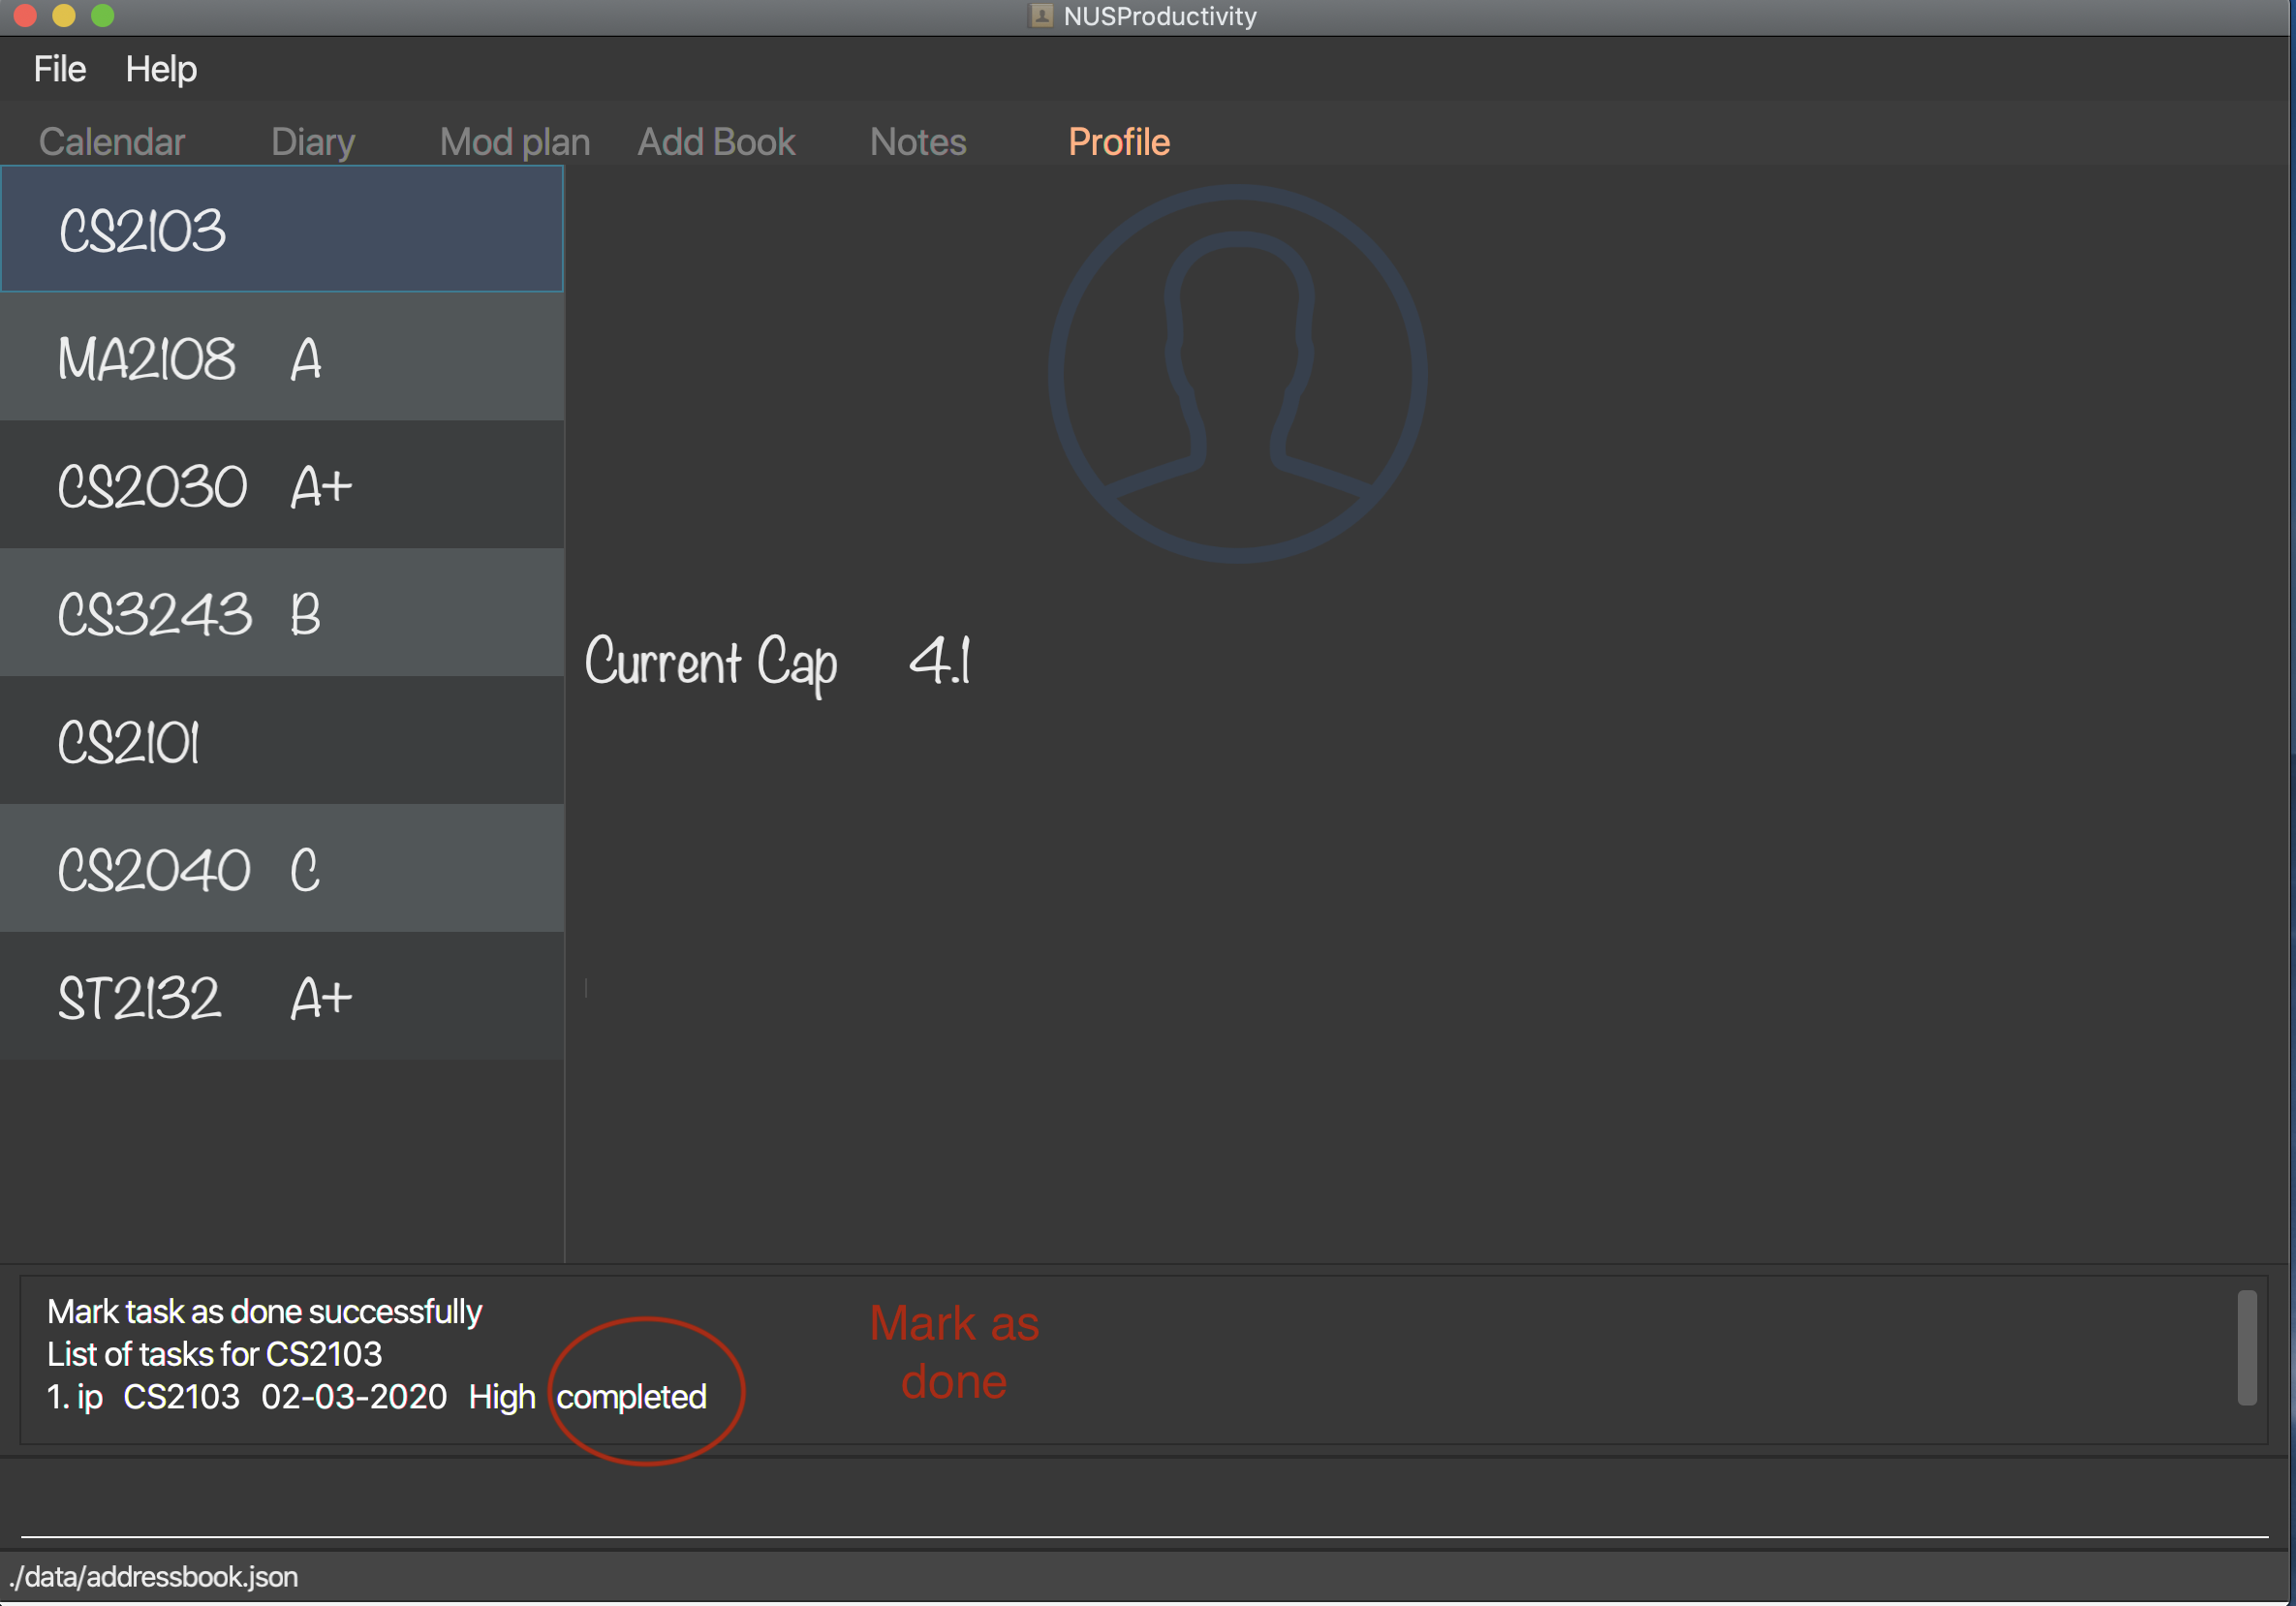
3.6.3. Marking a module task as done : done
-
Marks the specified module tasks for certain module as done in the module book and calendar.
-
Format:
done m/MODULE_CODE index/Index
This command is similar to the done command in Calendar feature but you need to specify the module code.
|
| Only refer to the index of tasks shown in result display panel when performing this command. (not the one in calendar) |
-
Example:
-
done m/cs2103 index/1
Marks the first module task for module cs2103 as done.
-
Clarification for taskDelete and done commands.If you did not provide specific module code in the command, the index required refers to the index of list of tasks shown in calendar tab. Otherwise, it refers to the index of list of module tasks shown in the result display panel. For example: taskDelete m/cs2103 index/1 will delete the first task as shown in Figure 26taskDelete index/1 will delete the first task shown in the task list in calendar tab.
|
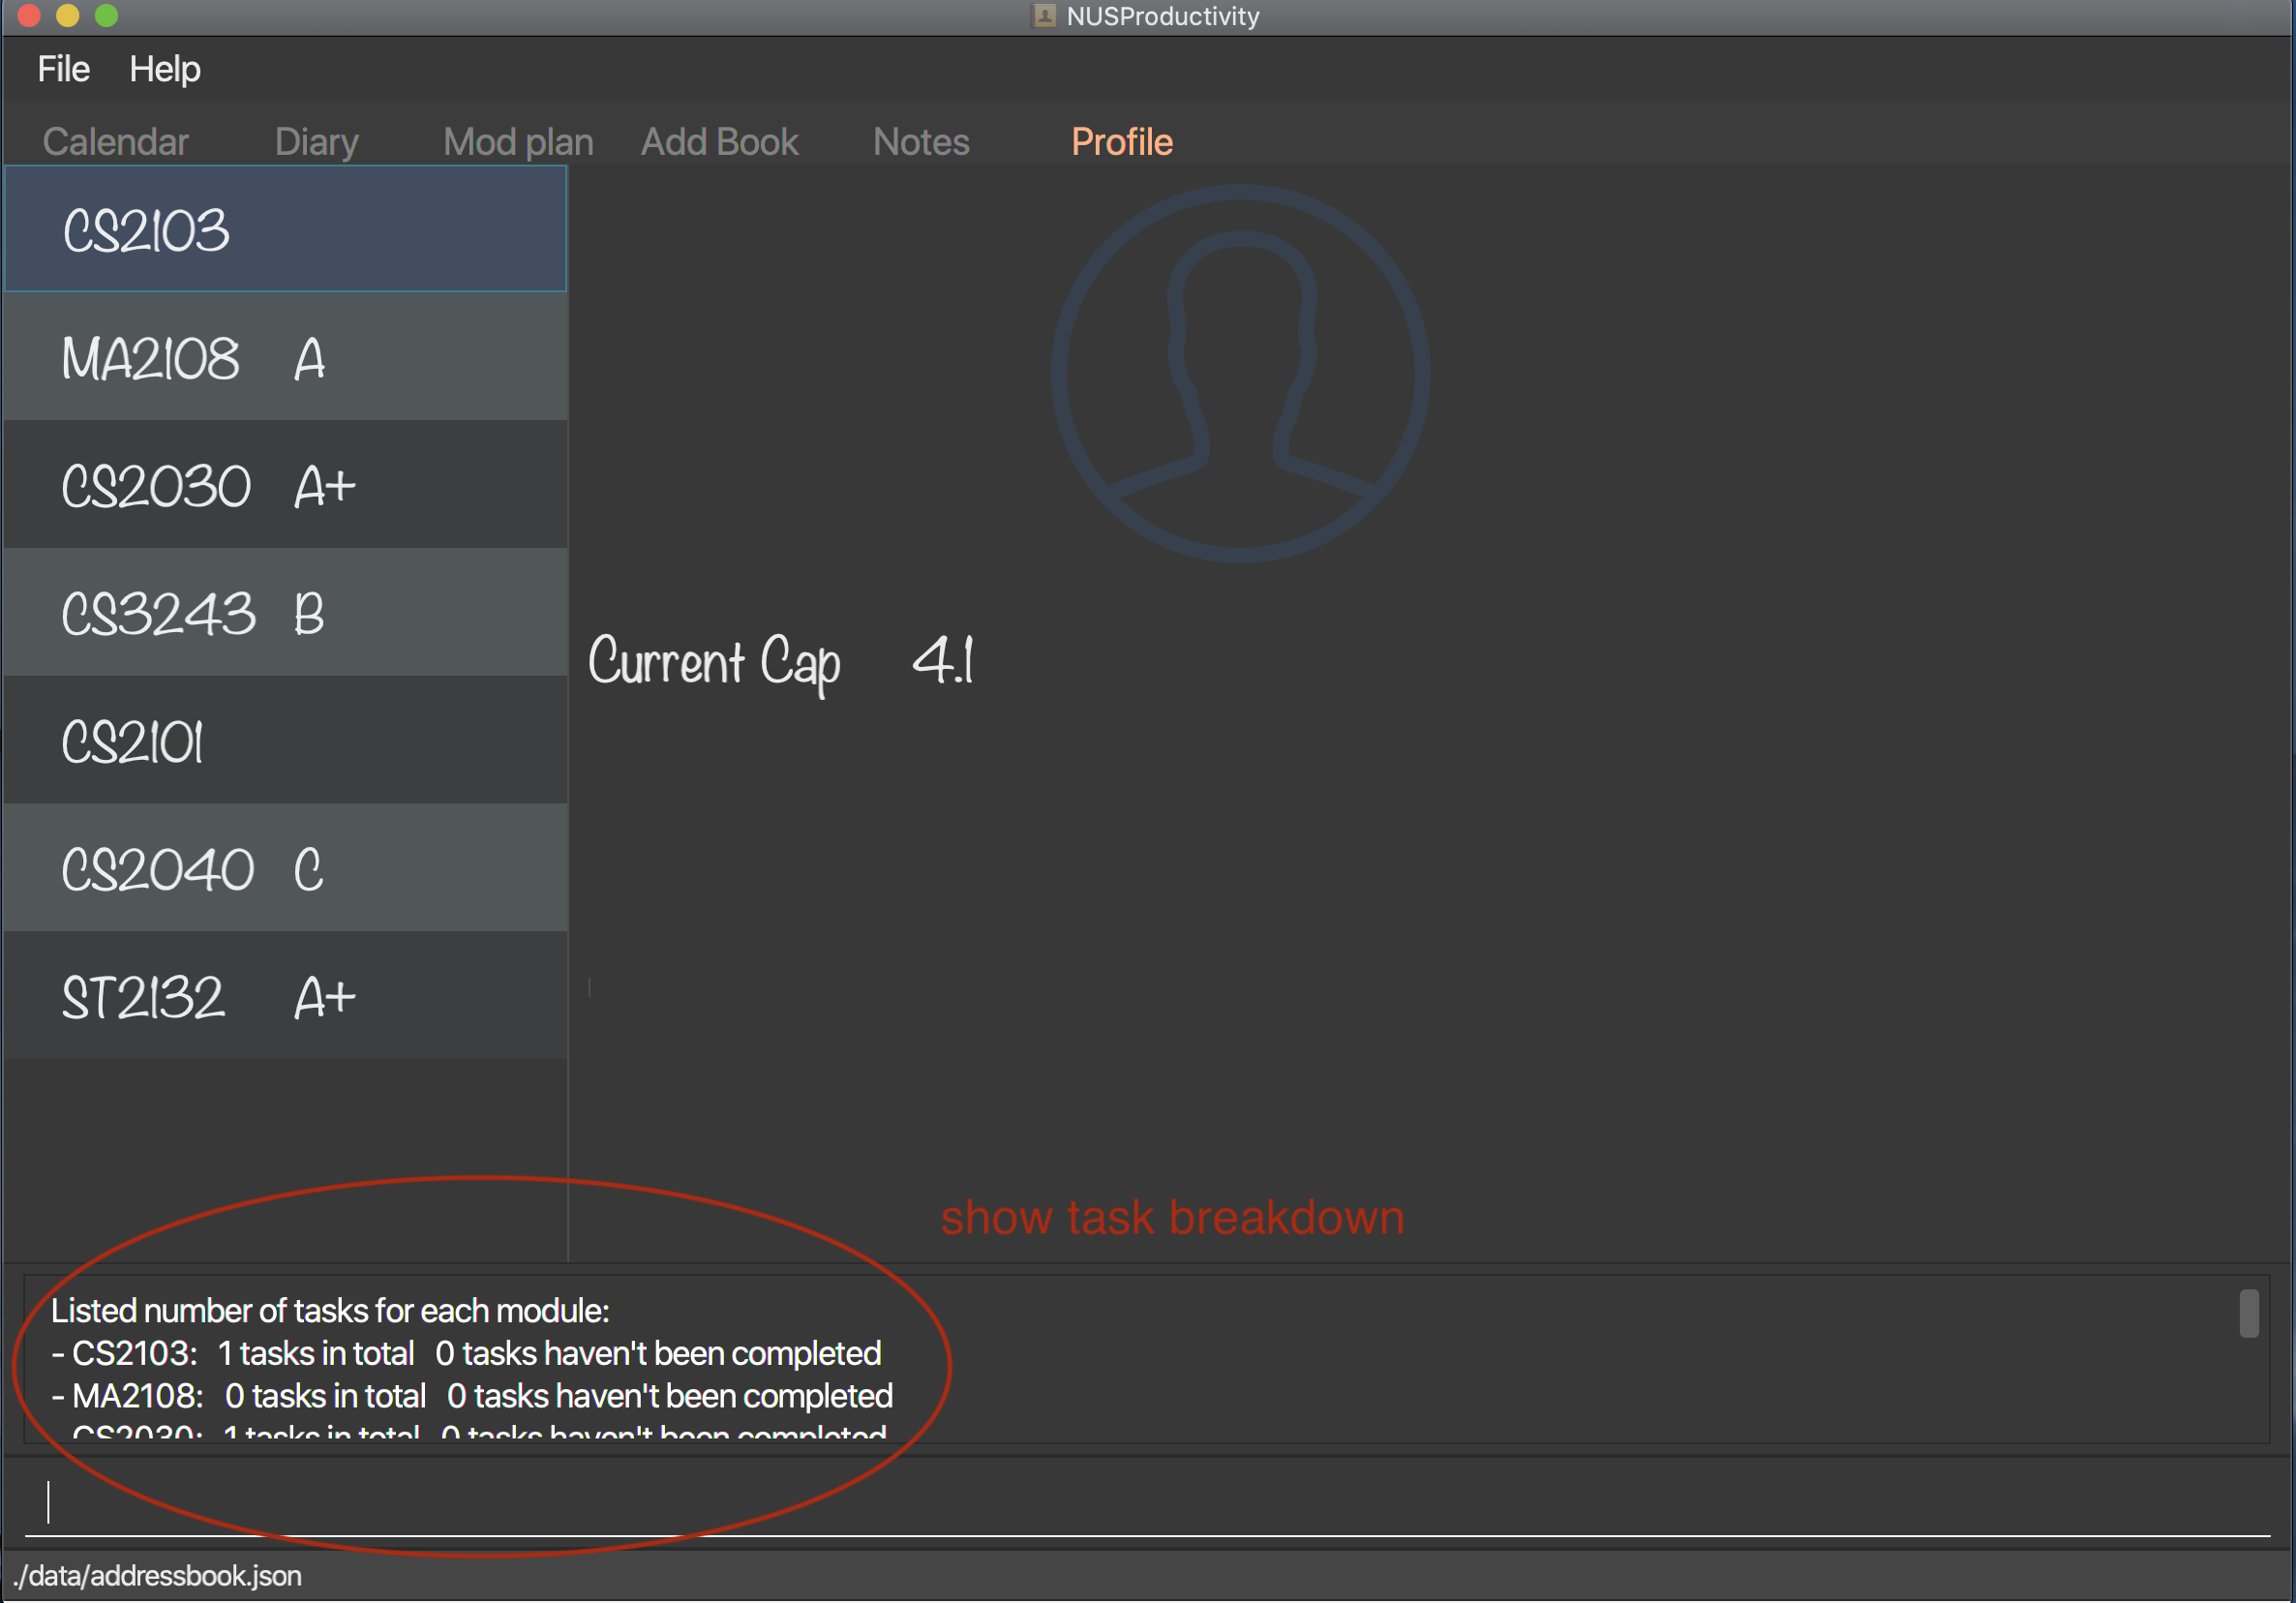
3.6.4. View task breakdown per module : taskBreakdown
-
Shows the how many tasks are there in total and how many tasks haven’t been completed yet for each module.
-
Format:
taskBreakdown
3.7. Module planning
3.7.1. View module requirement: modreq (coming in v2.0)
-
Shows the modules requirement for the major specified. This function will show the core modules that the individual have to take before graduation but have not taken yet.
-
Format:
modreq MAJOR -
Example:
-
modreq computer science
-
3.7.2. Module information: search
-
Shows basic information about the module, such as time of lecture, tutorial, exam venues and professor’s contact associated with the module.
-
Format:
search MODULE_CODE -
Example:
-
search CS2103T
-
3.8. Diary
-
The diary feature is just like a real life diary book. It allows you jot down any thoughts, be it for your personal life or for school work. You can also note down a concept you don’t understand or your reflection for each day in case you want to revisit them in the future. The diary supports adding and deleting a diary entry, display a particular diary entry and tag each entry with your mood or the weather on that day.
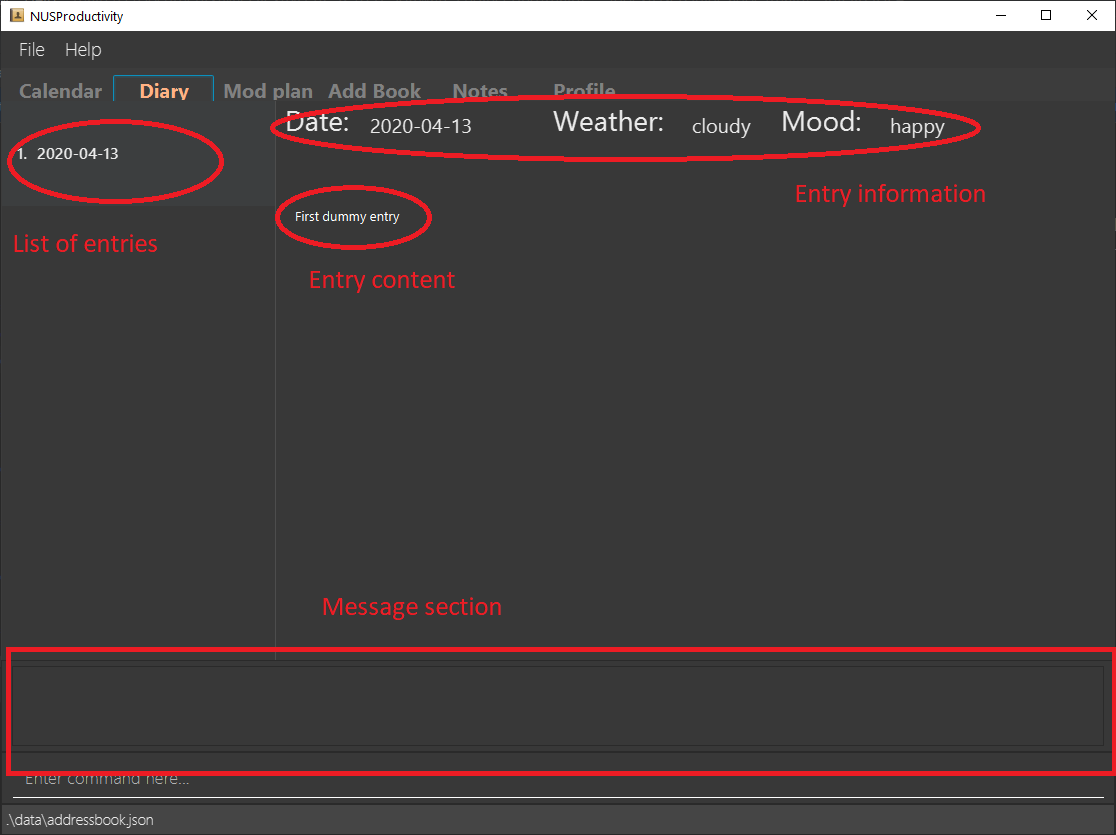
| The UI for diary is not fully implemented yet. (coming in v2.0) You can just refer to the message section for response when using the diary feature and ignore the GUI for now as it may not function properly. |
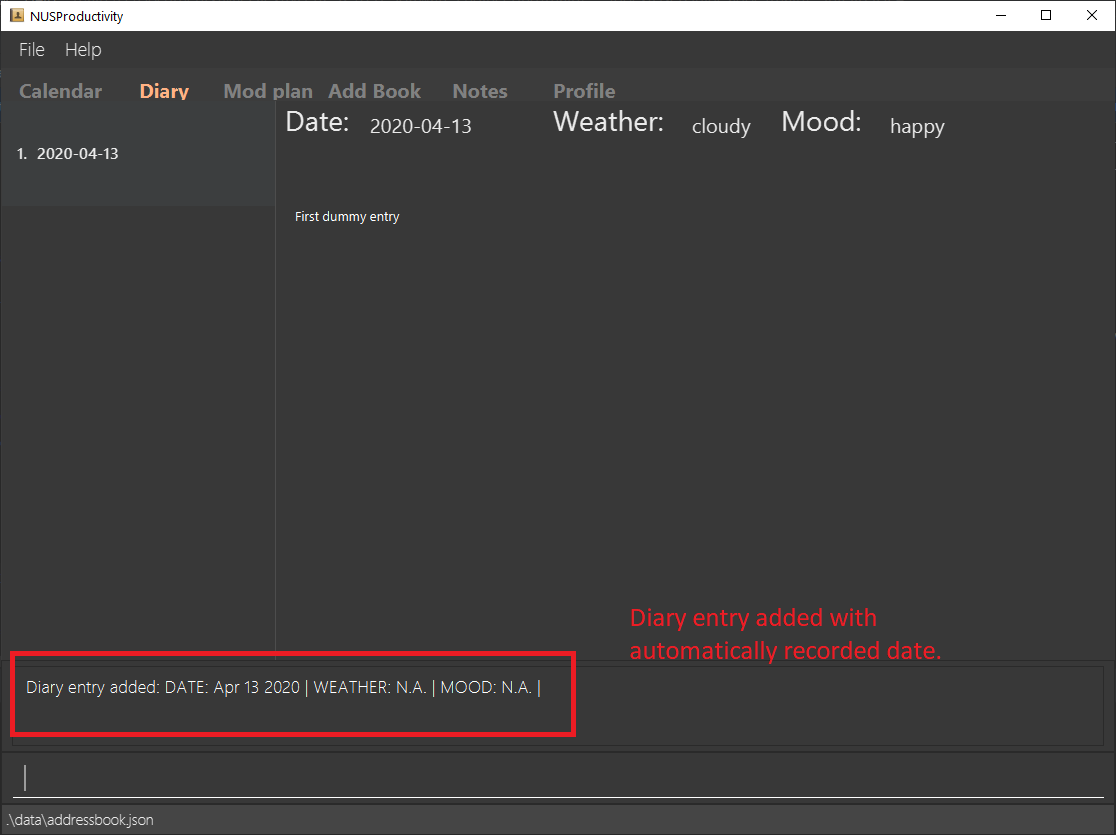
3.8.1. Adding an diary entry: diaryAdd
-
Adds a diary entry to the diary book.
-
Format:
diaryAdd ec/ENTRY_CONTENT
| The date of the diary will be automatically recorded according to the date you jot down the diary. |
-
Example:
diaryAdd ec/I had a weird dream today.
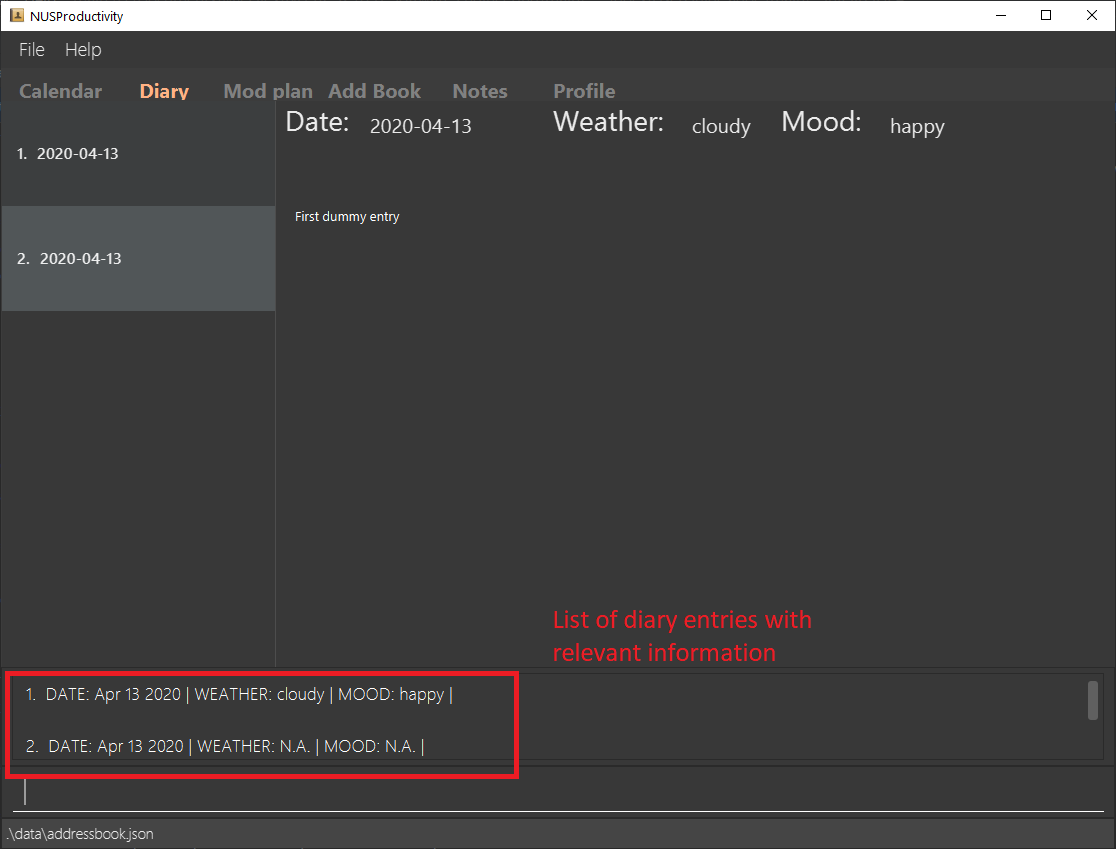
3.8.2. Viewing diary logs: diaryLog
-
Shows all diary entries with IDs and relevant information like date, weather and mood.
-
Format:
diaryLog
Anything thing that comes after the diaryLog command will be ignored.
|
-
Example:
diaryLog
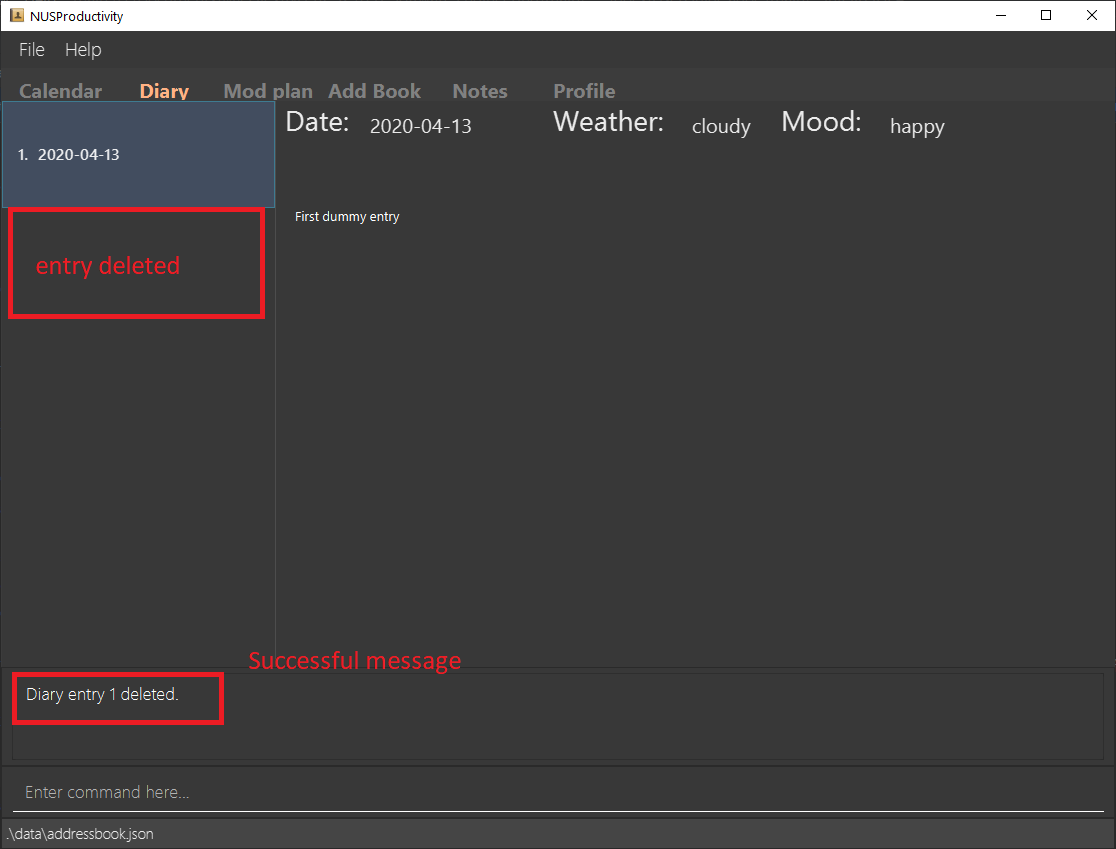
3.8.3. Deleting an diary entry: diaryDelete
-
Deletes the specified diary ID’s entry.
-
Format:
diaryDelete id/ENTRY_ID
The ENTRY_ID entered must be a integer and in the range of all available ENTRY_IDs as shown by the result of diaryLog.
|
-
Example:
diaryDelete id/1
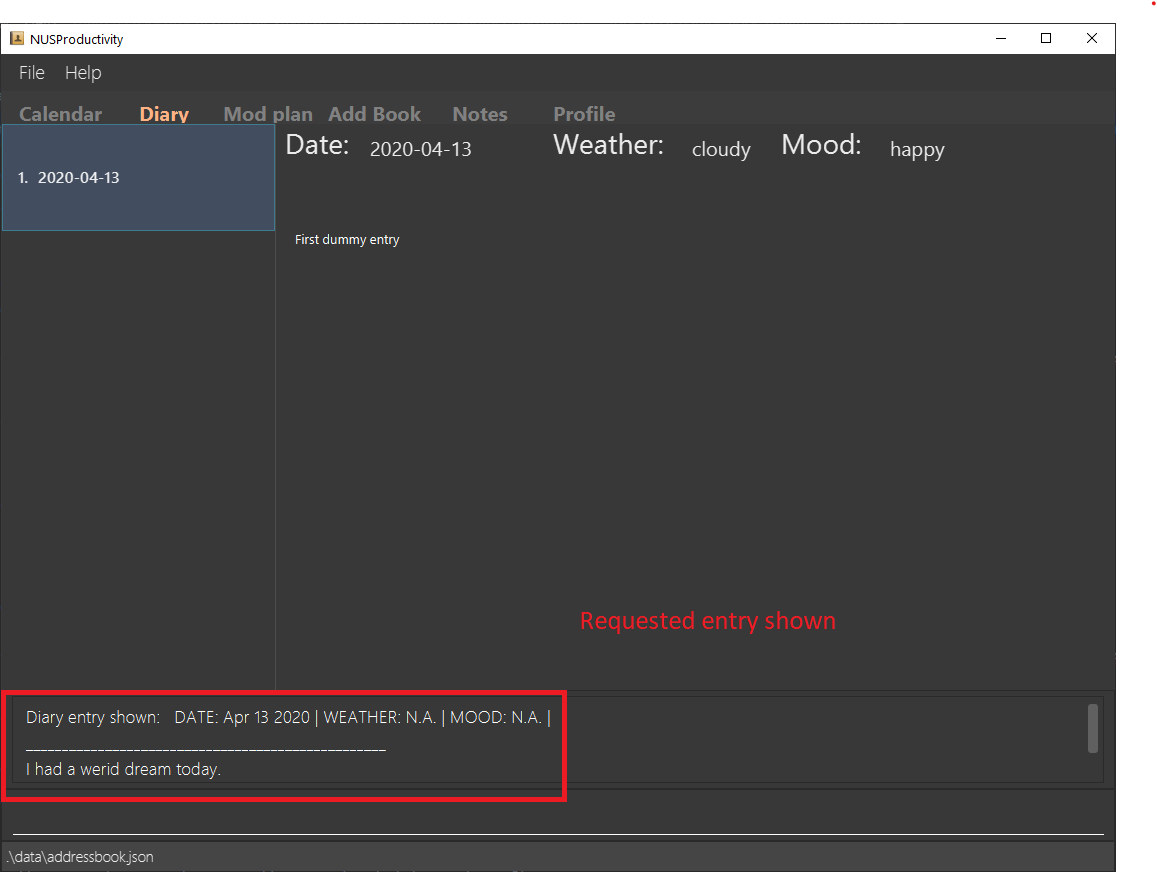
3.8.4. Viewing diary entries with a specified entry ID: diaryShow
-
Shows the diary entry for the specified entry ID.
-
Format:
diaryShow id/ENTRY_ID
The ENTRY_ID entered must be a integer and in the range of all available ENTRY_IDs as shown by the result of diaryLog.
|
-
Example:
diaryShow id/1
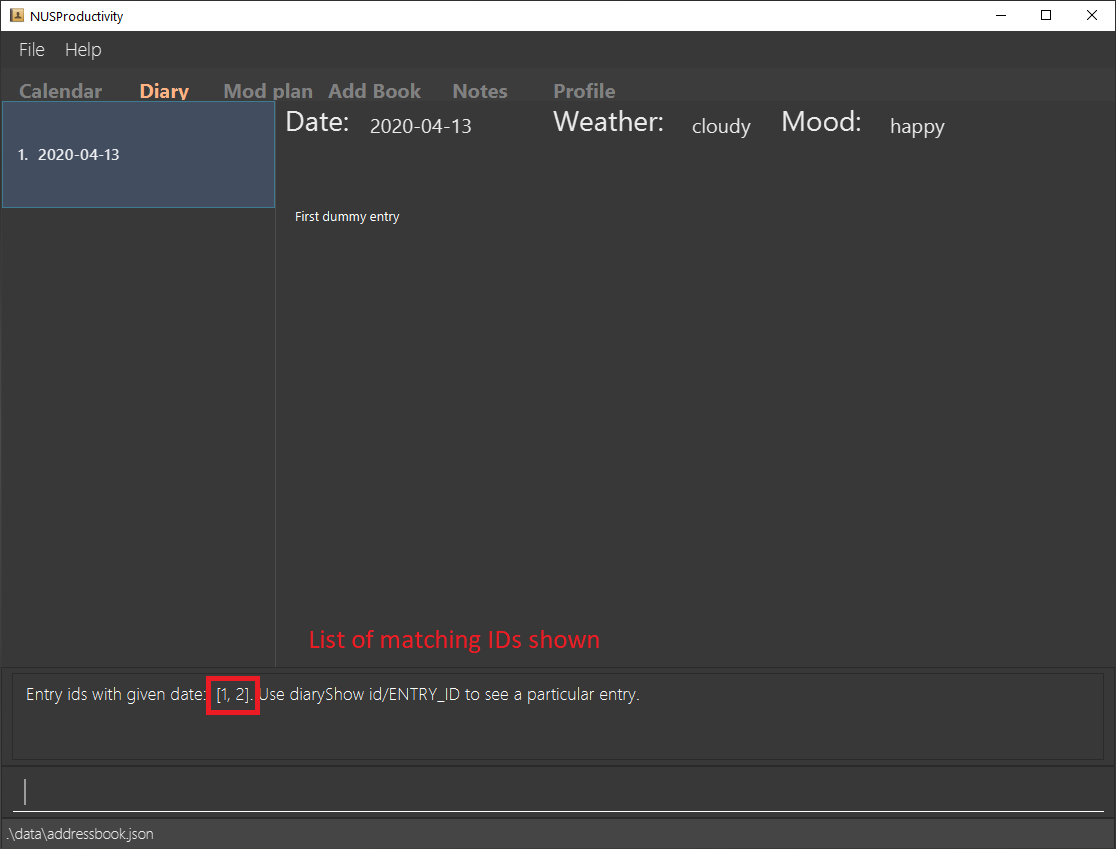
3.8.5. Viewing list of diary entries with a specified date: diaryShow
-
Shows the entry IDs of the diary entries that match the given date.
-
Format:
diaryShow date/DATE
| DATE needs to be in the format of DD-MM-YYYY. |
With the list of IDs, you can then view a specific diary entry with the diaryShow id/ENTRY_ID command.
|
-
Example:
diaryShow date/13-04-2020
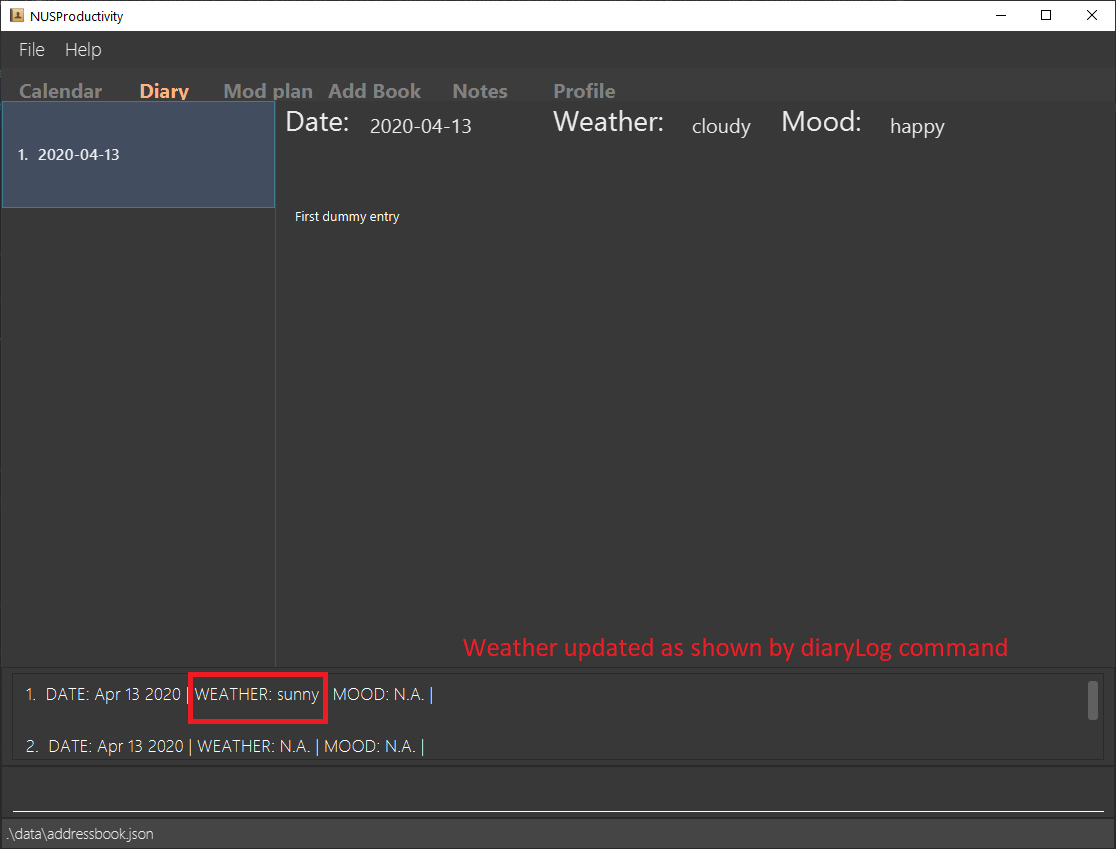
3.8.6. Tagging a diary entry with weather: diaryWeather
-
Tags the diary with the specific ID with a specific weather (e.g. sunny, cloudy)
-
Format:
diaryWeather id/ENTRY_ID w/WEATHER
| The application supports four different kinds of weathers. They are "cloudy", "rainy", "sunny", "windy". |
The diaryWeather command argument is case sensitive, all weathers should be in lower case.
|
-
Example:
diaryWeather id/1 w/sunny
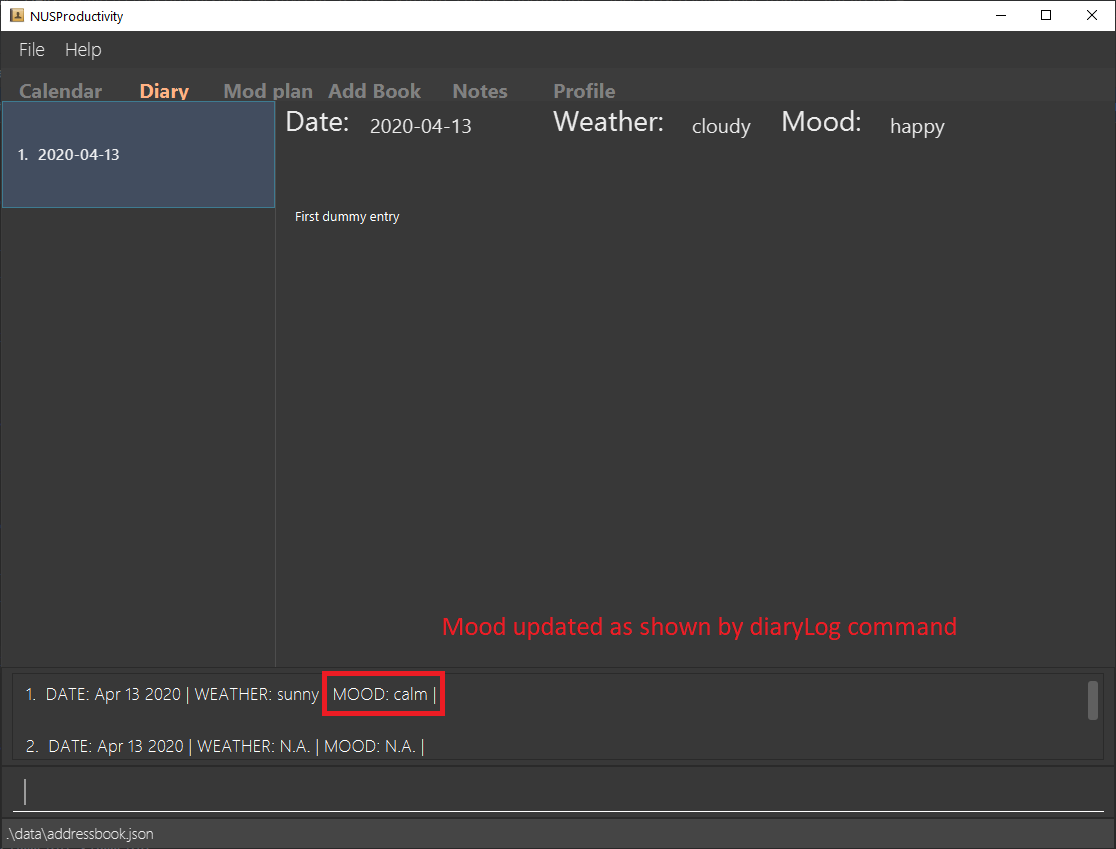
3.8.7. Tagging a diary entry with mood: diaryMood
-
Tags the diary with the specific ID with a specific mood (e.g. happy, stressed)
-
Format:
diaryMood id/ENTRY_ID m/MOOD
| The application supports four different kinds of moods. They are "calm, "happy", "sad", "stressed". |
The diaryMood command argument is case sensitive, all moods should be in lower case.
|
-
Example:
diaryMood id/1 m/calm
3.8.8. Filtering diary entries according to mood or weather: diaryFilter (coming in v2.0)
-
Shows the entry IDs of the diary entries that match the given mood or weather.
-
Format:
diaryFilter m/MOODordiaryFilter w/WEATHER -
Example:
-
diaryFilter m/happy -
diaryFilter w/sunny
-
4. Command Summary
This section summarizes the list of commands.
-
General:
-
calendar:
calendar -
notes:
notes -
modplan:
modplan -
diary:
diary -
profile:
profile -
help:
help -
exit:
exit
-
-
Calendar:
-
deadline :
deadlineAdd desc/DESCRIPTION by/DD-MM-YYYY cat/CATEGORYe.g.deadlineAdd desc/Do Chores by/30-04-2020 cat/Misc -
moduleTask:
moduleTask desc/DESCRIPTION m/MODULE CODE date/DD-MM-YYYY pri/PRIORITYe.g.moduleTask desc/Project Deadline date/30-04-2020 m/CS2103T pri/5 -
done:
done index/INDEXe.g.done index/1 -
taskDelete:
taskDelete index/INDEXe.g.taskDelete index/1 -
sortTask:
sortTask by/SORTING_PARAMe.g.sortTask by/priority -
findTask:
findTask m/MODULECODEorfindTask cat/CATEGORYorfindTask date/DD-MM-YYYYe.g.findTask m/CS2103T -
listTask:
listTaske.g.listTask
-
-
Notes
-
notesList loc/PATH pt/PATH TYPE e.g.
notesList loc/Desktop pt/abs -
notesOpen loc/PATH name/FILE_NAME pt/PATH_TYPE e.g.
notesOpen loc/Desktop name/test.doc pt/abs -
notesCreate loc/PATH name/FILE_NAME type/TYPE pt/PATH_TYPE e.g.
notesCreate loc/Desktop/ name/Test.doc type/file pt/abs -
notesDelete loc/PATH name/FILE_NAME pt/PATH_TYPE e.g.
notesDelete loc/Desktop/ name/Test.doc pt/abs
-
-
Address Book:
-
add n/NAME p/PHONE_NUMBER e/EMAIL a/ADDRESS [t/TAG]…
e.g.add n/James Ho p/22224444 e/jamesho@example.com t/friend t/colleague -
clear : clear
-
delete : delete INDEX
e.g.delete 3 -
edit : edit INDEX [n/NAME] [p/PHONE_NUMBER] [e/EMAIL] [t/TAG]…
e.g.edit 2 n/James Lee e/jameslee@example.com -
find : find KEYWORD [MORE_KEYWORDS]
e.g.find James Jake -
list: list
-
-
Profile (Module Book)
-
moduleAdd m/MODULE_CODE [g/GRADE]
e.g.moduleAdd m/cs2103 g/A -
moduleDel*MODULE_CODE
e.g.moduleDel CS2103 -
grade m/MODULE_CODE g/GRADE
e.g.grade m/cs2103 g/A -
cap
-
moduleTask desc/DESCRIPTION m/MODULE CODE date/DD-MM-YYYY pri/PRIORITY
e.g.moduleTask desc/Project m/CS2103T date/30-04-2020 pri/5 -
taskDelete m/MODULE_CODE index/INDEX e.g.
taskDelete m/cs2103 index/1 -
done m/MODULE_CODE index/INDEX e.g.
done m/cs2103 index/1 -
listModuleTasks m/MODULE_CODE e.g.
listModuleTasks m/CS2103 -
taskBreakdown
-
-
Diary :
-
diaryAdd ec/ENTRY_CONTENT
e.g.diaryAdd ec/I had a weird dream today. -
diaryLog
e.g.diaryLog -
diaryDelete id/ENTRY_ID
e.g.diaryDelete id/1 -
diaryShow id/ENTRY_ID or diaryShow date/DATE
e.g.diaryShow date/13-04-2020 -
diaryWeather id/ENTRY_ID w/WEATHER`
e.g.diaryWeather id/1 w/sunny -
diaryMood id/ENTRY_ID m/MOOD
e.g.diaryMood id/1 m/calm -
diaryFilter m/MOOD or diaryFilter w/WEATHER (coming in v2.0)
e.g.diaryFilter m/happy
-
-
Mod Plan:
-
search MODULE_CODE
e.g.search CS2103T -
mymodplan: mymodplan (coming in v2.0)
-
mymodplan add MODULE CODE e.g.
mymodplan add CS2103T(coming in v2.0) -
mymodplan done MODULE CODE e.g.
mymodplan done CS2103T(coming in v2.0) -
modreq : modreq {\MAJOR} + (coming in v2.0) e.g.
modreq computer science
-
5. Glossary
-
NUS : National University of Singapore
-
CAP : The Cumulative Average Point is the weighted average grade point of the letter grades of all the modules taken by the students, according to NUS’s grading system.
-
CLI : Command Line Interface
6. FAQ
Q: How do I transfer my data to another Computer?
A: Install the app in the other computer and overwrite the empty data file it creates with the file that contains the data of your previous fitness log book folder.
Q: How do I save my data in my own PC?
A: NusProductivity saves your data of all your modules, grades and tasks after you make changes.
Q: Do I need Internet connection when using NUSProductivity?
A: Although we try to keep NUSProductivity as an offline application, some minimal network connection is required for the first time usage of certain features such as moduleAdd and search. However, only the first time searching for a module information is required as the results will be cached in our application to allow no Internet connection for future usage.